picopos

Help & documentation

A guide to every part of your shop, from first setup to daily sales.

Watch & follow guides include captioned videos made from browser screenshots and illustrated steps. Captured in the fictional demo shop on 19 November 2026. Google sign-in, sharing, live sync, and offline recovery are written guides only.

48 guides · 10 topics

Getting started

Connect your workbook, invite your team, or explore the demo.

Open Settings
Connect Google Sheets

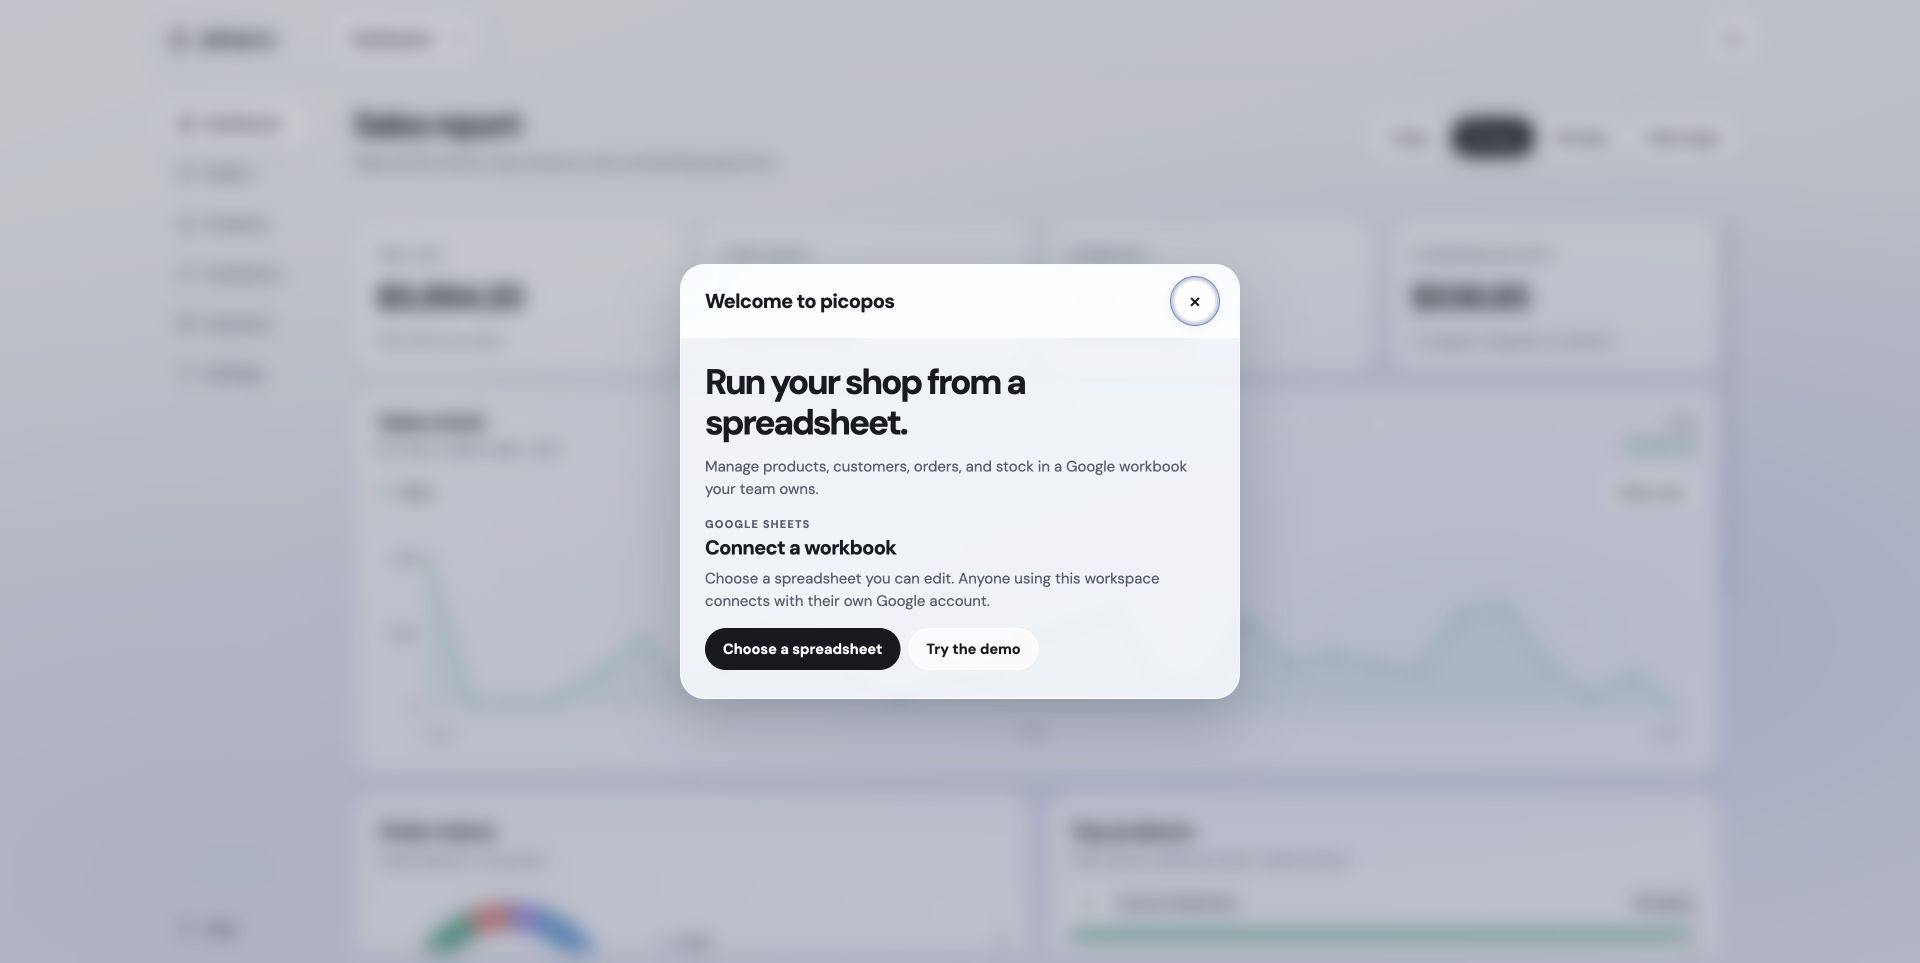
Select Connect a workbook on the welcome screen, or go to Settings. Open Create a new workbook, enter your shop name, and select Create workbook. To connect a file you already use, select Choose an existing workbook. New files are named “picopos · Your shop”. When you connect a workbook for the first time and it has no picopos settings, choose a currency, shipping options, and a sync interval before finishing setup. The sync interval applies to this browser. The chooser starts by searching for “picopos”. If an older workbook has a different name, search for it by filename. Sign in with an account that can edit the file. picopos creates its managed tabs and leaves unrelated tabs alone.

Your workbook holds products, variants, customers, orders, order items, returns, stock entries, purchase lots, categories, and settings. Keep managed headers and record IDs intact when editing Sheets directly.
Work with staff

Share the spreadsheet with each staff member and grant edit access. Each person connects with their own Google account. Spreadsheet sharing controls who can access the workbook.

Tabs in the same browser profile coordinate saves. Different devices do not share an atomic stock reservation, so review inventory warnings when several people confirm orders at once.

Try the demo

Choose Try the demo to explore a populated shop without connecting Google. It includes products, variants, customers, a year of orders, stock movements, and purchase lots. Demo prices use USD; customer details are fictional.

You can change demo records to practise. Changes last only until you reload or leave the demo. Choose Leave demo in Settings to return to connection setup.

A first-sale checklist
  1. Set your currency and shipping rates in Settings.
  2. Create categories, products, and variants in Products.
  3. Record opening stock or a delivery in Inventory; link purchase lots if you want cost estimates.
  4. Create an order, select the customer and items, and save a draft.
  5. Confirm the order, record payment status, ship it, and mark it completed.
  6. Review the Dashboard and check sync status in Settings.
Watch & follow: Explore the demo and connection screen

Start with the fictional demo shop. Connecting Google Sheets requires your own editable workbook.

Silent step-by-step video · pause at any point. Select a screenshot to enlarge it.

  1. Choose Try the demo to explore without connecting a Google account.

    Choose Try the demo to explore without connecting a Google account.
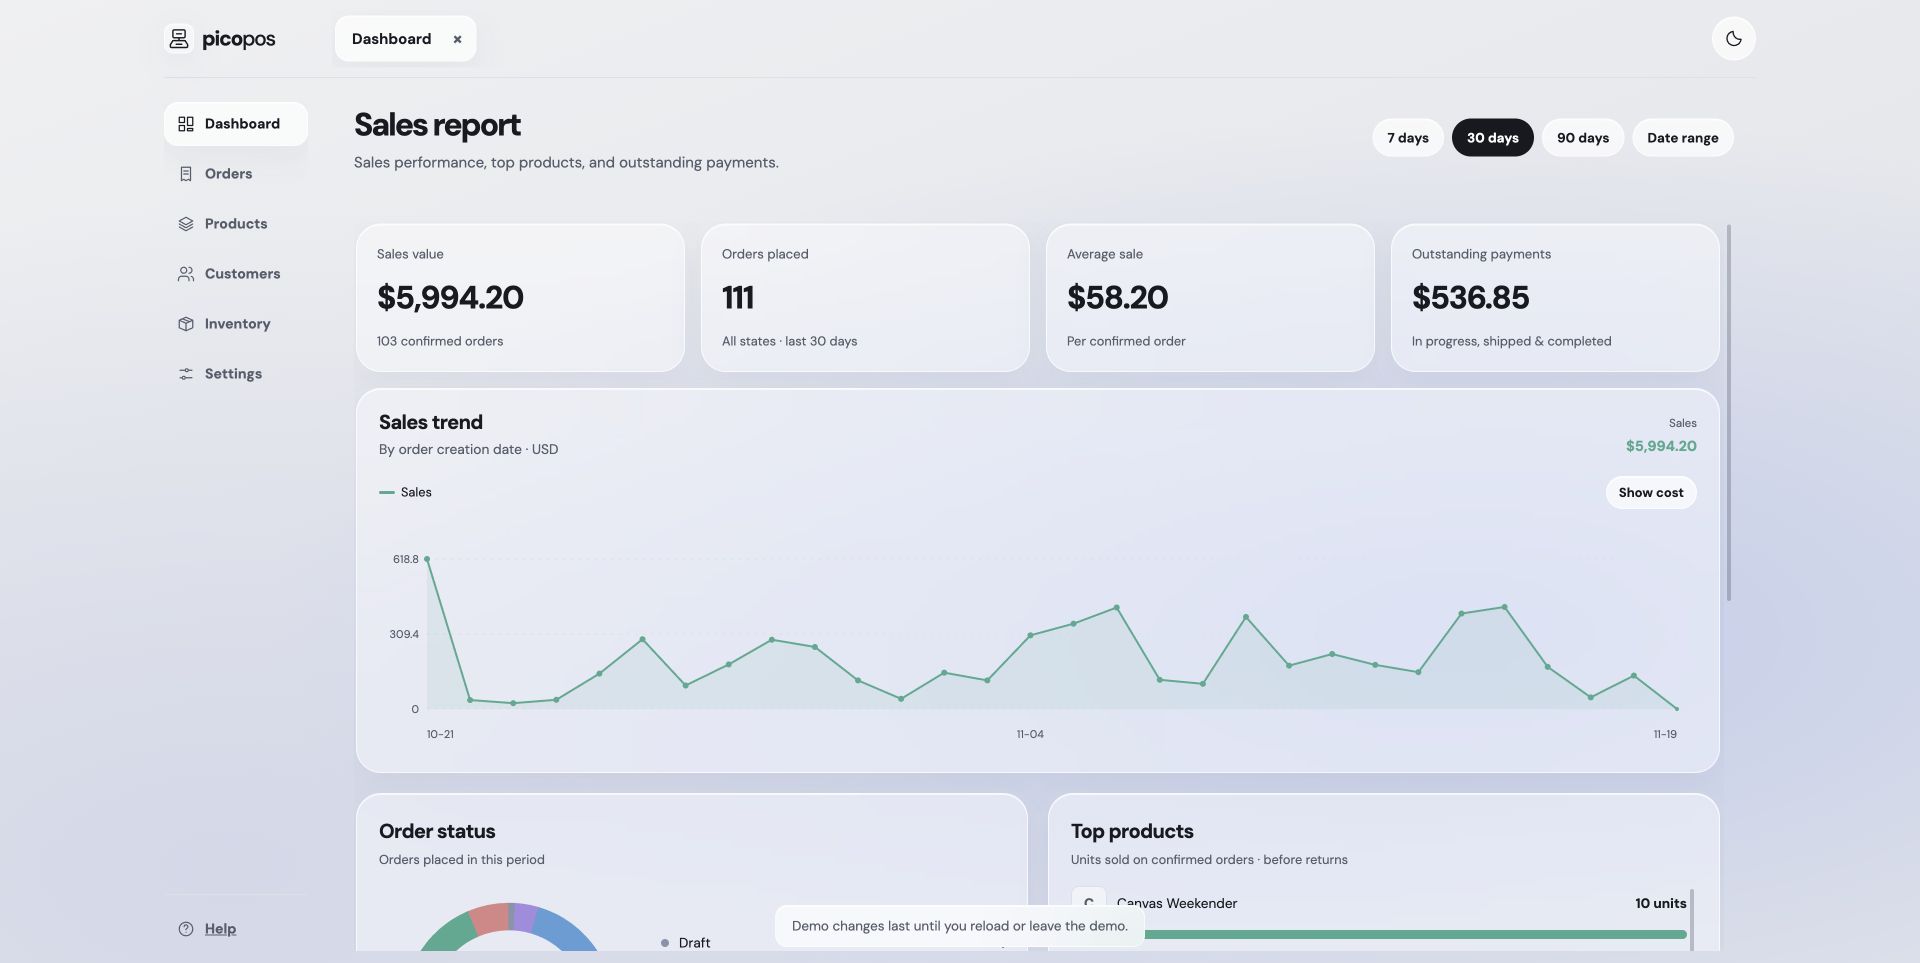
  2. The demo opens a populated sales report. Demo edits reset when you reload or leave.

    The demo opens a populated sales report. Demo edits reset when you reload or leave.
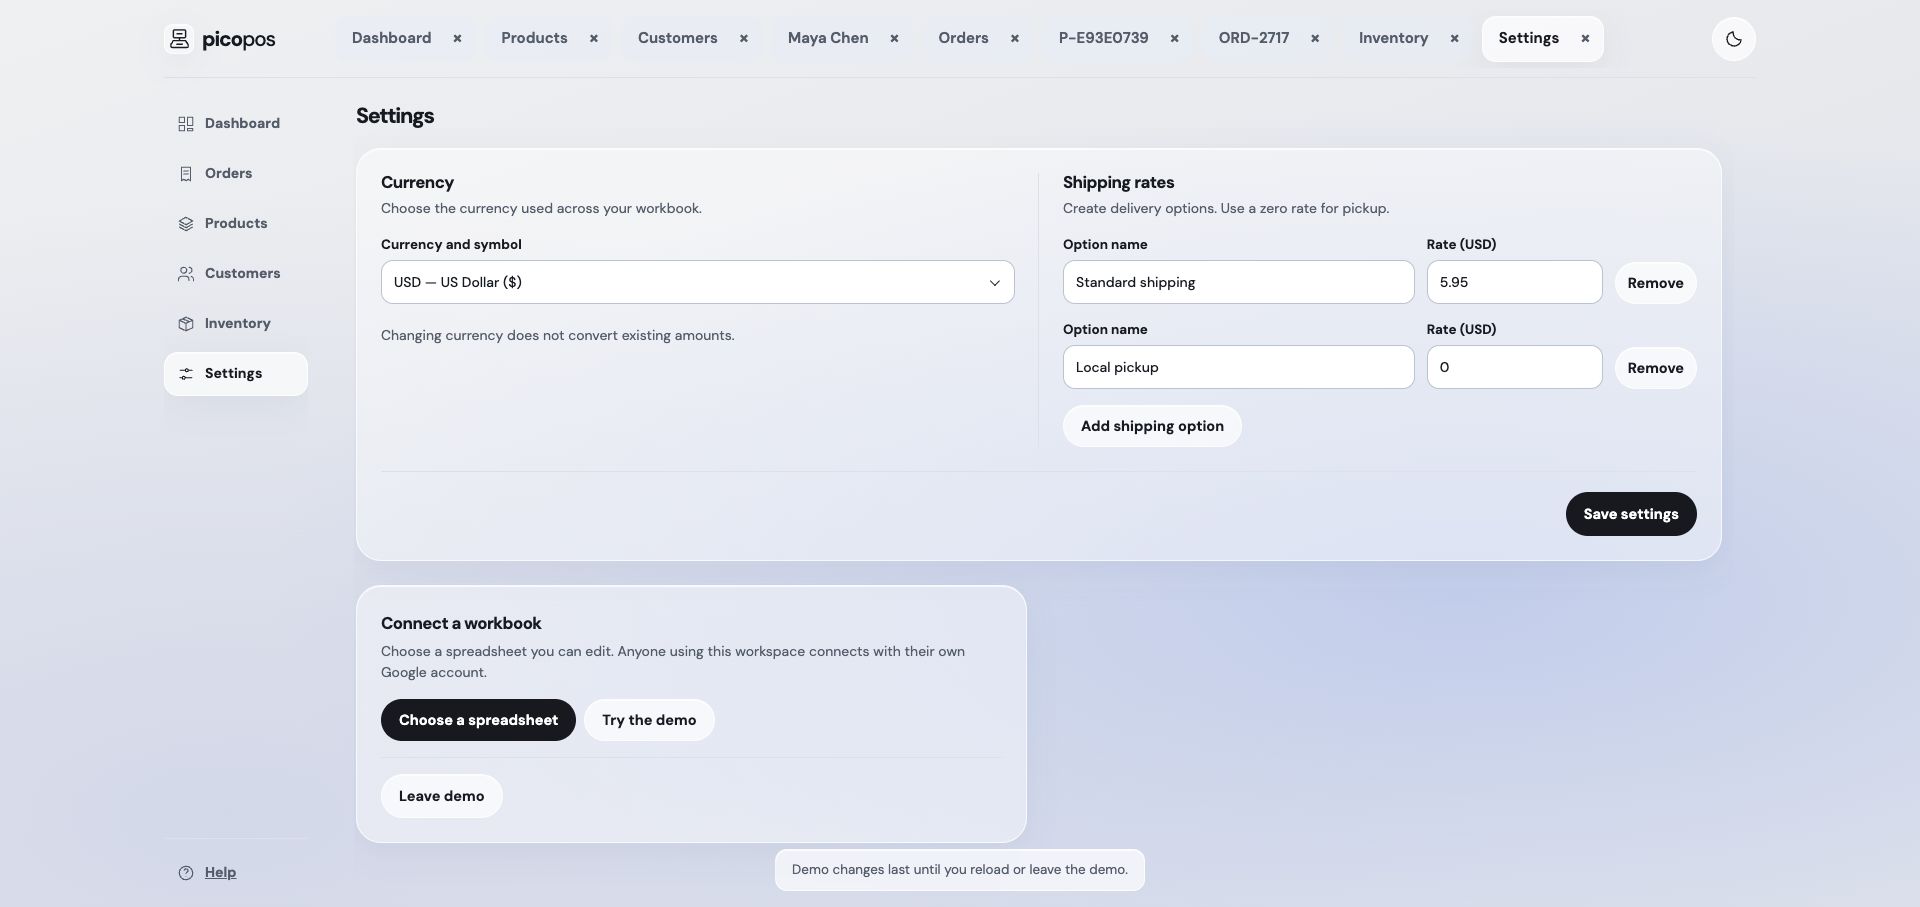
  3. Open Settings to find currency, shipping options, workbook connection, and Leave demo.

    Open Settings to find currency, shipping options, workbook connection, and Leave demo.

Workspace & navigation

Move between screens, keep records open, and choose your theme.

Open Dashboard
Sidebar and open tabs

Use the sidebar to open Dashboard, Orders, Products, Customers, Inventory, or Settings. Help opens documentation in a separate browser tab from the sidebar footer. Open pages appear as tabs across the top; select a tab to return or use its close button.

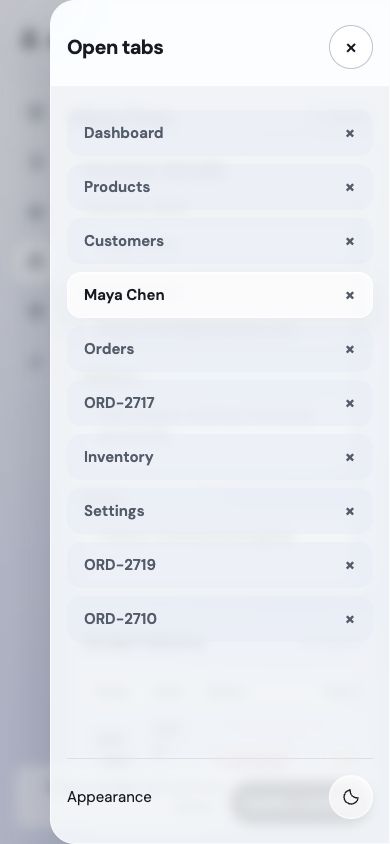
Order details, new orders, and customer details can open as separate tabs. Forms and filters stay with their mounted tab when you switch away. Closing a tab or reloading does not preserve unsaved form edits. On smaller screens, use Open tabs to manage your pages.

Direct links and browser history

Each screen has a URL such as #/orders, #/inventory/lots, or /help/. You can bookmark it, reload it, or use browser Back and Forward. A record link still requires access to the workbook containing that record.

Light and dark themes

Use the appearance control in the header to switch between day and night modes. On smaller screens, Appearance is available in the Open tabs panel. The same theme applies to forms, reports, and Help.

Watch & follow: Desktop tabs, mobile tabs, and appearance

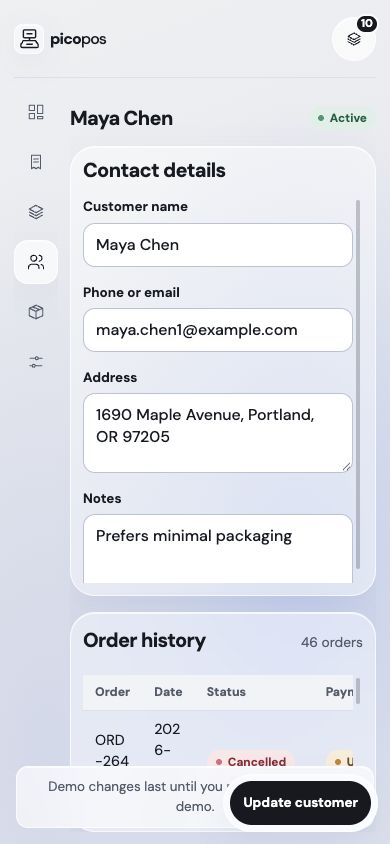
Open pages keep their own tabs. These captures show desktop and 390-pixel mobile layouts.

Silent step-by-step video · pause at any point. Select a screenshot to enlarge it.

  1. Use the sidebar for screens and the top tabs for open pages and records.

    Use the sidebar for screens and the top tabs for open pages and records.
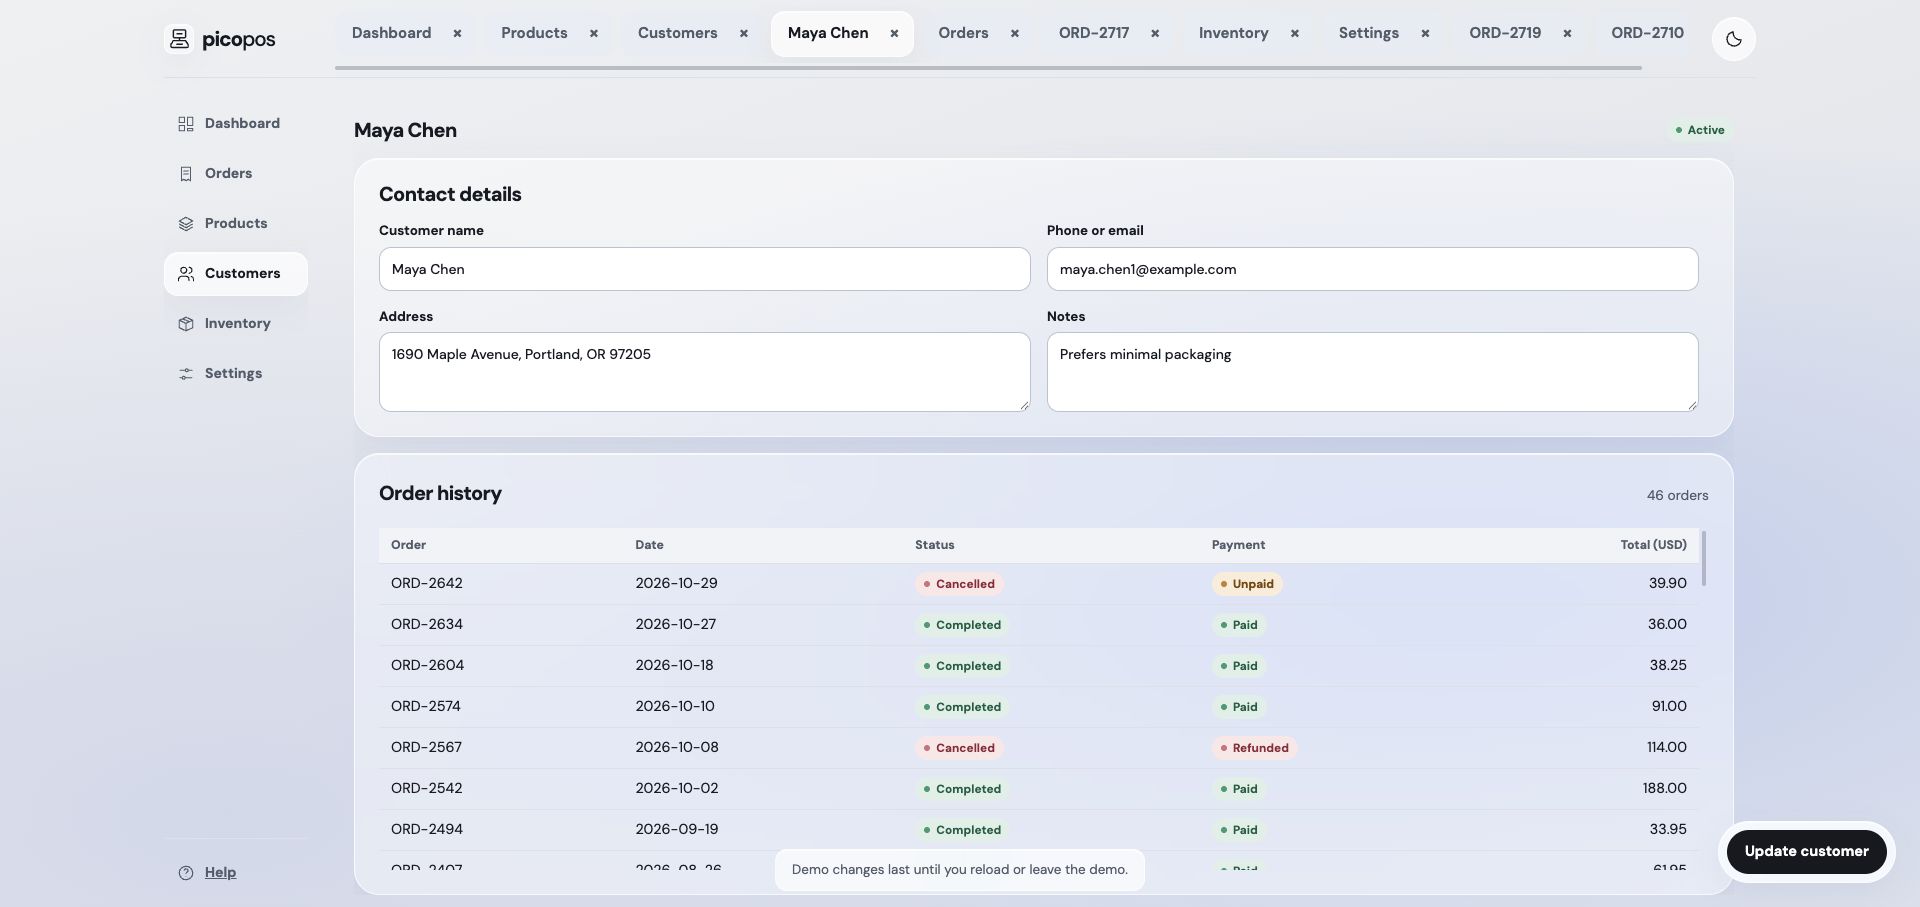
  2. Opening a customer creates a detail tab with contact details and order history.

    Opening a customer creates a detail tab with contact details and order history.
  3. On a phone, the header offers an Open tabs button.

    On a phone, the header offers an Open tabs button.
  4. Open tabs lists your pages and includes the appearance control.

    Open tabs lists your pages and includes the appearance control.
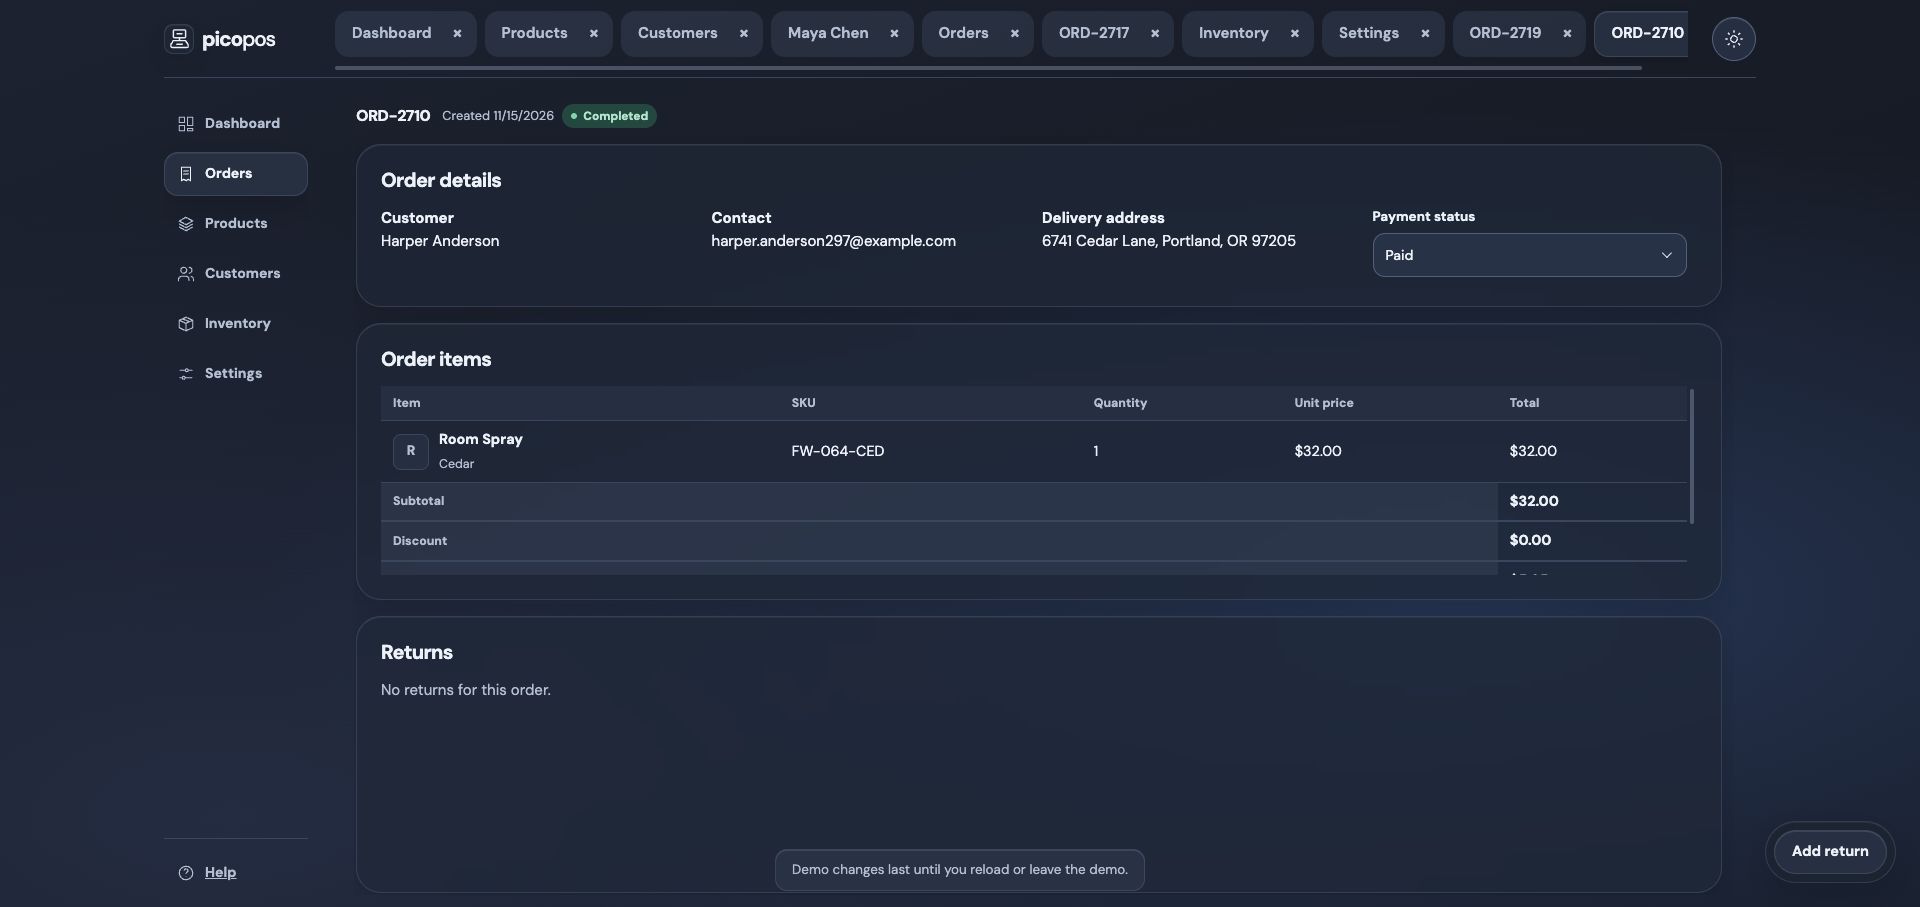
  5. Night mode changes the workspace colors while keeping the same controls.

    Night mode changes the workspace colors while keeping the same controls.

Sales report

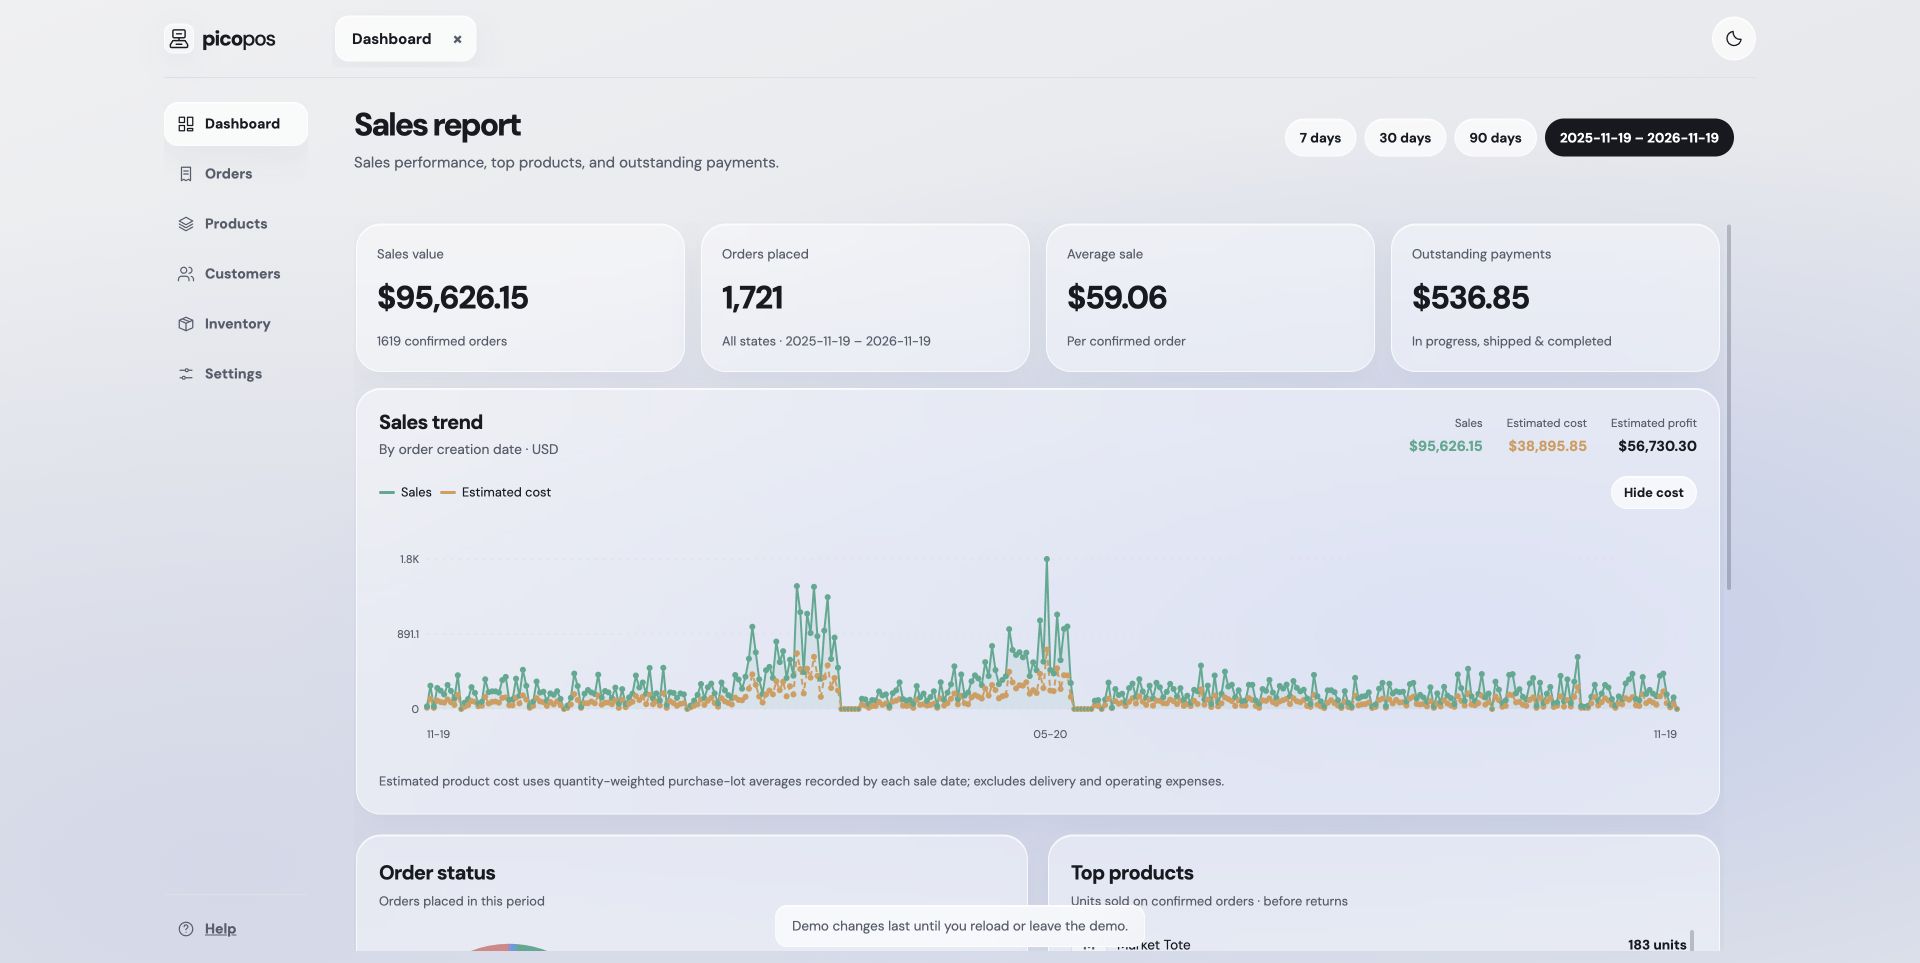
Explore sales, estimated cost and profit, order status, and stock health.

Open Dashboard
Reporting periods and custom dates

Choose 7, 30, or 90 days for a period ending today. Date range lets you select inclusive From and To dates within the available order history, including a single day. Presets without orders and invalid or empty custom ranges are disabled.

Report periods use order creation dates in your browser’s local time zone. Pending local changes are included. The report reflects each order’s current status, rather than its status at a past point in time.

Sales, averages, and outstanding payments

Sales value adds item subtotals, subtracts discounts, and adds shipping for In progress, Shipped, and Completed orders. Drafts, cancellations, and orders marked Refunded are excluded. Unpaid confirmed orders still count as sales.

Average sale divides sales value by the number of qualifying orders. Orders placed counts every order in the period, including drafts and cancellations. Outstanding payments adds unpaid In progress, Shipped, and Completed order totals.

Trend graph and hover details

The sales line groups values by creation day. Hover over a point, tap it, or focus it with the keyboard to see the date, sales value, sales count, and estimated profit. Escape dismisses the tooltip.

Show cost overlays an amber dashed estimated-cost line and adds cost and profit totals in the chart header. Both lines use the same currency scale. Hide cost removes the overlay.

How estimated cost and profit work

For each sold variant, picopos uses positive Opening stock and Receipt entries linked to purchase lots and dated no later than the sale. A lot’s unit cost is its total purchase amount divided by total purchased units. Eligible receipts are weighted by their quantities, then multiplied by units sold.

Estimated profit is sales value minus estimated product cost. It excludes delivery expenses and other operating expenses, so it is not net profit. Lot costs are averages, not exact costs assigned to each sold unit. Editing lot amounts can change past estimates.

If a sold variant has no eligible cost history, that day’s cost line has a gap and its cost and profit are unavailable. Period cost and profit totals are unavailable when any sold units lack costs. Received returns do not automatically subtract sales or refund amounts.

Order status, top products, and inventory health

Order status shows the distribution of all orders created in the selected period. Top products ranks the five products with the most units on qualifying confirmed sales; the list scrolls within its card.

Inventory health shows current stock across all dates, regardless of the report period. Active variants with five or fewer available units need attention. View stock opens Inventory. Returns are not deducted from the top-products ranking.

Watch & follow: Read sales and estimated costs

Compare the default period with a custom year-long range. Numbers and dates are illustrative demo values.

Silent step-by-step video · pause at any point. Select a screenshot to enlarge it.

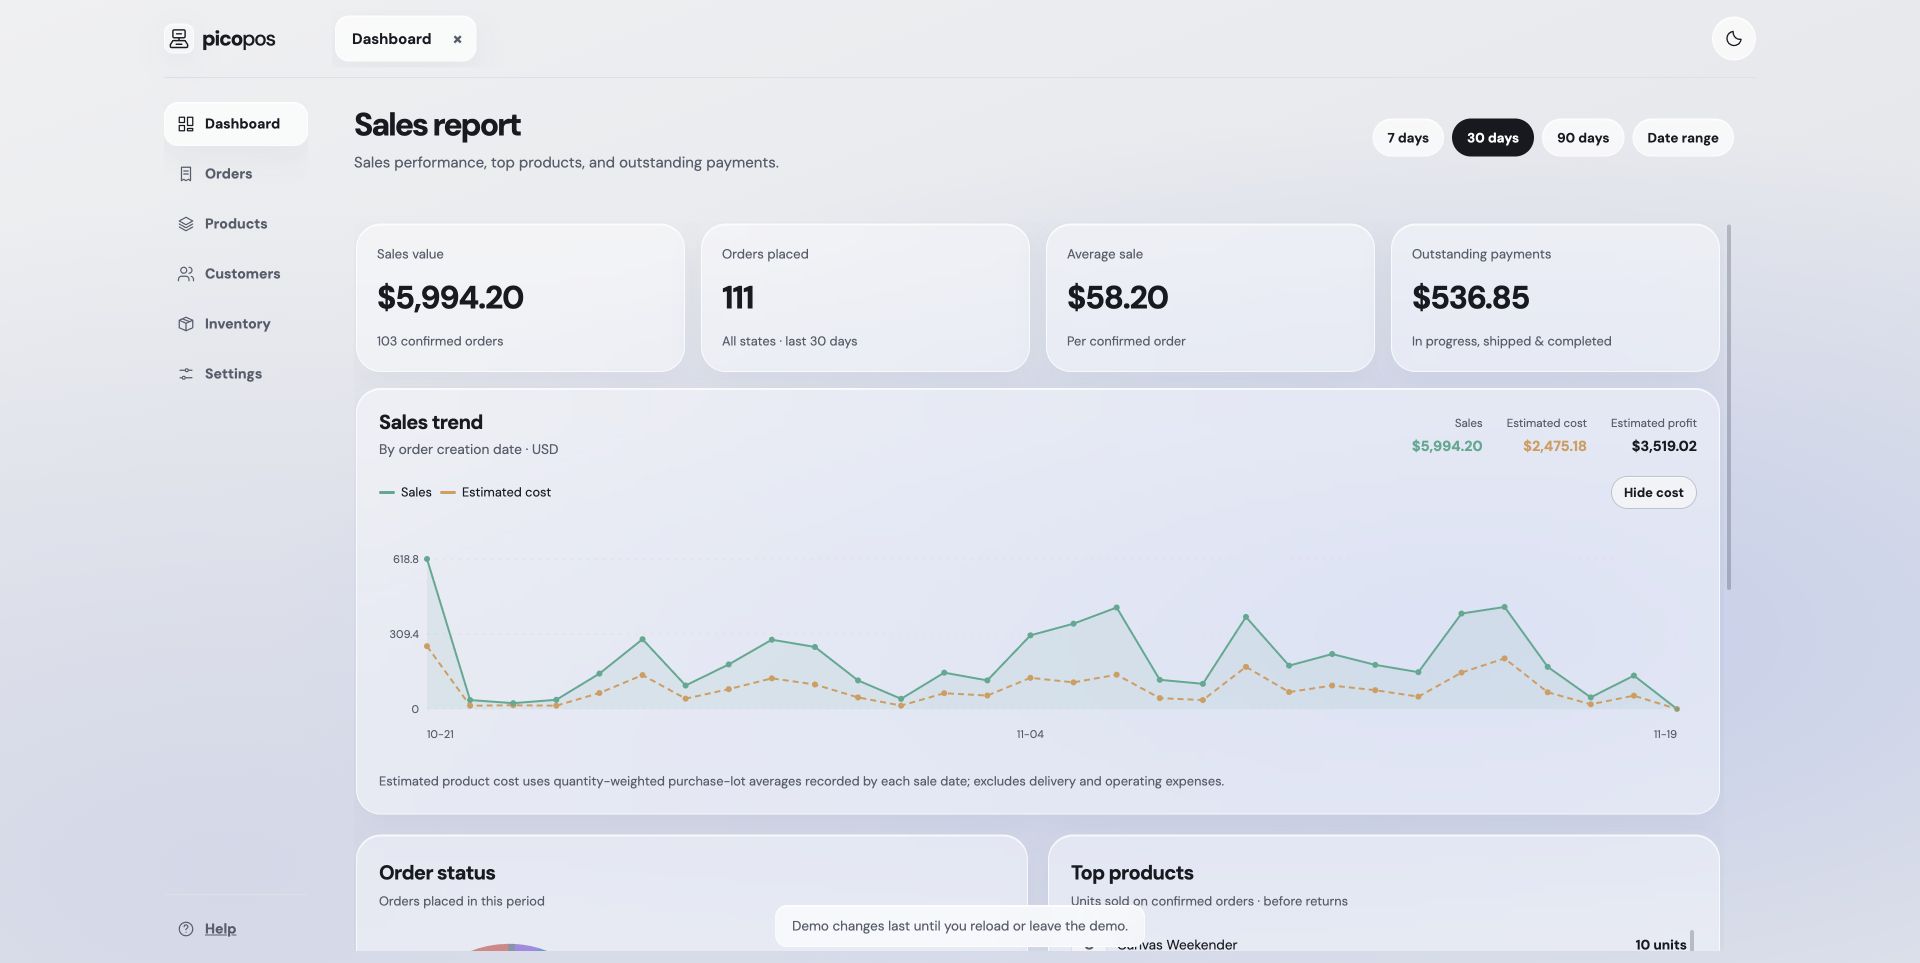
  1. Read sales value, order count, average sale, and outstanding payments for the selected period.

    Read sales value, order count, average sale, and outstanding payments for the selected period.
  2. Select Show cost to overlay estimated cost and show estimated profit.

    Select Show cost to overlay estimated cost and show estimated profit.
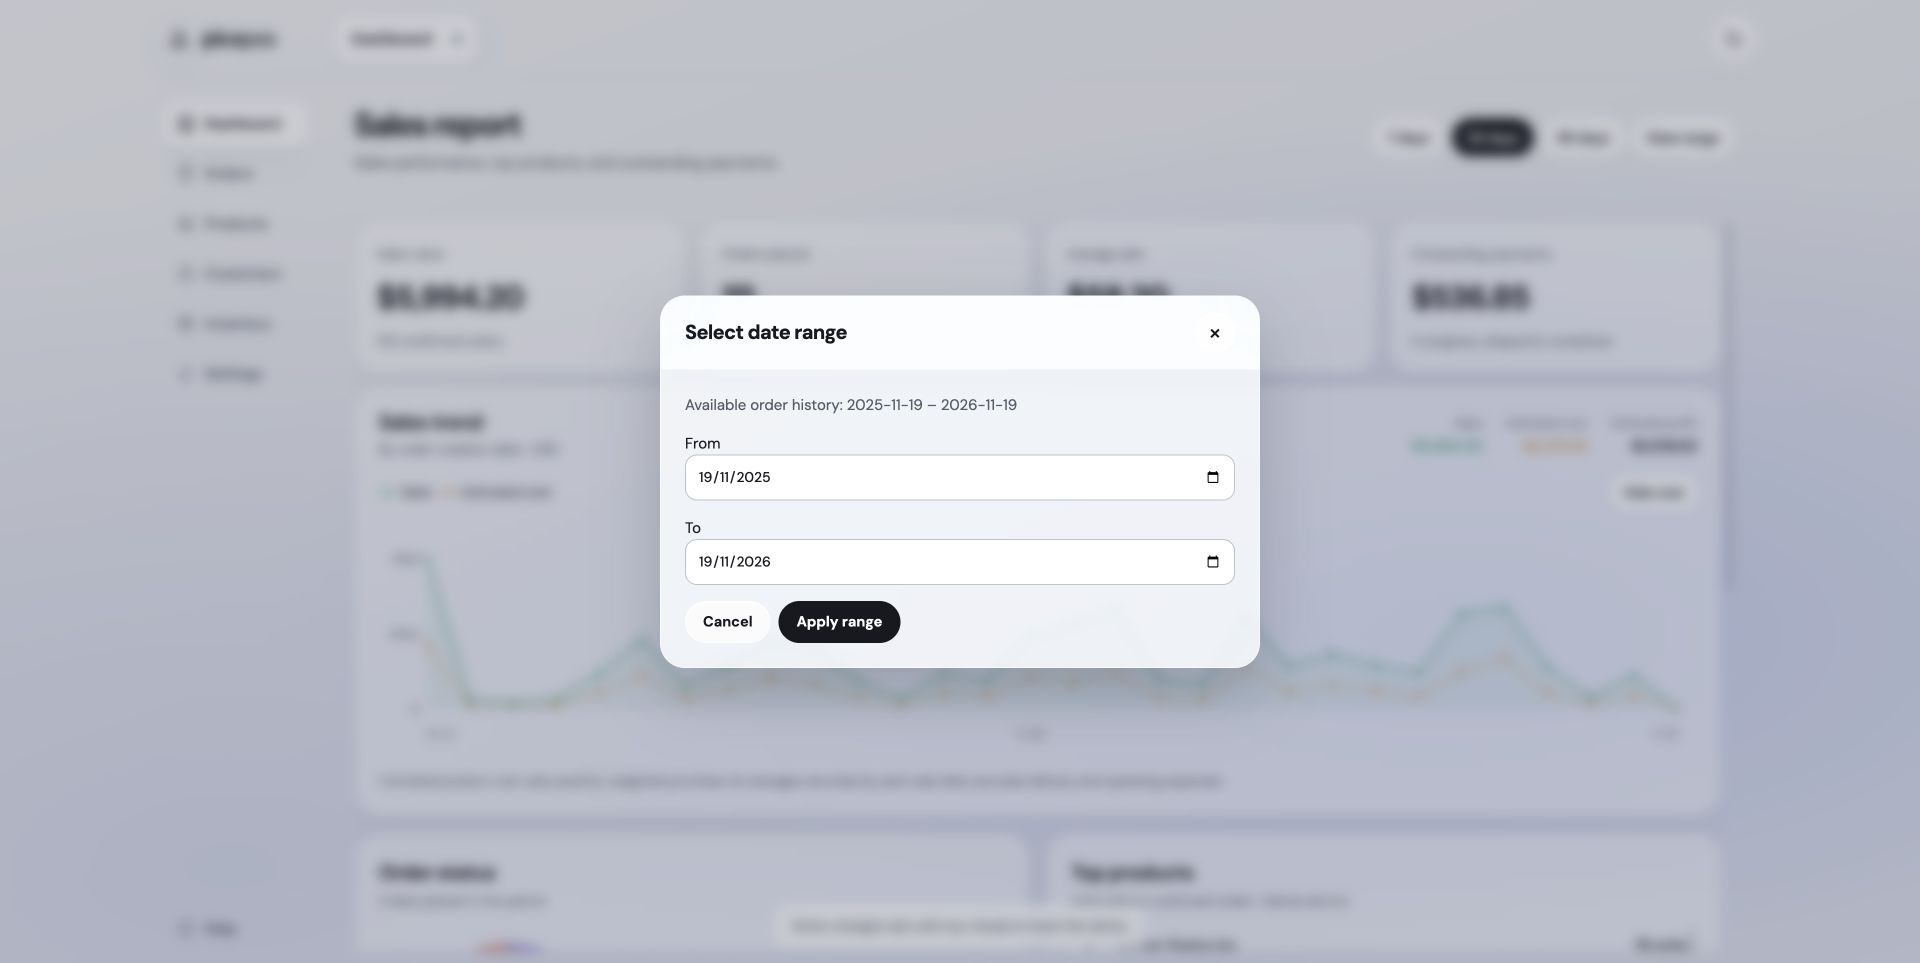
  3. Choose Date range, review From and To, then select Apply range.

    Choose Date range, review From and To, then select Apply range.
  4. The report recalculates for the selected dates. Inventory health still describes current stock.

    The report recalculates for the selected dates. Inventory health still describes current stock.

Products & categories

Maintain your catalog, options, SKUs, pricing, photos, and category tree.

Open Products
Create and edit products
  1. Open Products and choose the new-product action.
  2. Enter the product name, category, description, and optional option names such as Color and Size.
  3. Set the first variant’s SKU, option values, and price, then save.
  4. Expand the product to view its variants. Use Edit product, Add variant, or Edit variant to make further changes.

Product records describe the item; variants hold the sellable SKU and price. Creating a product or variant does not add stock.

Variants, prices, and active status

Give every variant a unique SKU. SKU comparison ignores case and surrounding whitespace. Option values follow the same order as the product’s option names. Prices must be nonnegative.

Use the active setting to archive products or variants without deleting their history. Order lines retain the product name, variant name, SKU, and price recorded when the order was created; later catalog edits do not rewrite those snapshots.

Search and category filters

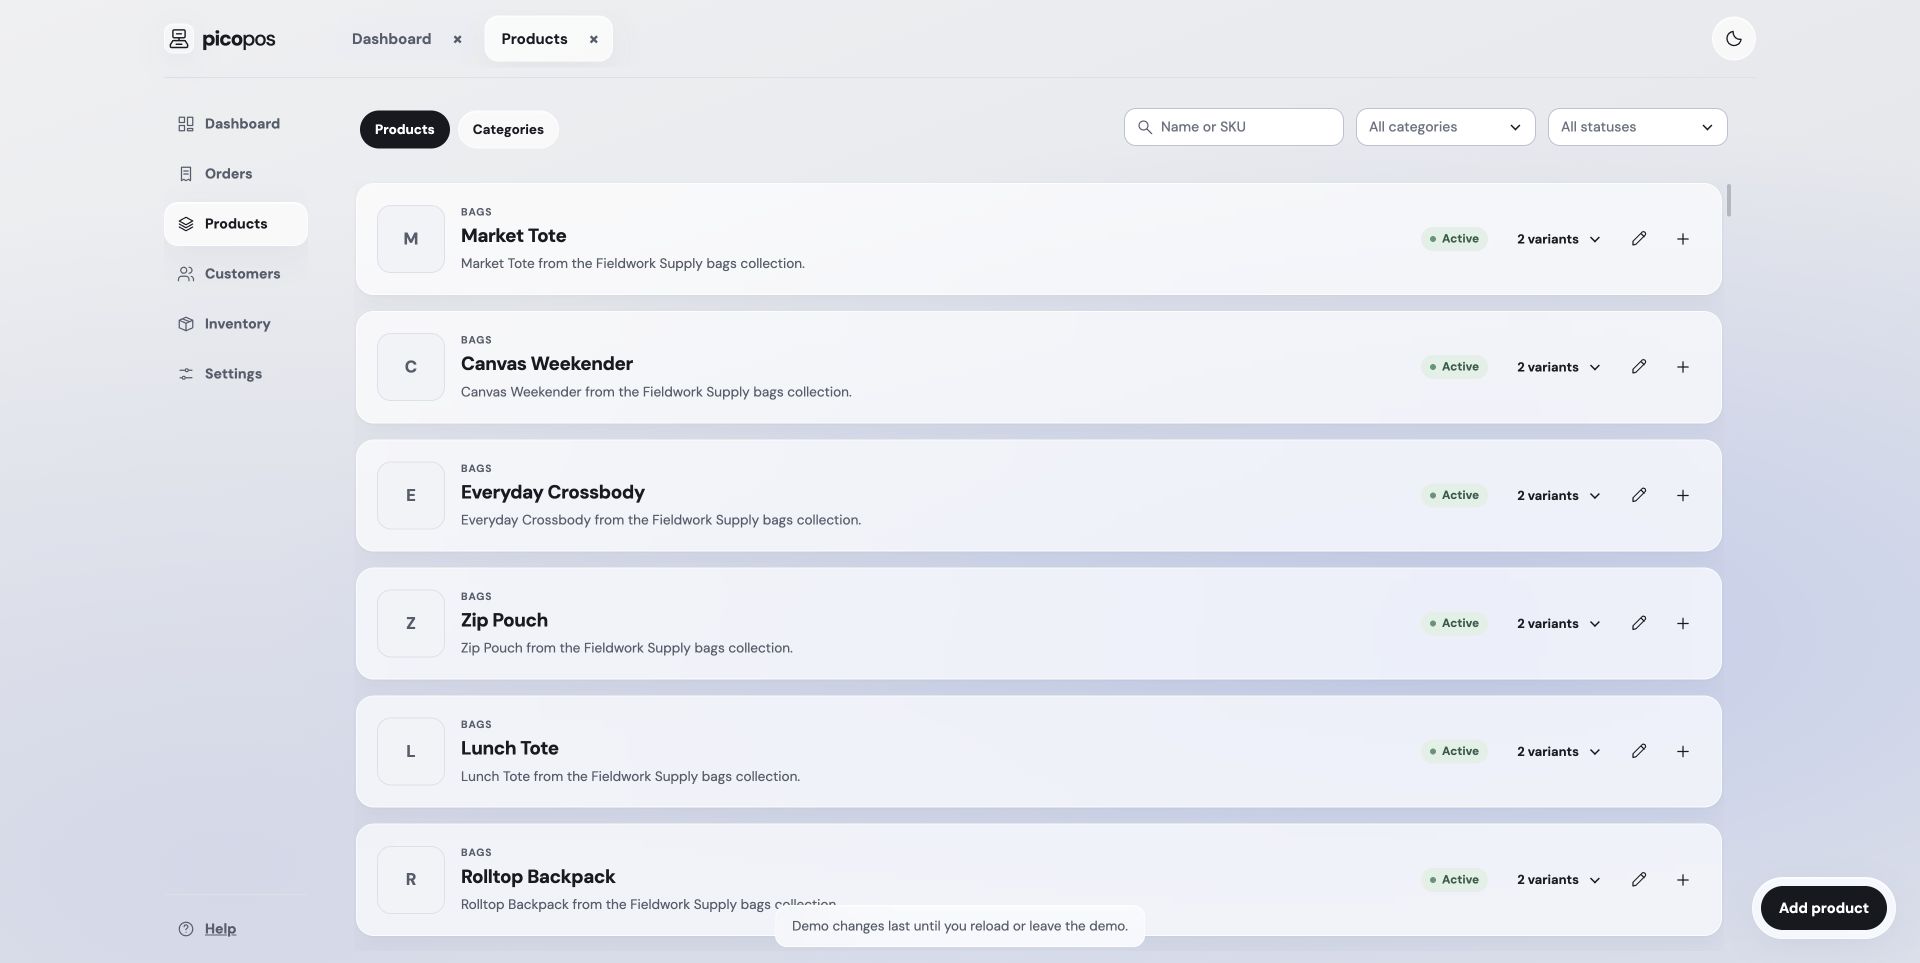
Search Products by name or SKU, then narrow the list by category and product status. Clear filters resets the selection. Expand a product to inspect its variants.

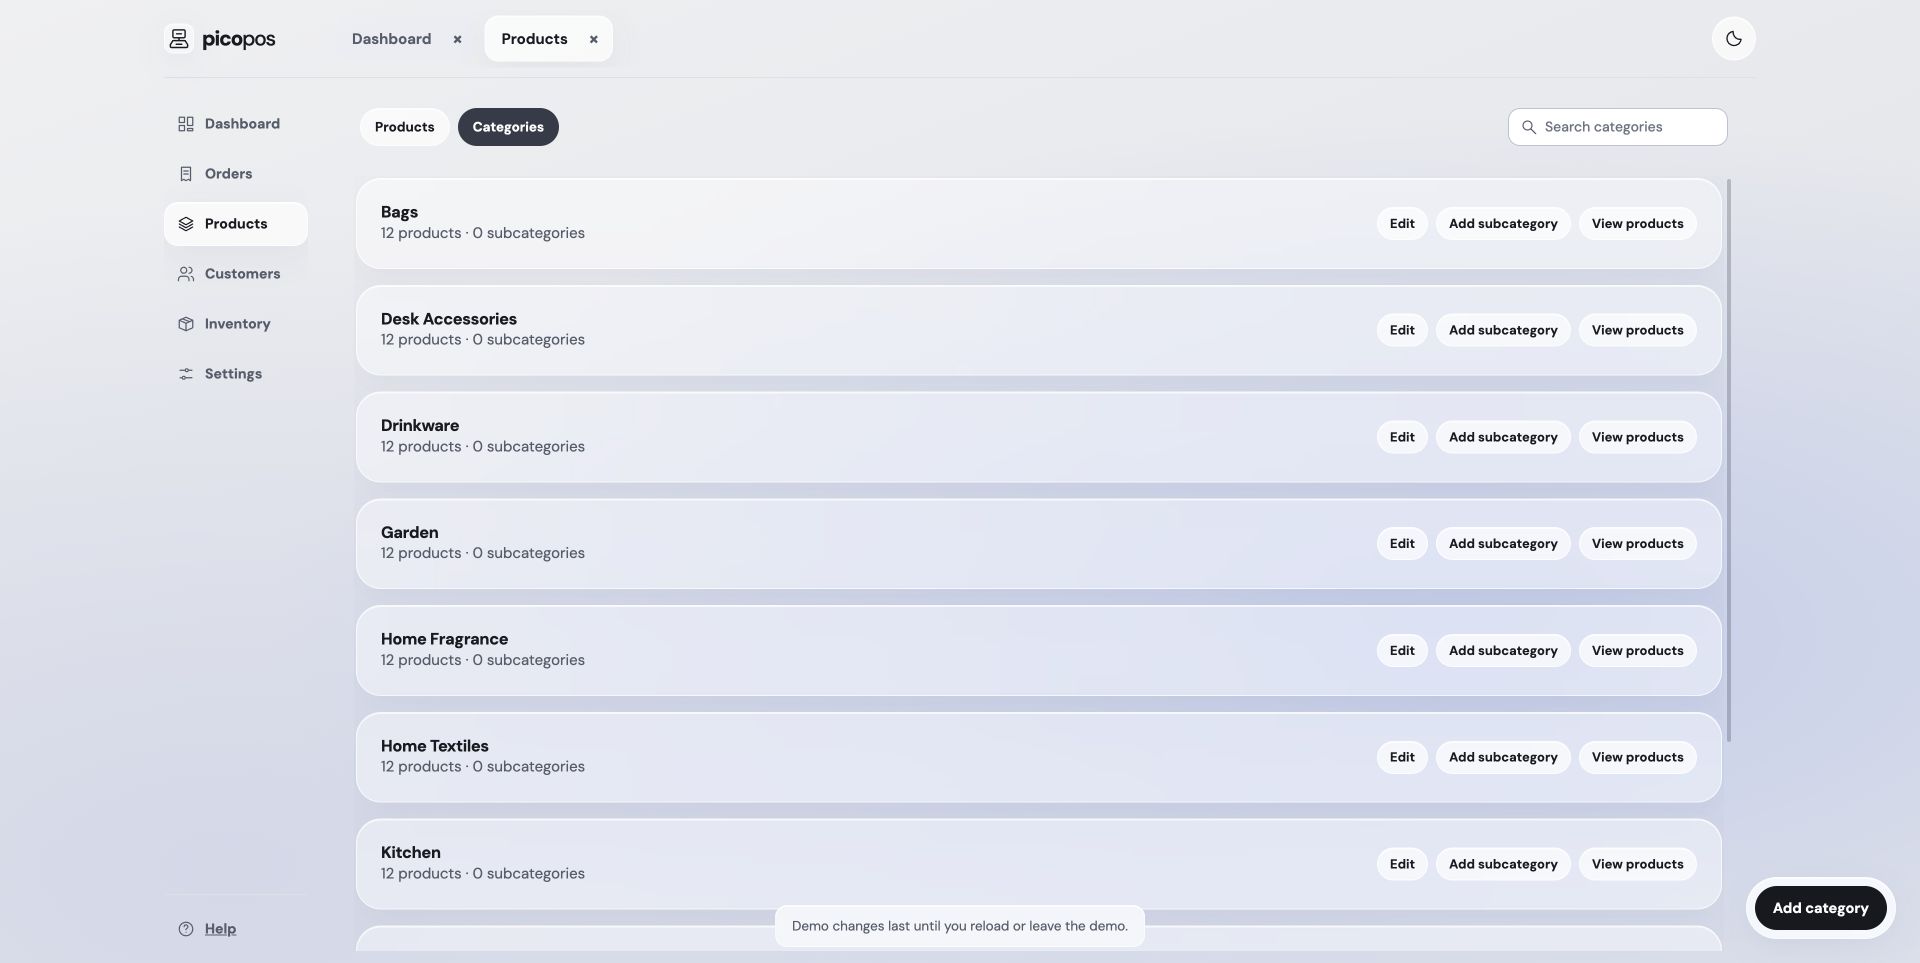
Open Categories to create, search, and edit categories. Choose an optional parent to build a hierarchy. A category cannot be its own parent or a descendant of itself.

Product photos

Photos are optional. Use the product photo control to choose a supported image or remove an existing photo. The app compresses the image for storage in the workbook; keep your original separately.

JPEG, PNG, WebP, AVIF, and HEIC-family files up to 24 MiB are accepted, subject to browser decoding support. If an image cannot be read, try a JPEG copy. Images are stored in the spreadsheet rather than a separate image service.

Watch & follow: Create a simple product

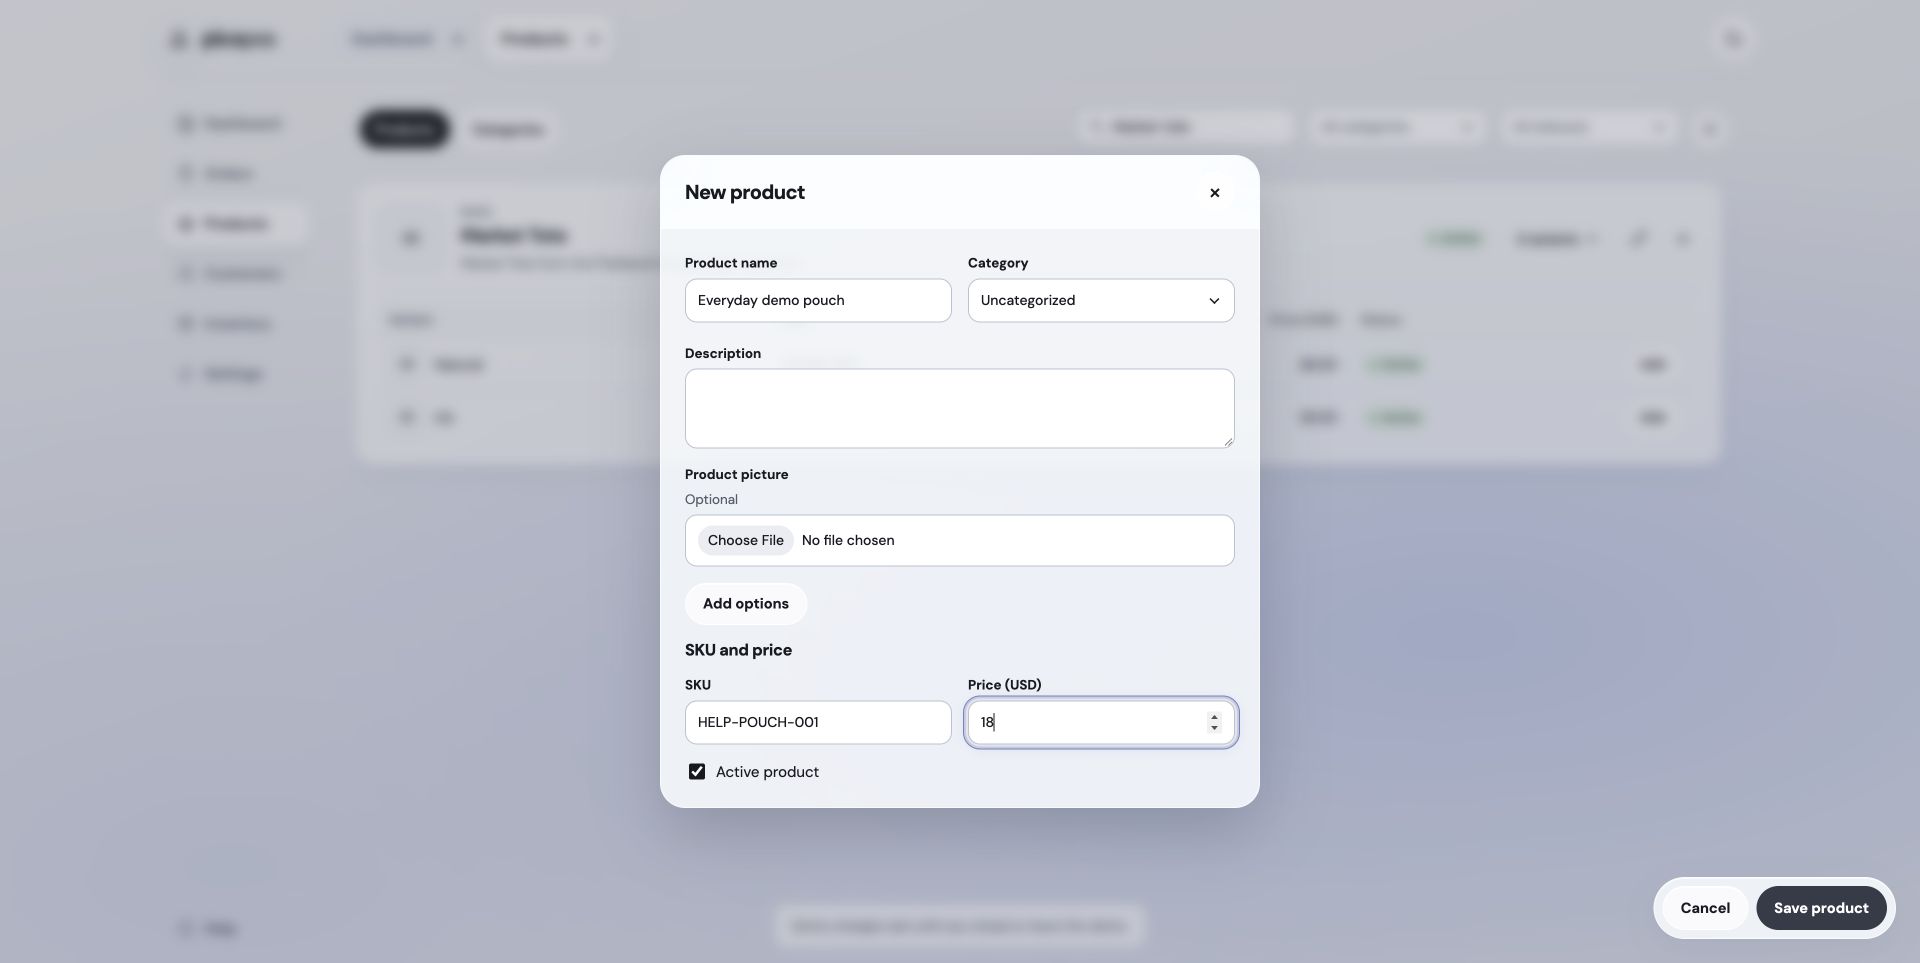
This example creates Everyday demo pouch with SKU HELP-POUCH-001 and a USD 18 price.

Silent step-by-step video · pause at any point. Select a screenshot to enlarge it.

  1. Open Products and select Add product.

    Open Products and select Add product.
  2. Enter the product name, unique SKU, and price. A photo and options are optional.

    Enter the product name, unique SKU, and price. A photo and options are optional.
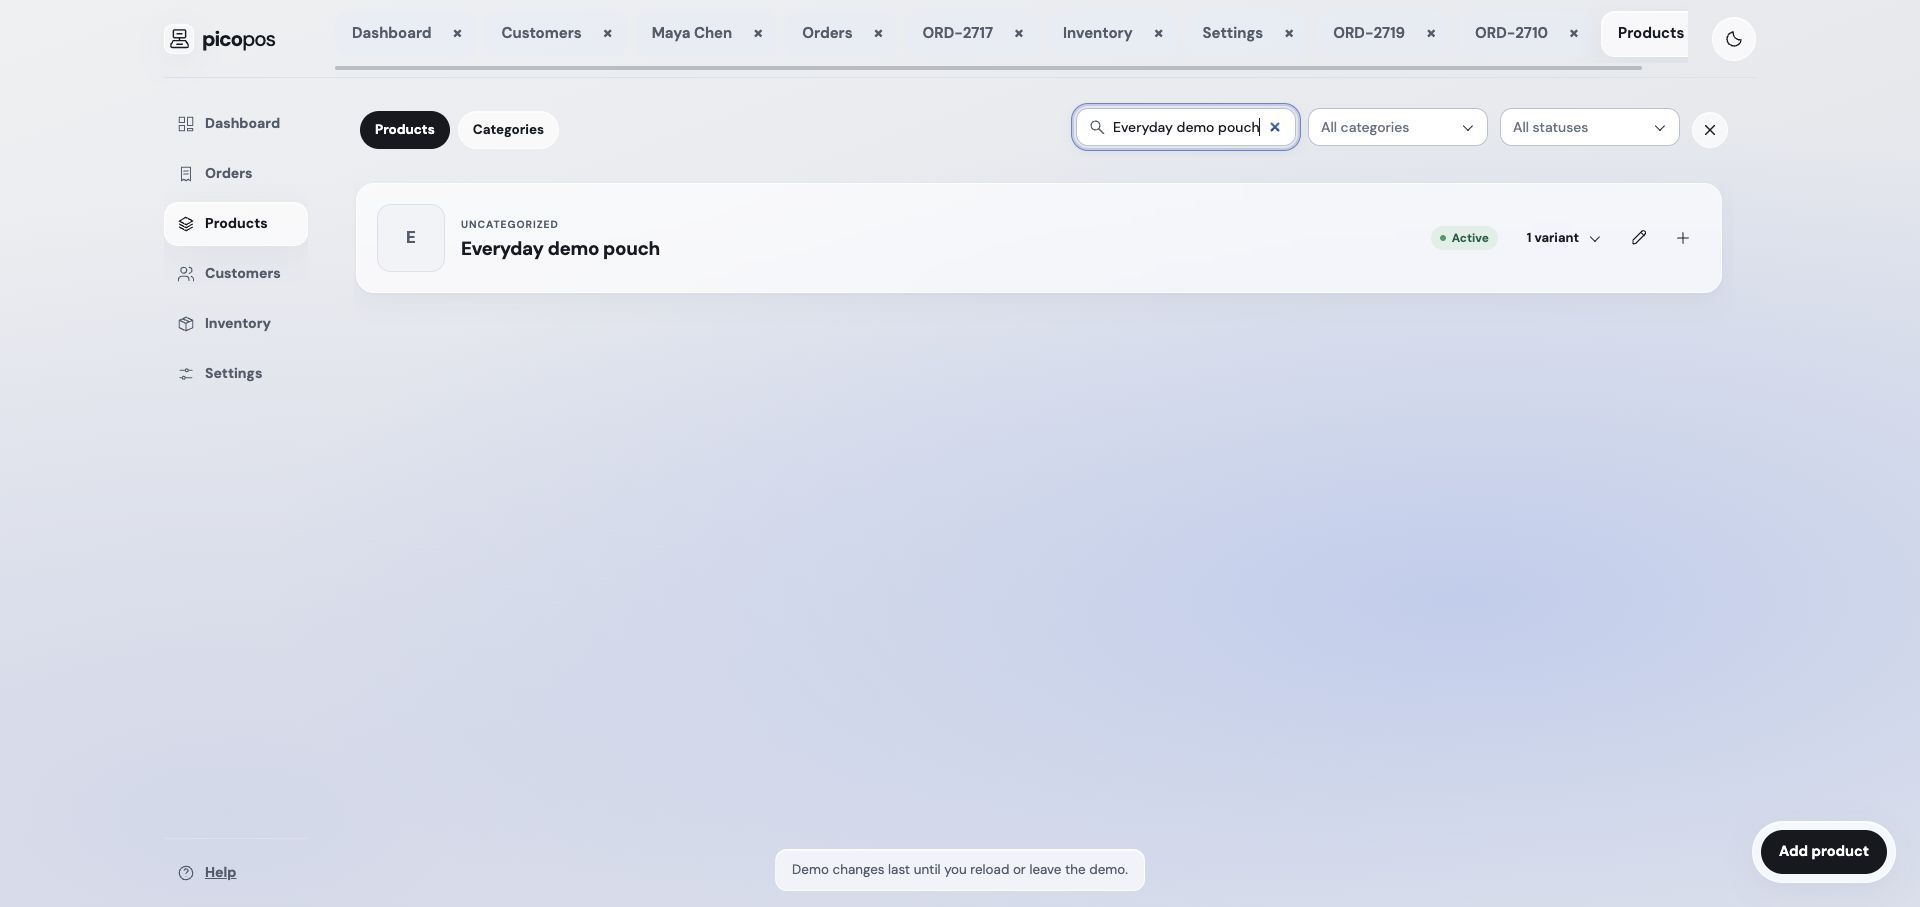
  3. Save the product and search for Everyday demo pouch to find the new record. Stock is added separately in Inventory.

    Save the product and search for Everyday demo pouch to find the new record. Stock is added separately in Inventory.
Watch & follow: Find, edit, and add variants

Use Market Tote to inspect its existing variants and the product and variant editors. Editor captures show prepared forms, not saved variant changes.

Silent step-by-step video · pause at any point. Select a screenshot to enlarge it.

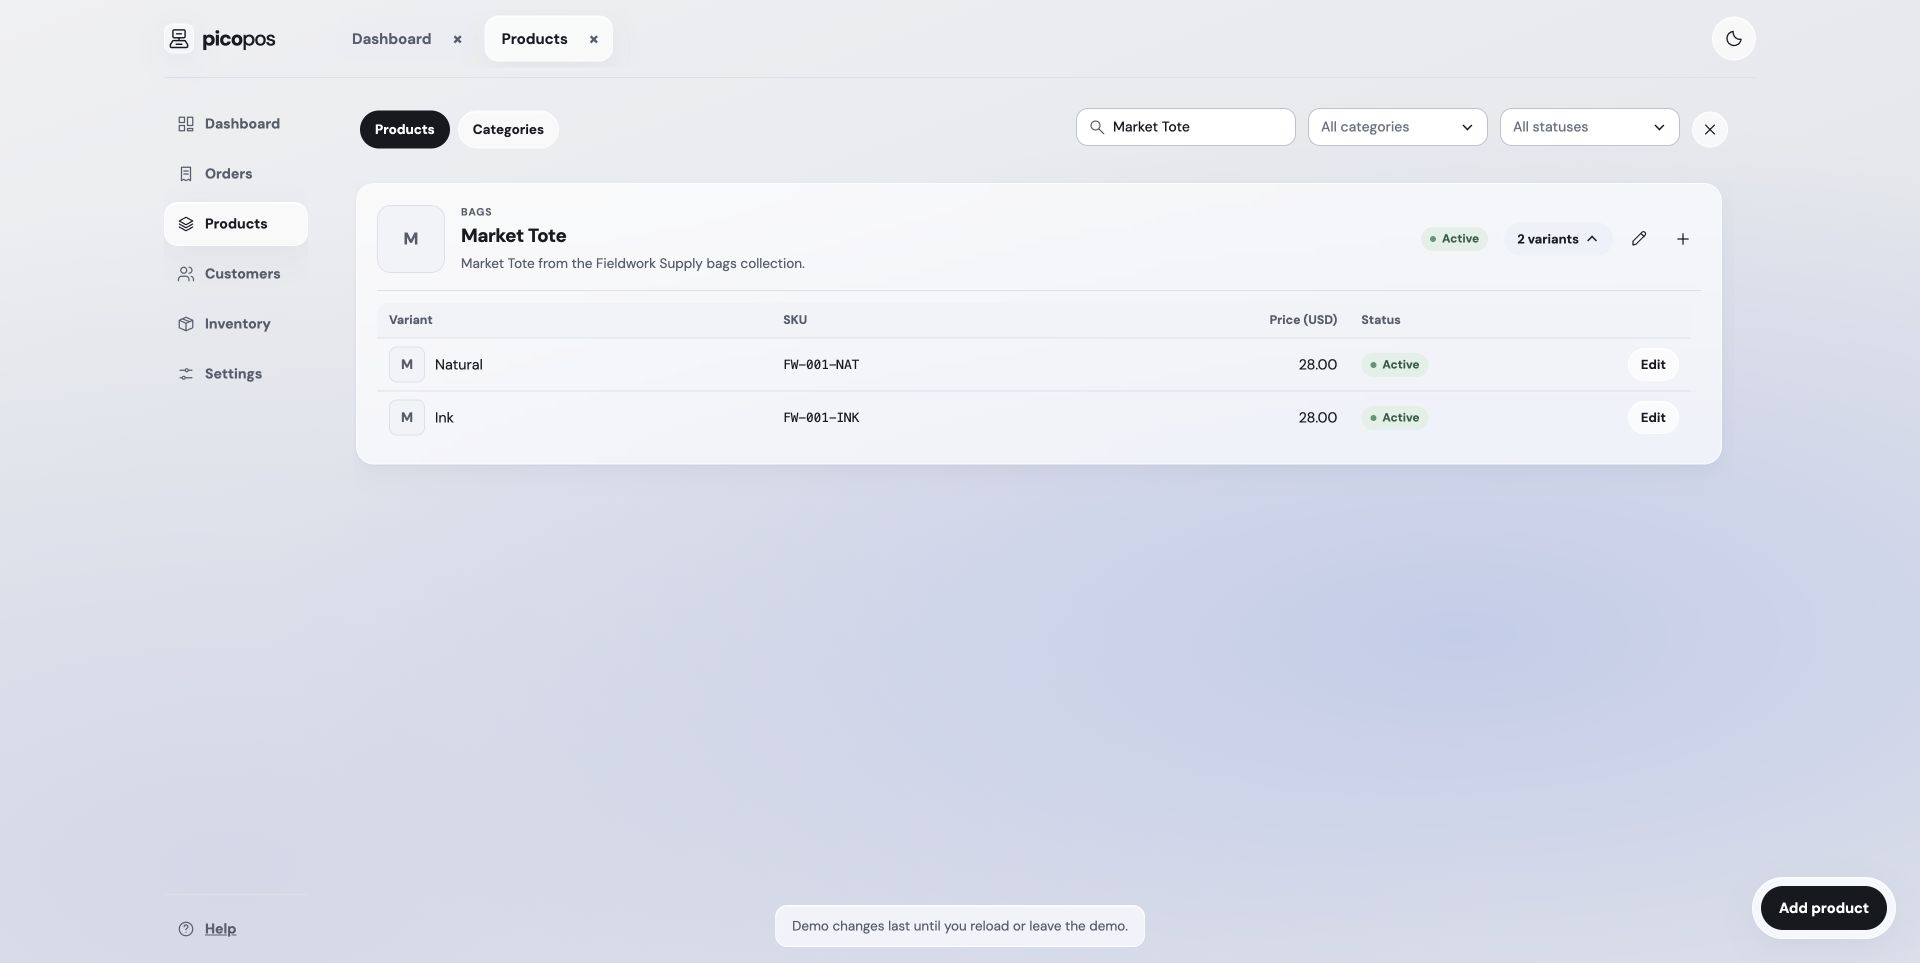
  1. Search for Market Tote and expand Variants to see Natural and Ink, their SKUs, prices, and status.

    Search for Market Tote and expand Variants to see Natural and Ink, their SKUs, prices, and status.
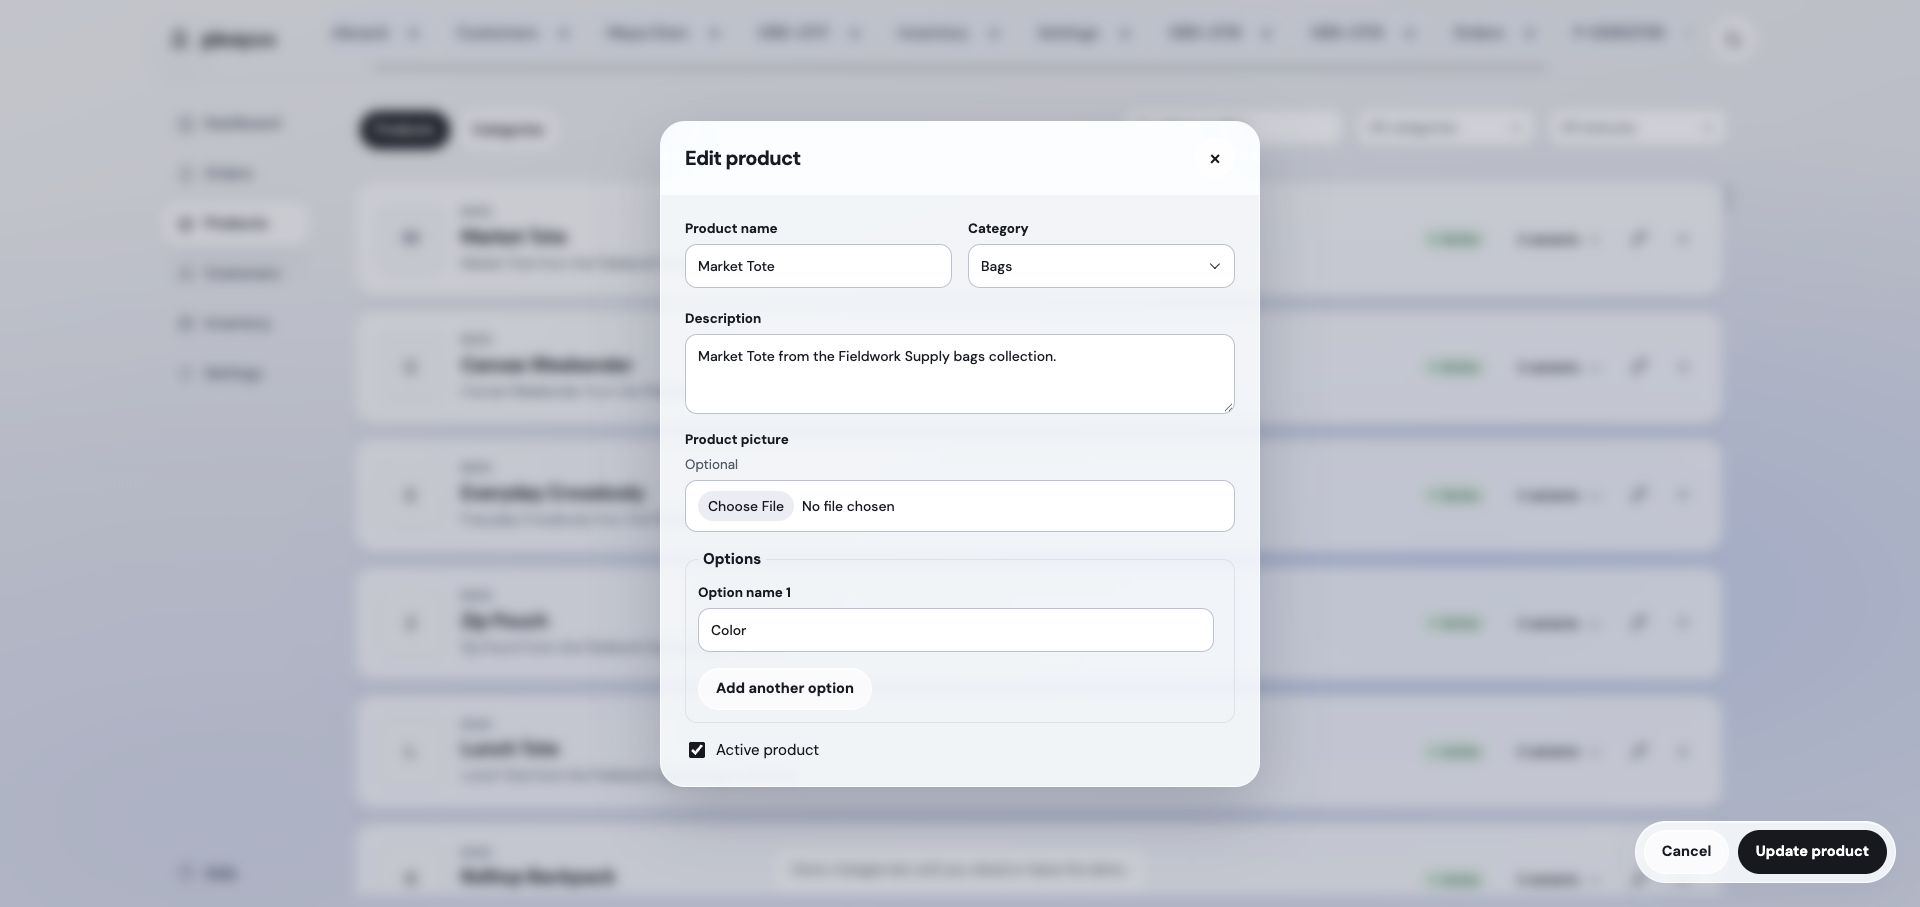
  2. Edit product holds the name, category, description, optional photo, option names, and Active product setting.

    Edit product holds the name, category, description, optional photo, option names, and Active product setting.
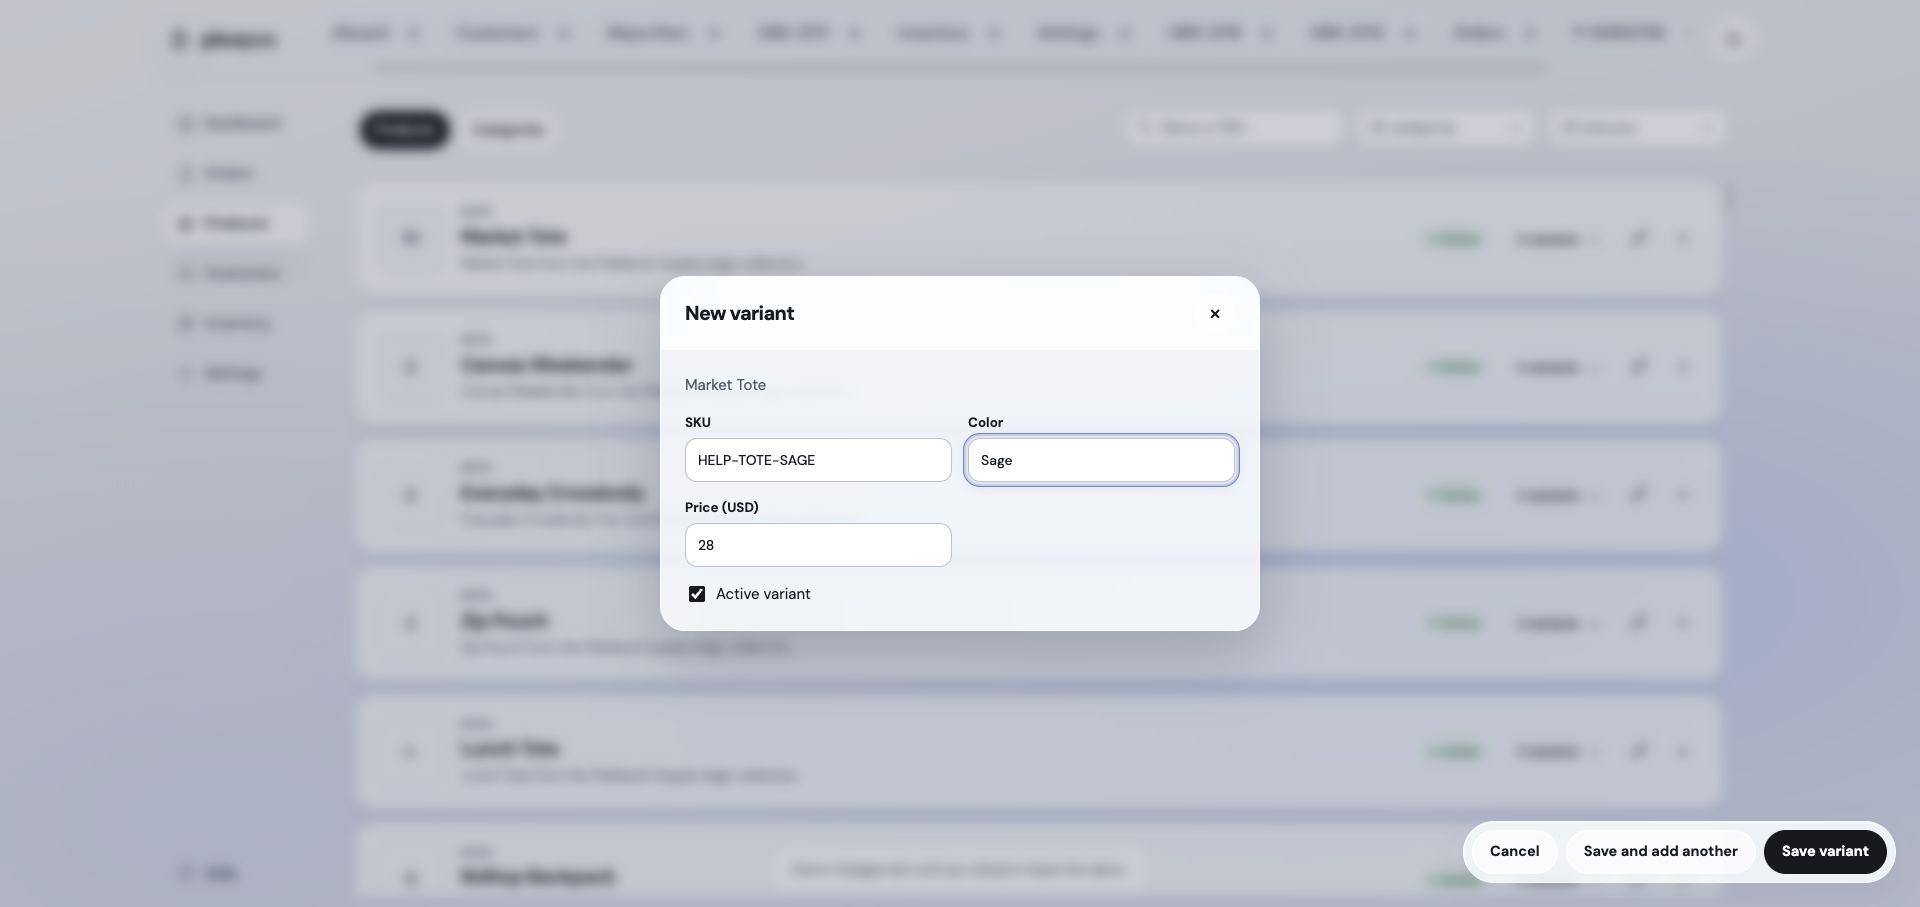
  3. Add variant opens a form for a unique SKU, Color, price, and Active variant setting.

    Add variant opens a form for a unique SKU, Color, price, and Active variant setting.
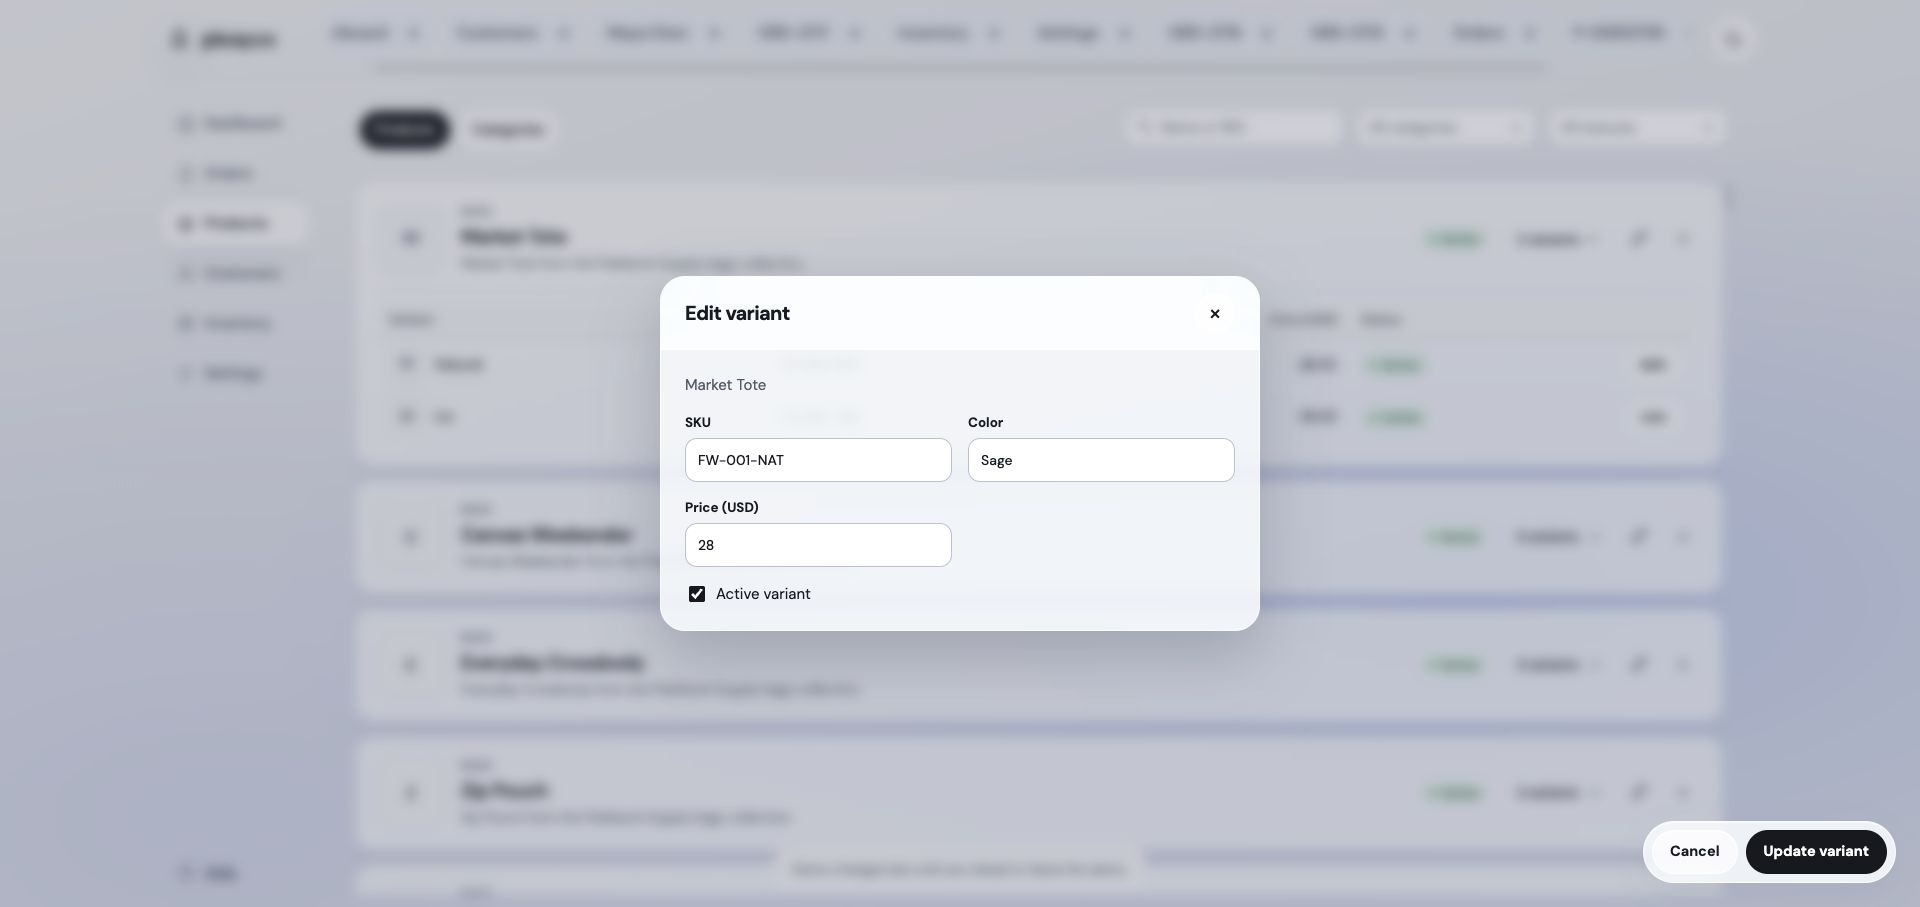
  4. Edit variant lets you update its SKU, option value, price, and active status.

    Edit variant lets you update its SKU, option value, price, and active status.
Watch & follow: Create a nested category

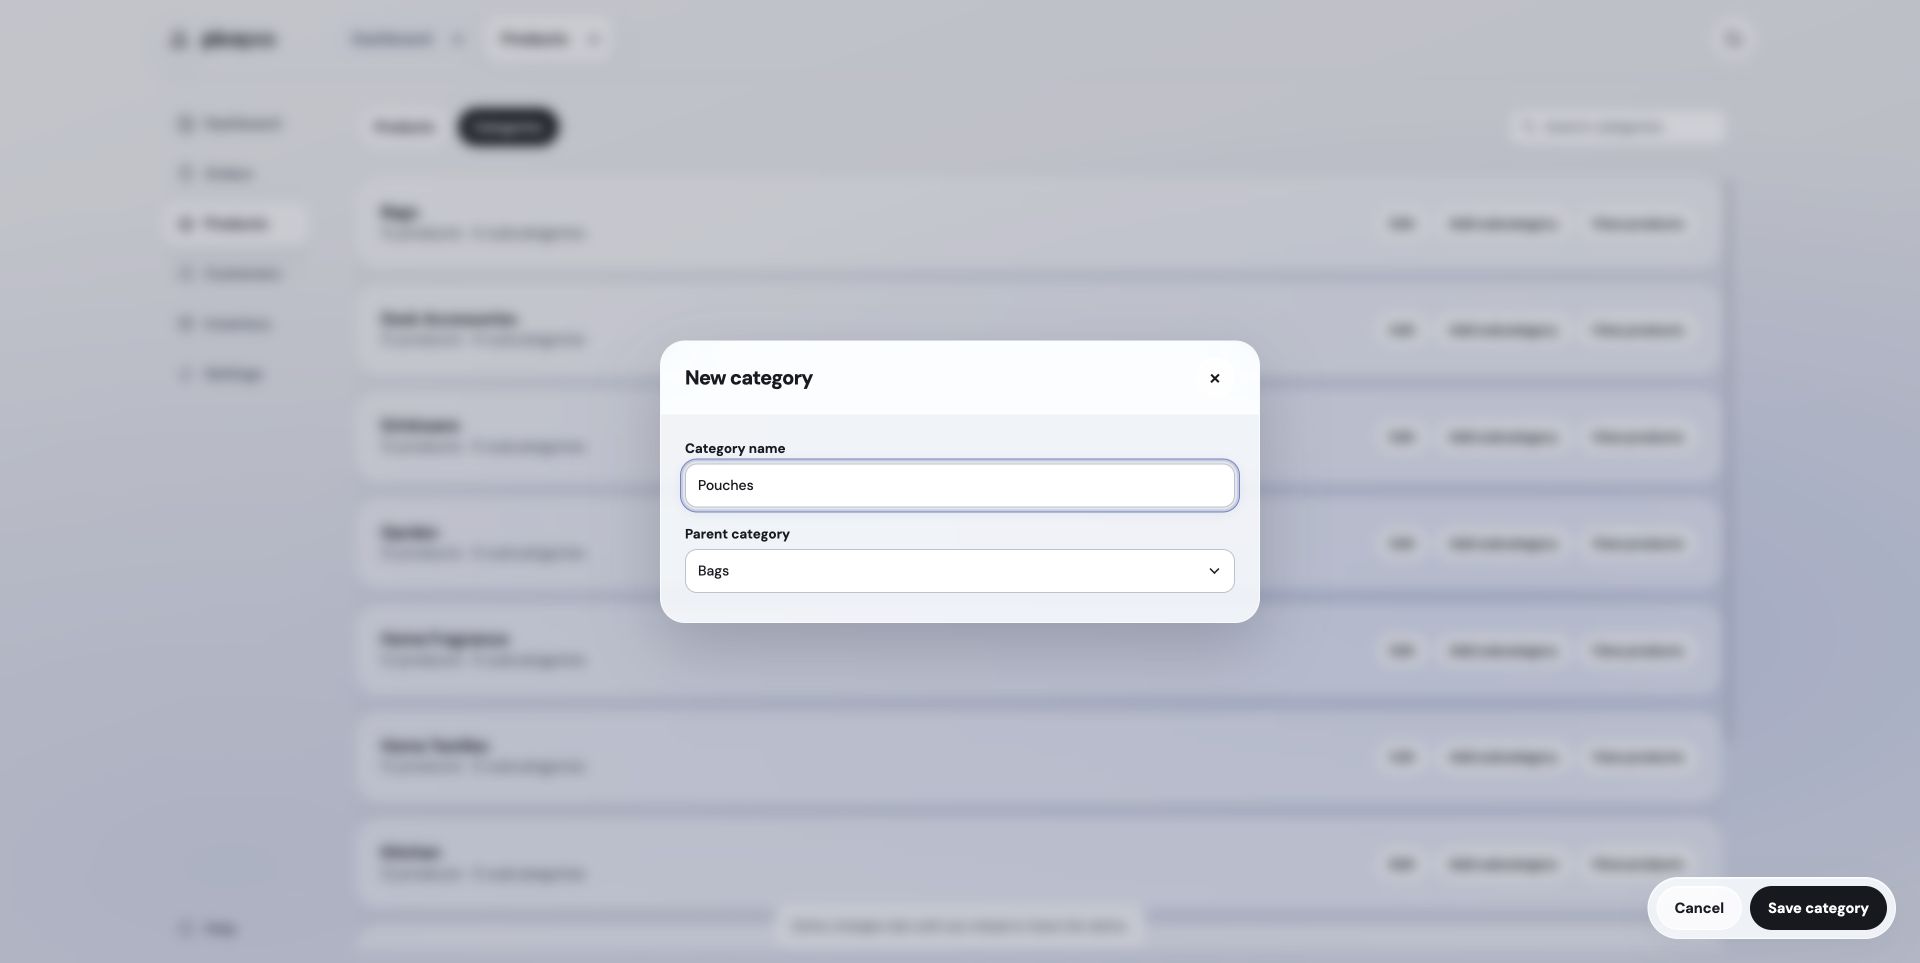
This example adds Pouches beneath Bags.

Silent step-by-step video · pause at any point. Select a screenshot to enlarge it.

  1. Open Categories to browse the category list.

    Open Categories to browse the category list.
  2. Select Add subcategory beside Bags, enter Pouches, and keep Bags as the parent.

    Select Add subcategory beside Bags, enter Pouches, and keep Bags as the parent.
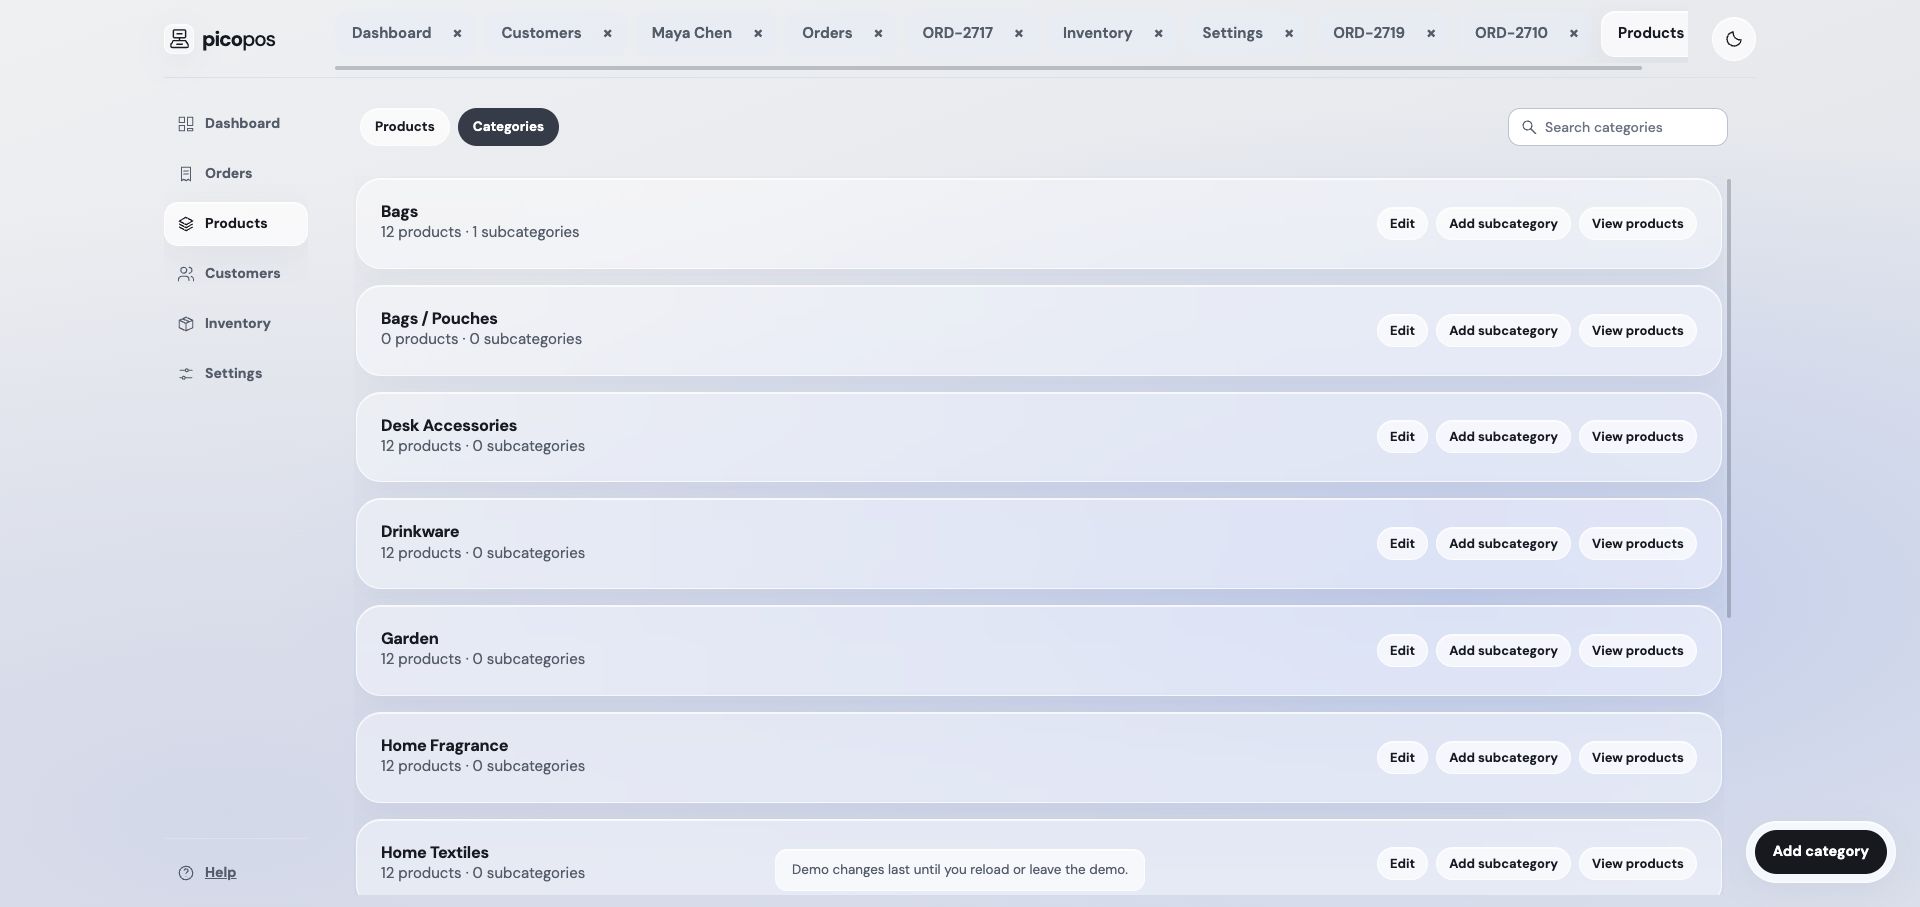
  3. Save category. Pouches appears under Bags; parent categories group their descendants.

    Save category. Pouches appears under Bags; parent categories group their descendants.

Customers

Manage contact details and review each customer’s order history.

Open Customers
Create, find, and edit customers

Create a customer with a name and optional contact details, address, and notes. Search by name, phone, email, or address and use the status filter to narrow the directory.

Open a customer to see contact details and order history. Use the active setting to archive a saved customer without deleting historical orders.

Saved customers and historical contacts

The directory includes saved customers and contacts found on older, unlinked orders. Select a saved customer when creating an order to connect the new order to their history.

Orders keep their own customer, contact, and address snapshots. Editing a customer does not rewrite earlier orders. Historical contacts are not automatically merged with saved records just because their names match.

Watch & follow: Find a customer and inspect order history

The fictional demo customer Maya Chen illustrates contact details and historical orders. This walkthrough does not save customer edits.

Silent step-by-step video · pause at any point. Select a screenshot to enlarge it.

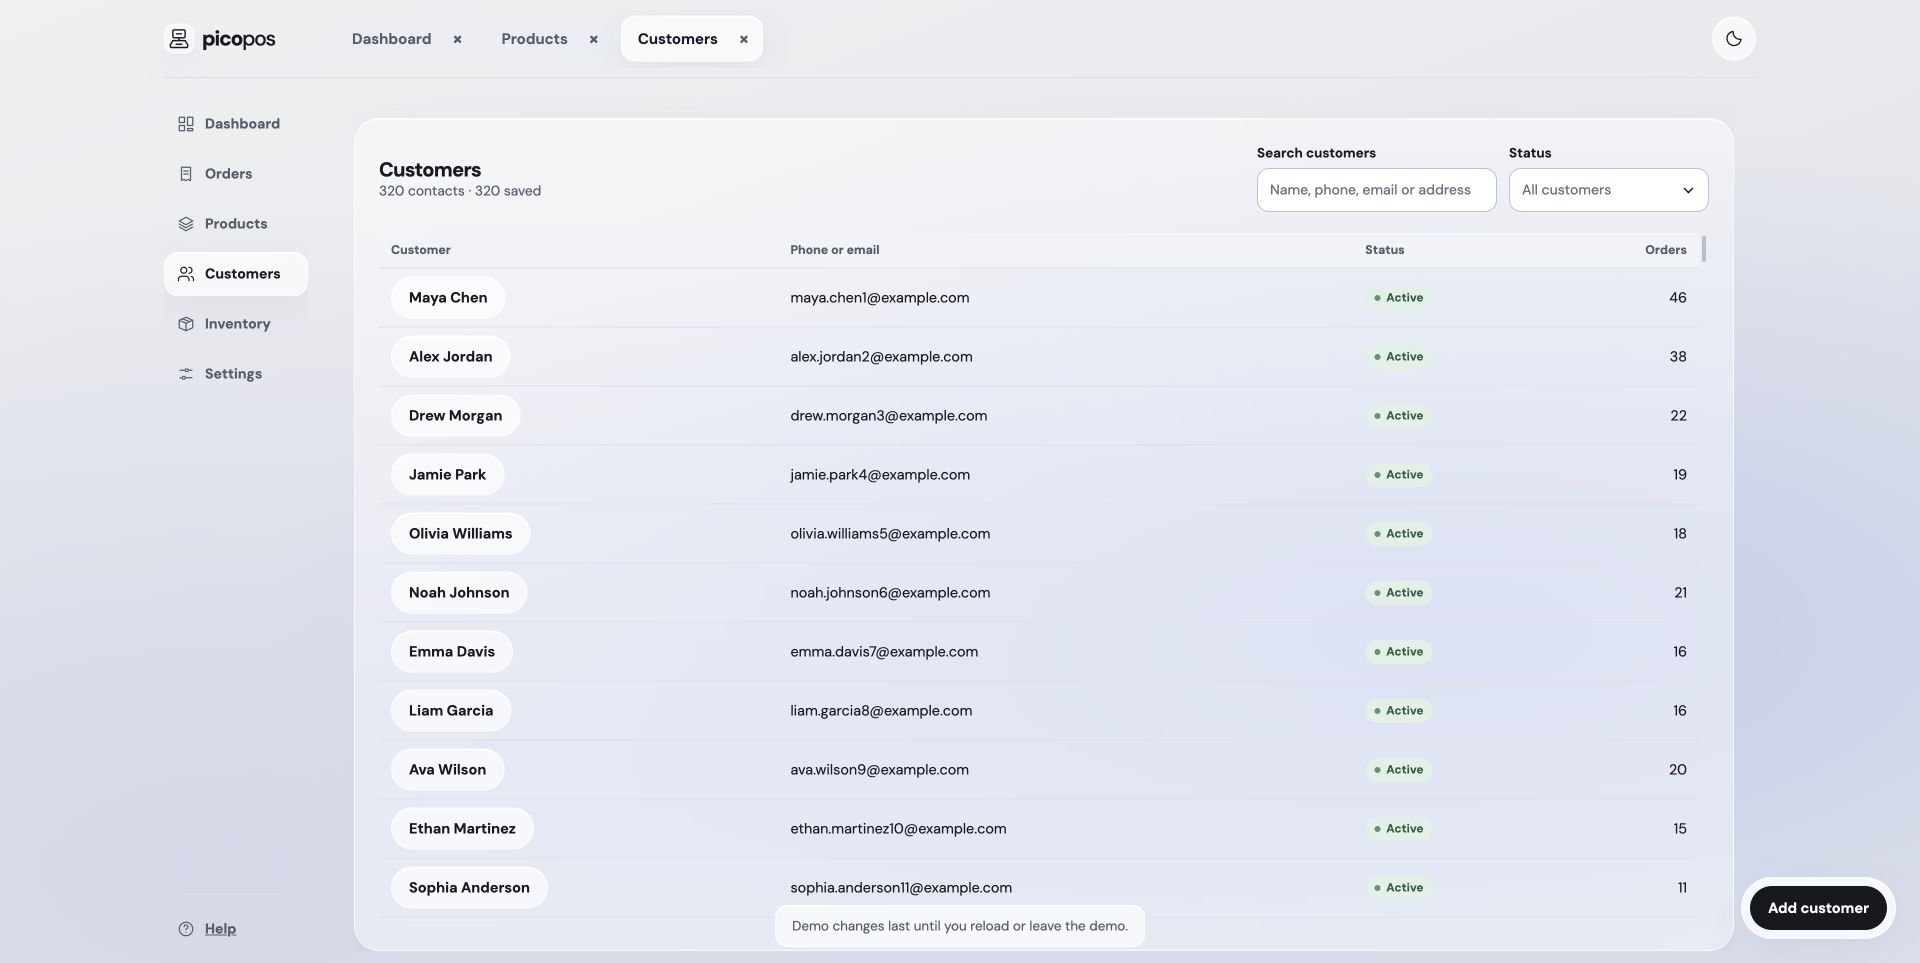
  1. Open Customers to browse saved contacts and their order counts.

    Open Customers to browse saved contacts and their order counts.
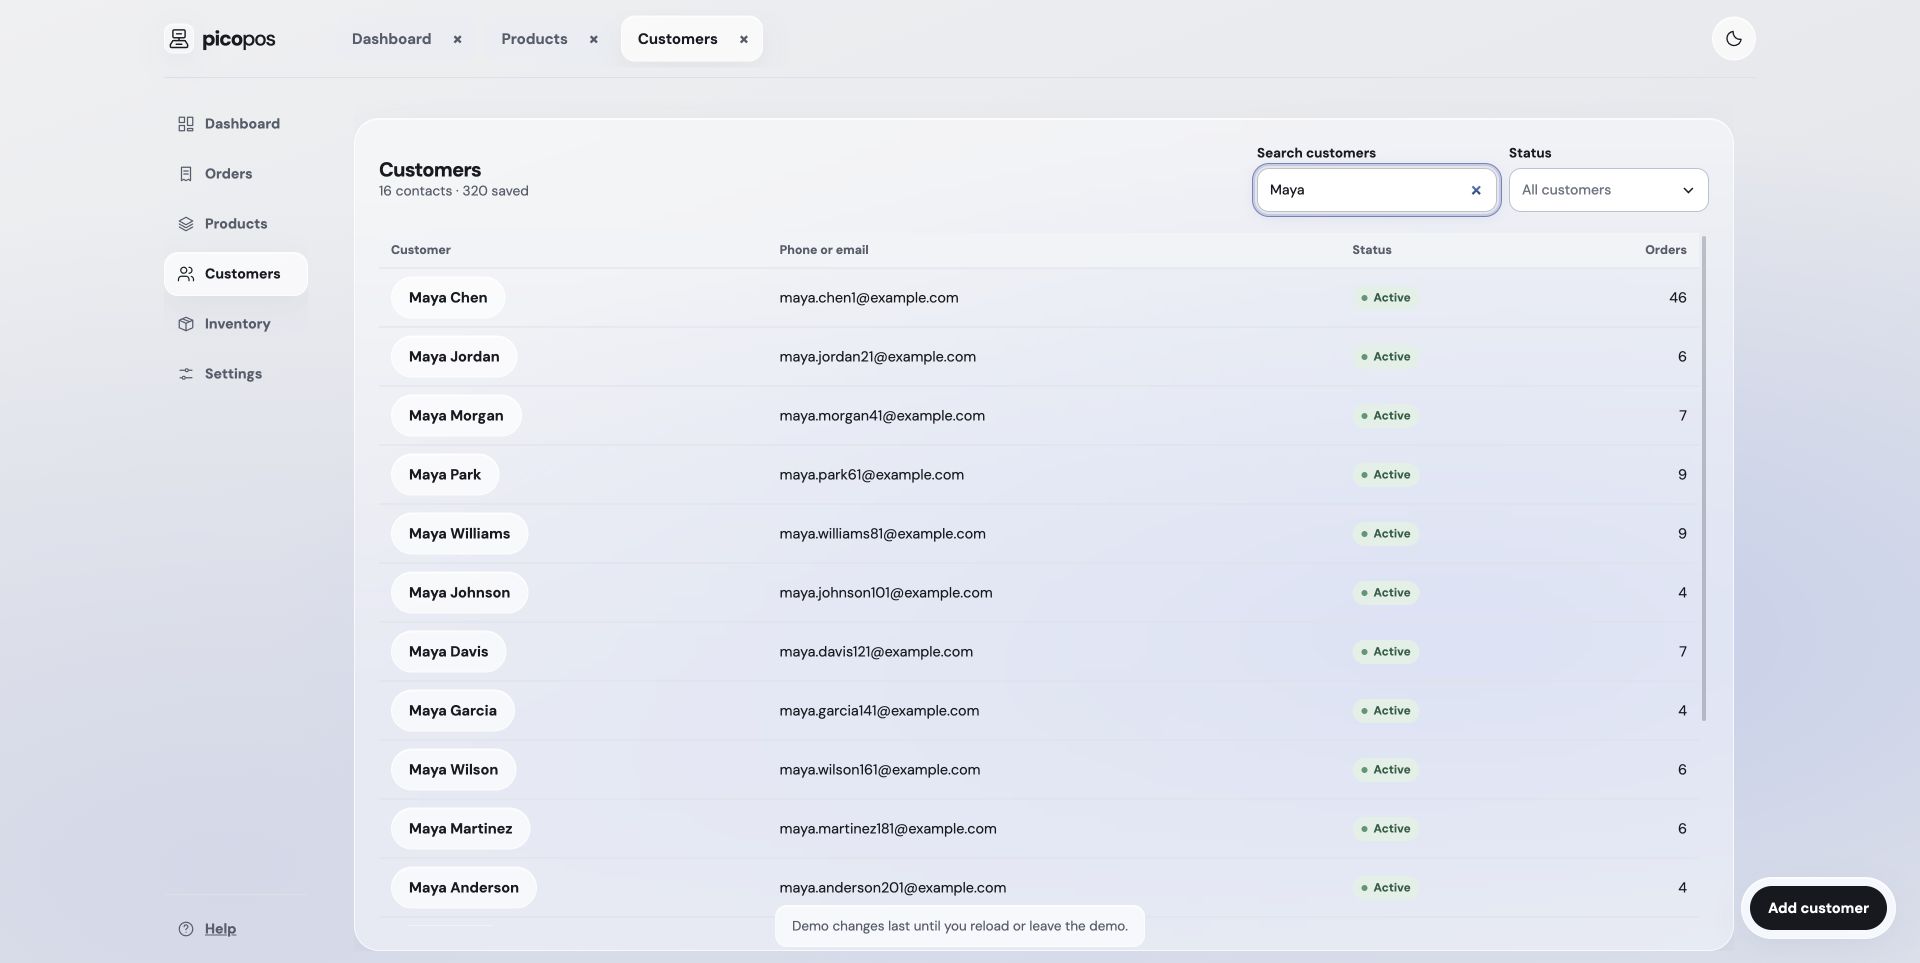
  2. Search for Maya to narrow the directory. Search can match contact fields as well as names.

    Search for Maya to narrow the directory. Search can match contact fields as well as names.
  3. Open Maya Chen to review contact details, notes, and order history. Update customer saves edits when you make them.

    Open Maya Chen to review contact details, notes, and order history. Update customer saves edits when you make them.

Orders & payments

Create drafts, confirm stock, fulfil orders, and track payment separately.

Open Orders
Find orders and follow the order journey

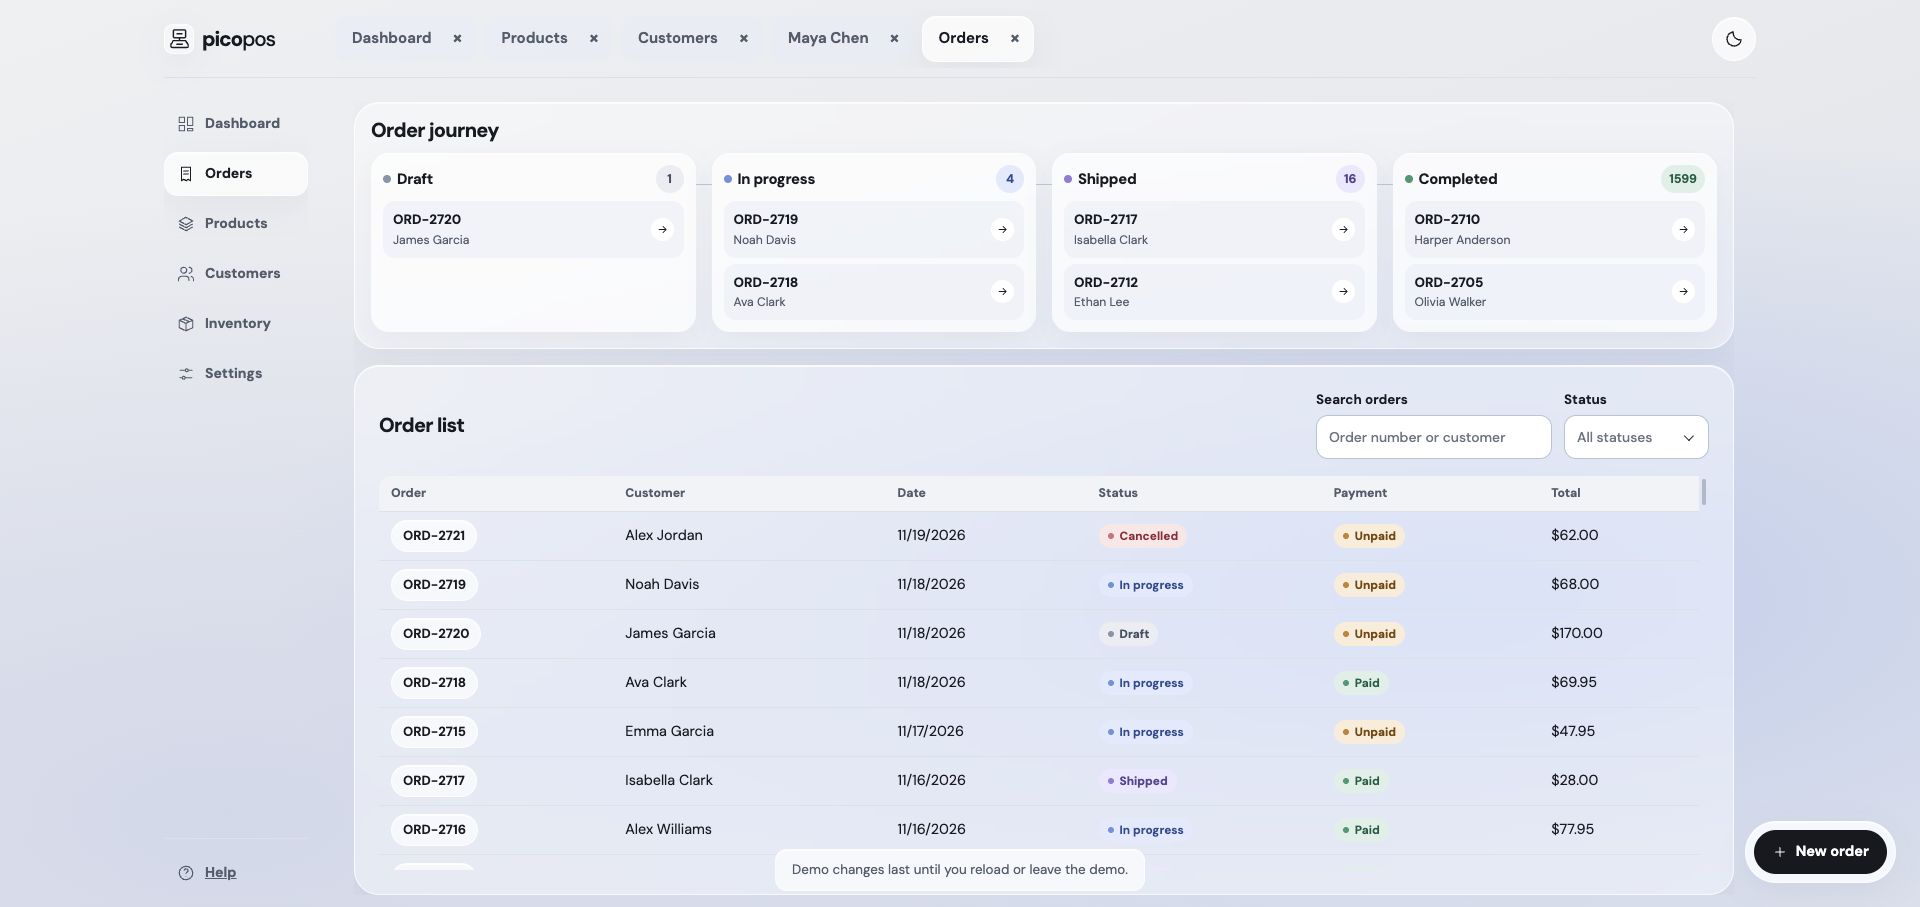
The order journey groups orders by status. Select a stage to filter the list or open a record directly. The order list supports order-number or customer search and status filtering.
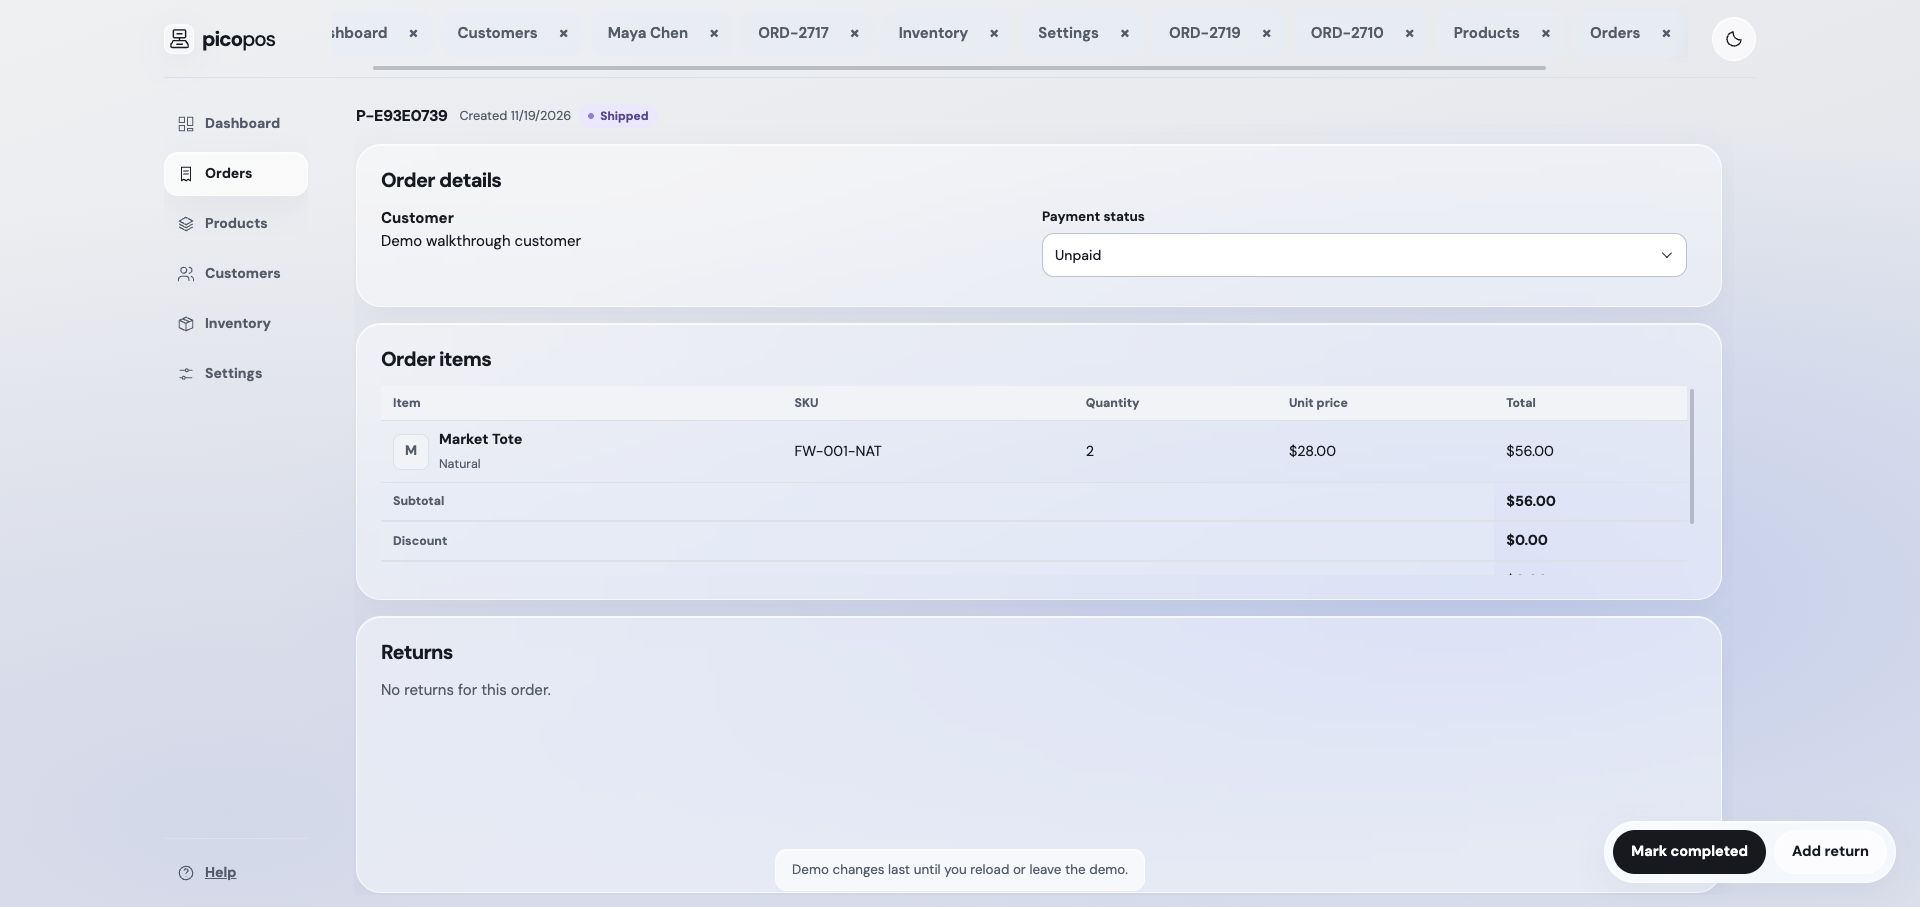
Opening an order shows its saved customer details, items, totals, payment status, and returns. Detail tabs let you switch between records without losing the list.

Create a draft
  1. Choose the new-order action in Orders.
  2. Select a customer or enter customer details, then add one or more variants.
  3. Set positive whole-number quantities and review unit prices.
  4. Choose shipping, enter any discount and notes, and save the draft.

Order total equals quantity × unit price across all lines, minus discount, plus shipping. The discount cannot exceed the item subtotal. Drafts do not reserve inventory.
Confirm, ship, complete, or cancel

The normal sequence is Draft → In progress → Shipped → Completed. Confirmation reserves stock, and shipping deducts on-hand quantities and clears those reservations. Stock availability is checked when confirming and shipping.
Draft and In progress orders can be cancelled, releasing any reservations. Completed and Cancelled orders cannot be advanced further. Shipping applies to the whole order; use returns for items that come back after shipping.

Record payment status

Payment is tracked separately as Unpaid, Paid, or Refunded in order details. Changing payment status does not confirm, ship, cancel, or move inventory.

Marking an order Refunded excludes it from report sales. The app does not process a payment or transfer a refund to the customer. Payment status is a record of what happened outside picopos.

Watch & follow: Create a two-unit draft order

The example orders two Natural Market Totes at USD 28 each for Demo walkthrough customer, using free local pickup.

Silent step-by-step video · pause at any point. Select a screenshot to enlarge it.

  1. Open Orders and select New order.

    Open Orders and select New order.
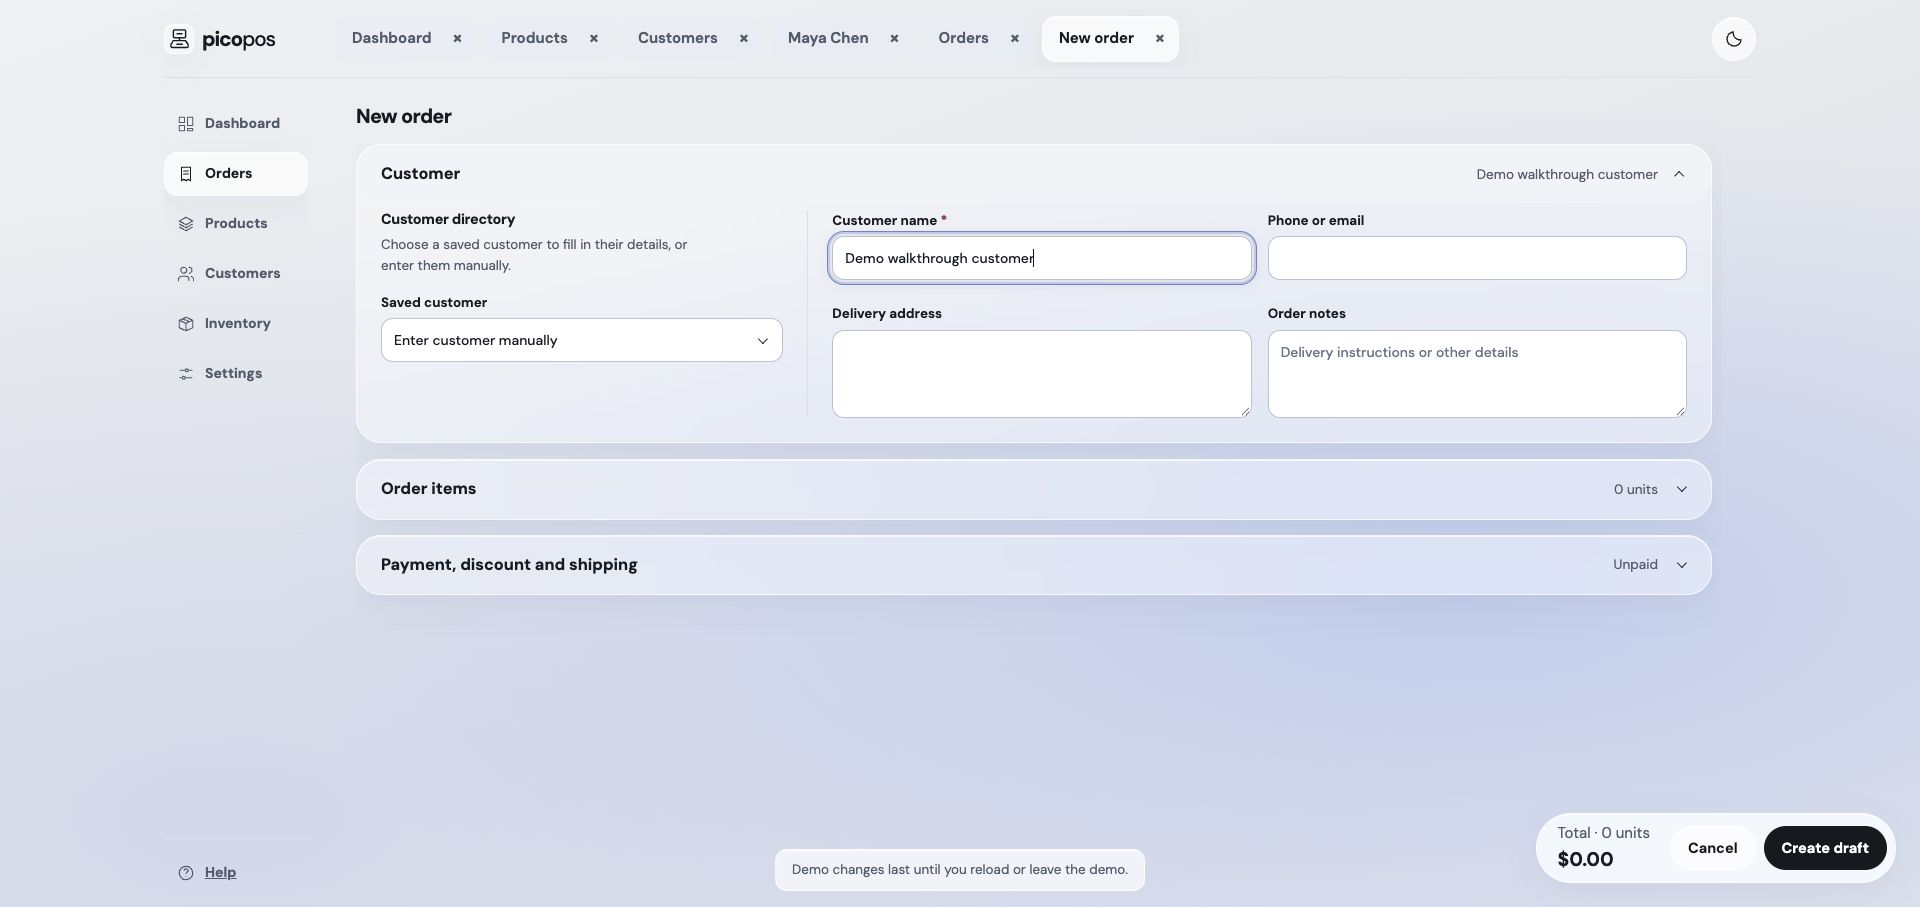
  2. Expand Customer and enter a name, or select an existing saved customer.

    Expand Customer and enter a name, or select an existing saved customer.
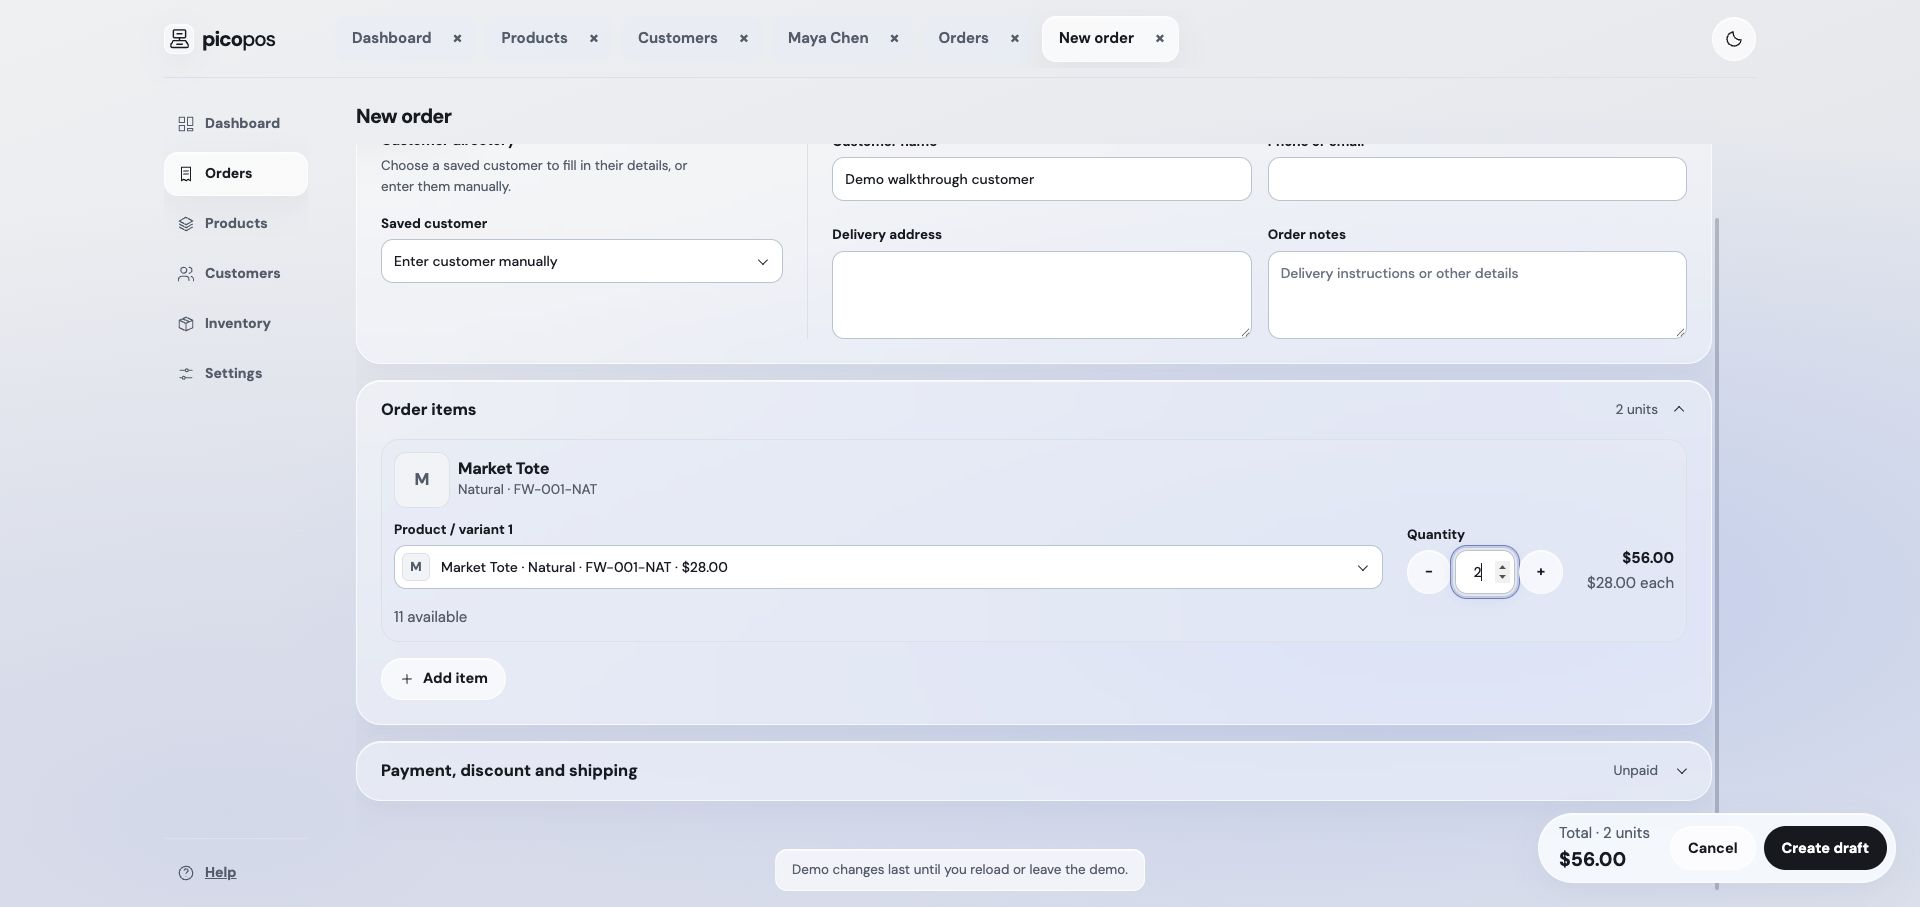
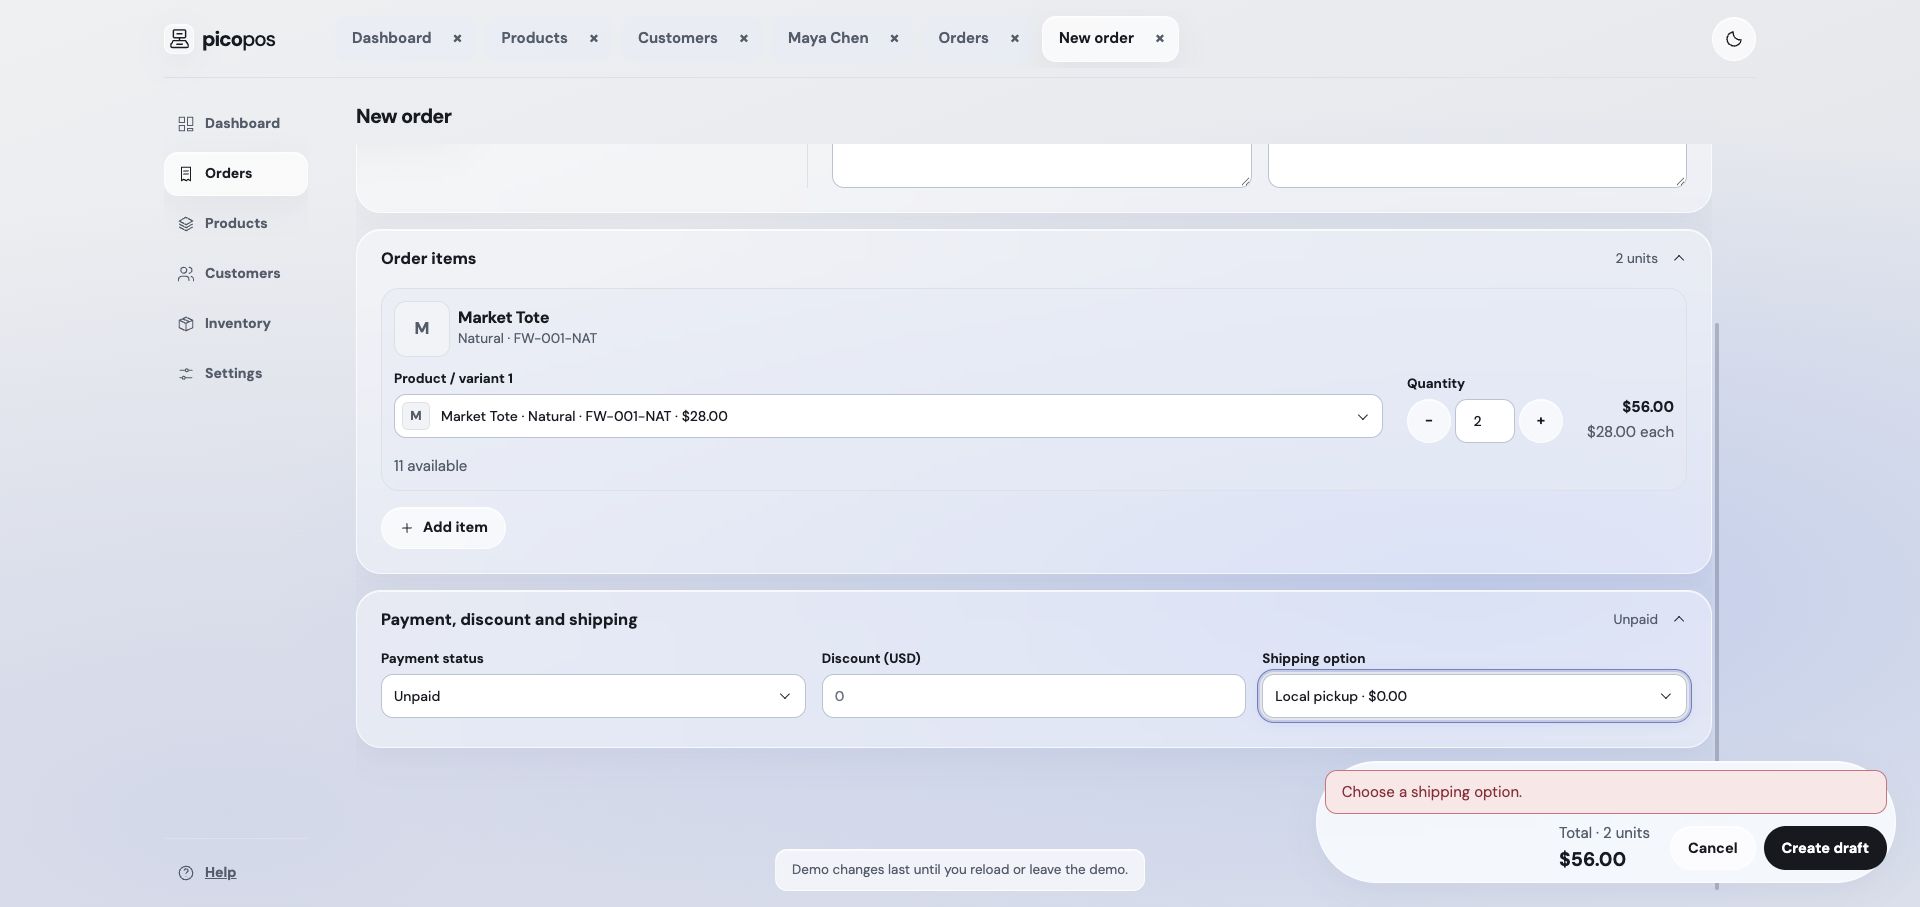
  3. Expand Order items, choose Market Tote / Natural, and set Quantity to 2. The item subtotal is USD 56.

    Expand Order items, choose Market Tote / Natural, and set Quantity to 2. The item subtotal is USD 56.
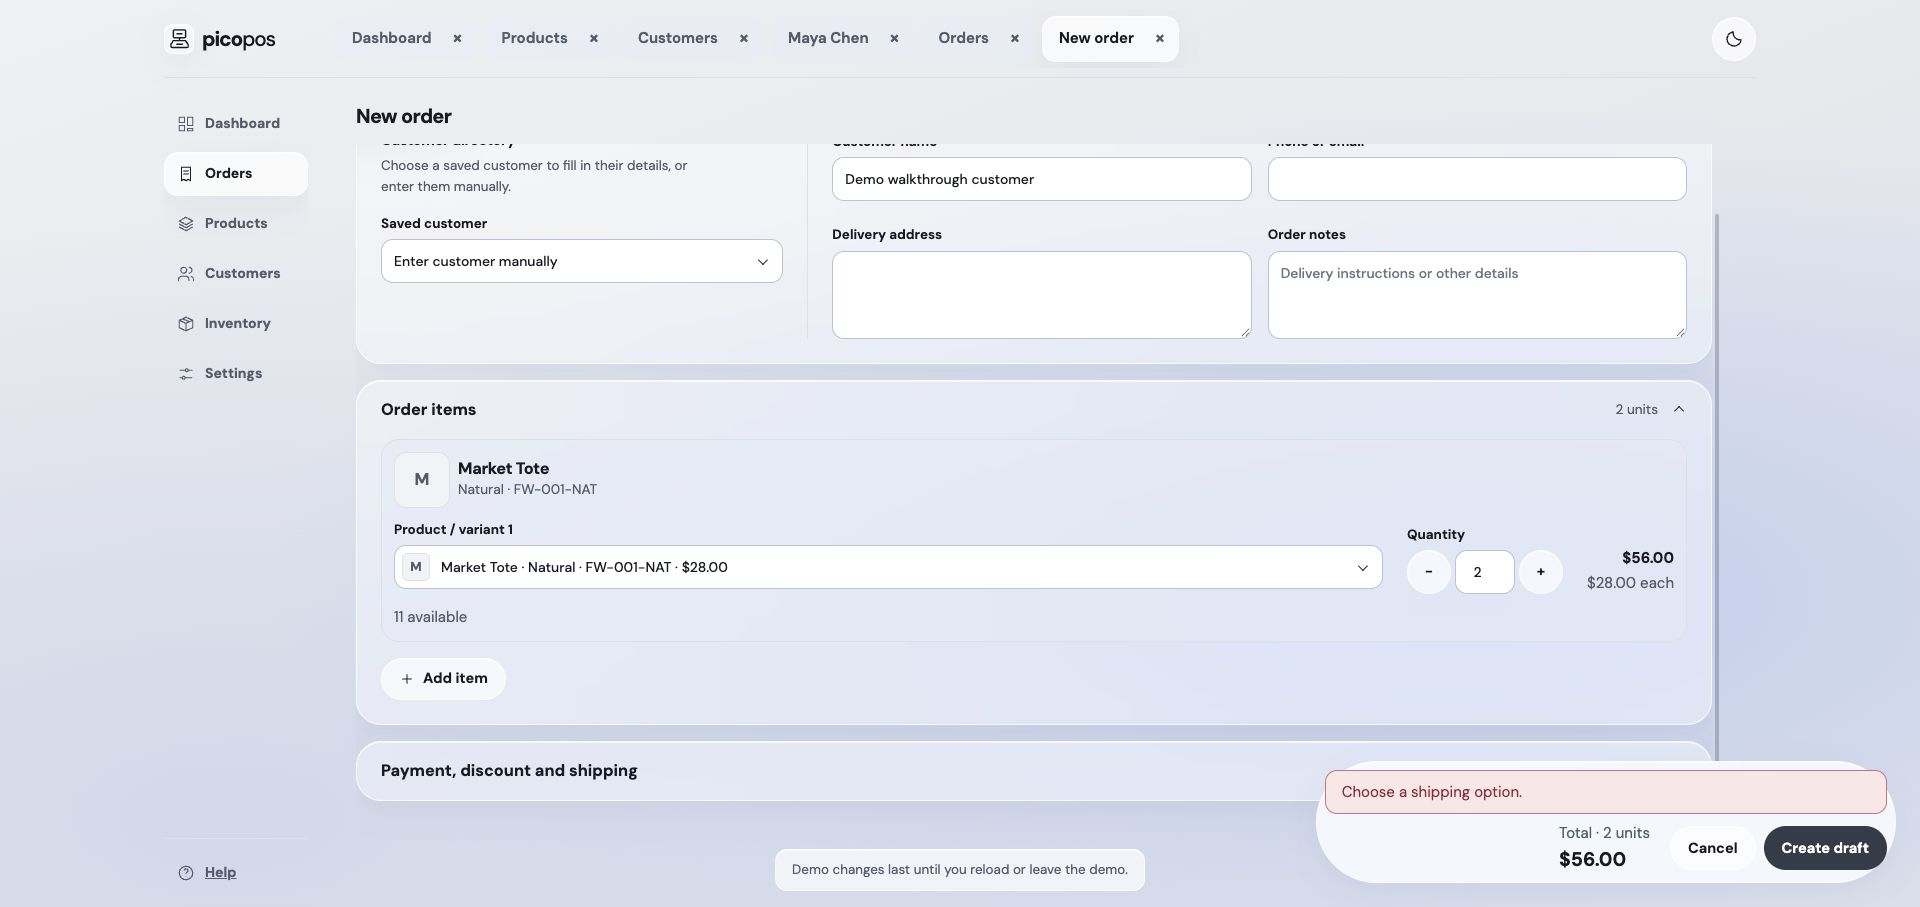
  4. Saving without a shipping option shows Choose a shipping option. Fill the missing field before retrying.

    Saving without a shipping option shows Choose a shipping option. Fill the missing field before retrying.
  5. Expand Payment, discount and shipping and choose Local pickup. The previous validation message clears after a successful save.

    Expand Payment, discount and shipping and choose Local pickup. The previous validation message clears after a successful save.
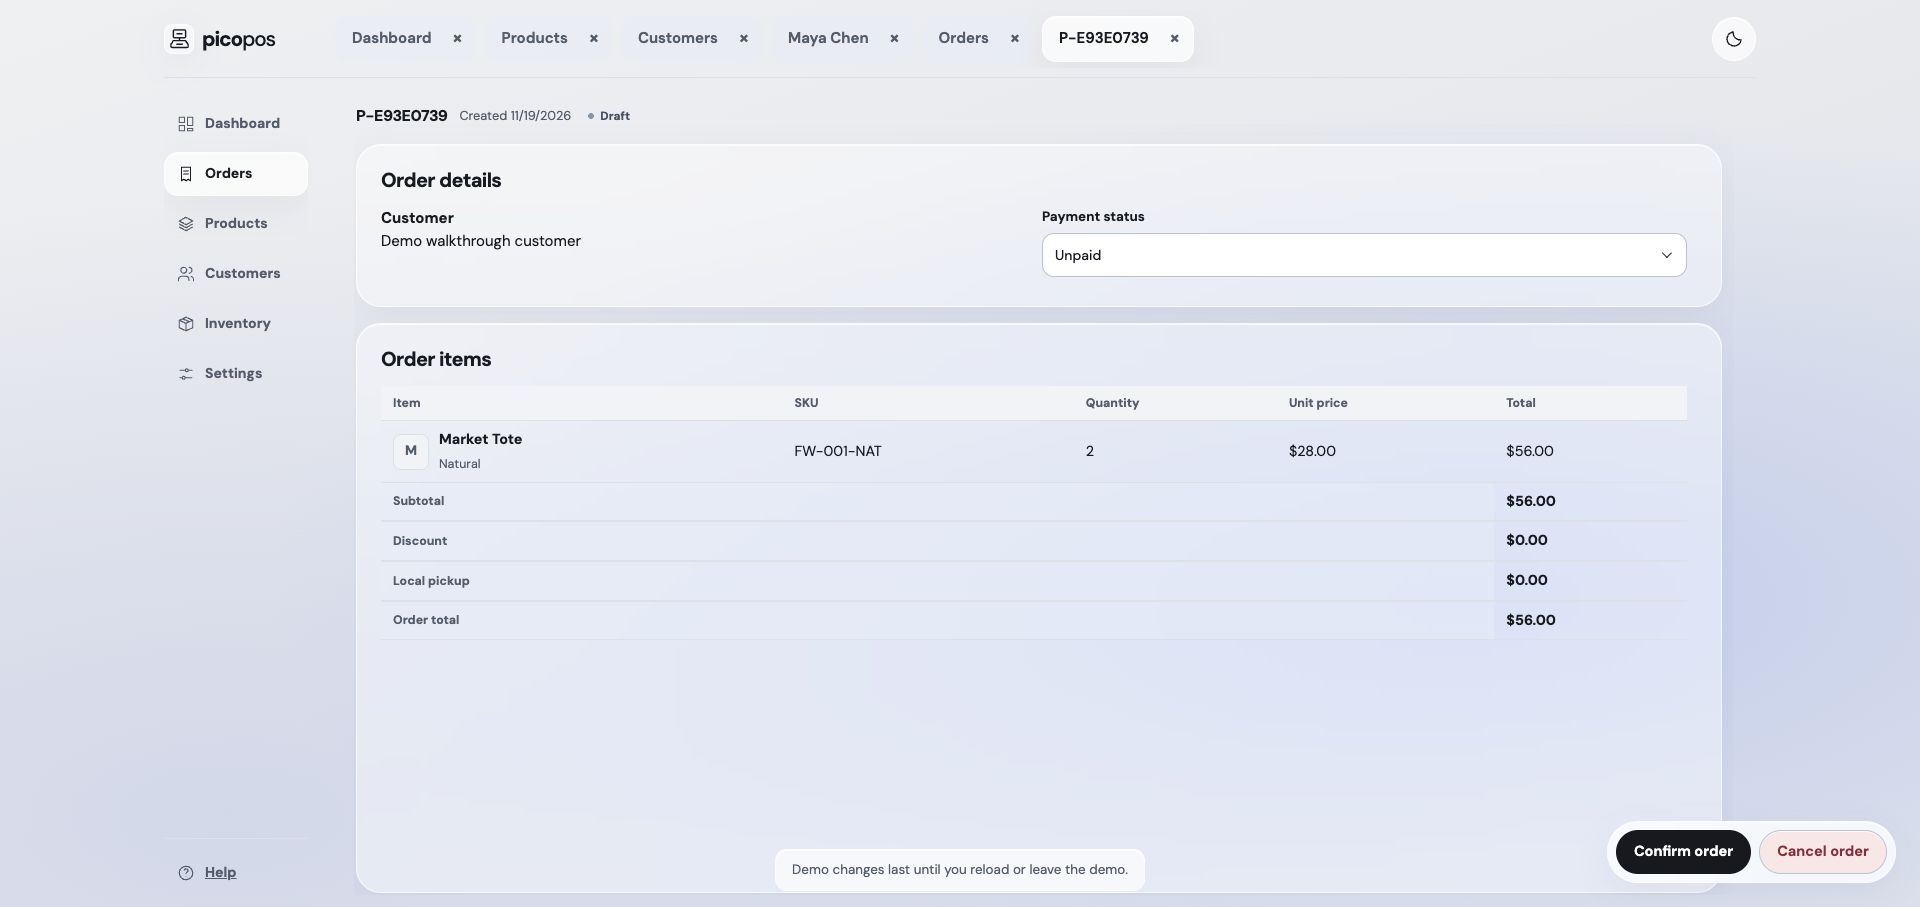
  6. Select Create draft. The saved order shows Draft and a USD 56 total; no stock is reserved yet.

    Select Create draft. The saved order shows Draft and a USD 56 total; no stock is reserved yet.
Watch & follow: Confirm, ship, and complete an order

These captures follow the same disposable demo order through all four states. Payment status is separate from fulfilment.

Silent step-by-step video · pause at any point. Select a screenshot to enlarge it.

  1. Draft: review the items and total, then select Confirm order.

    Draft: review the items and total, then select Confirm order.
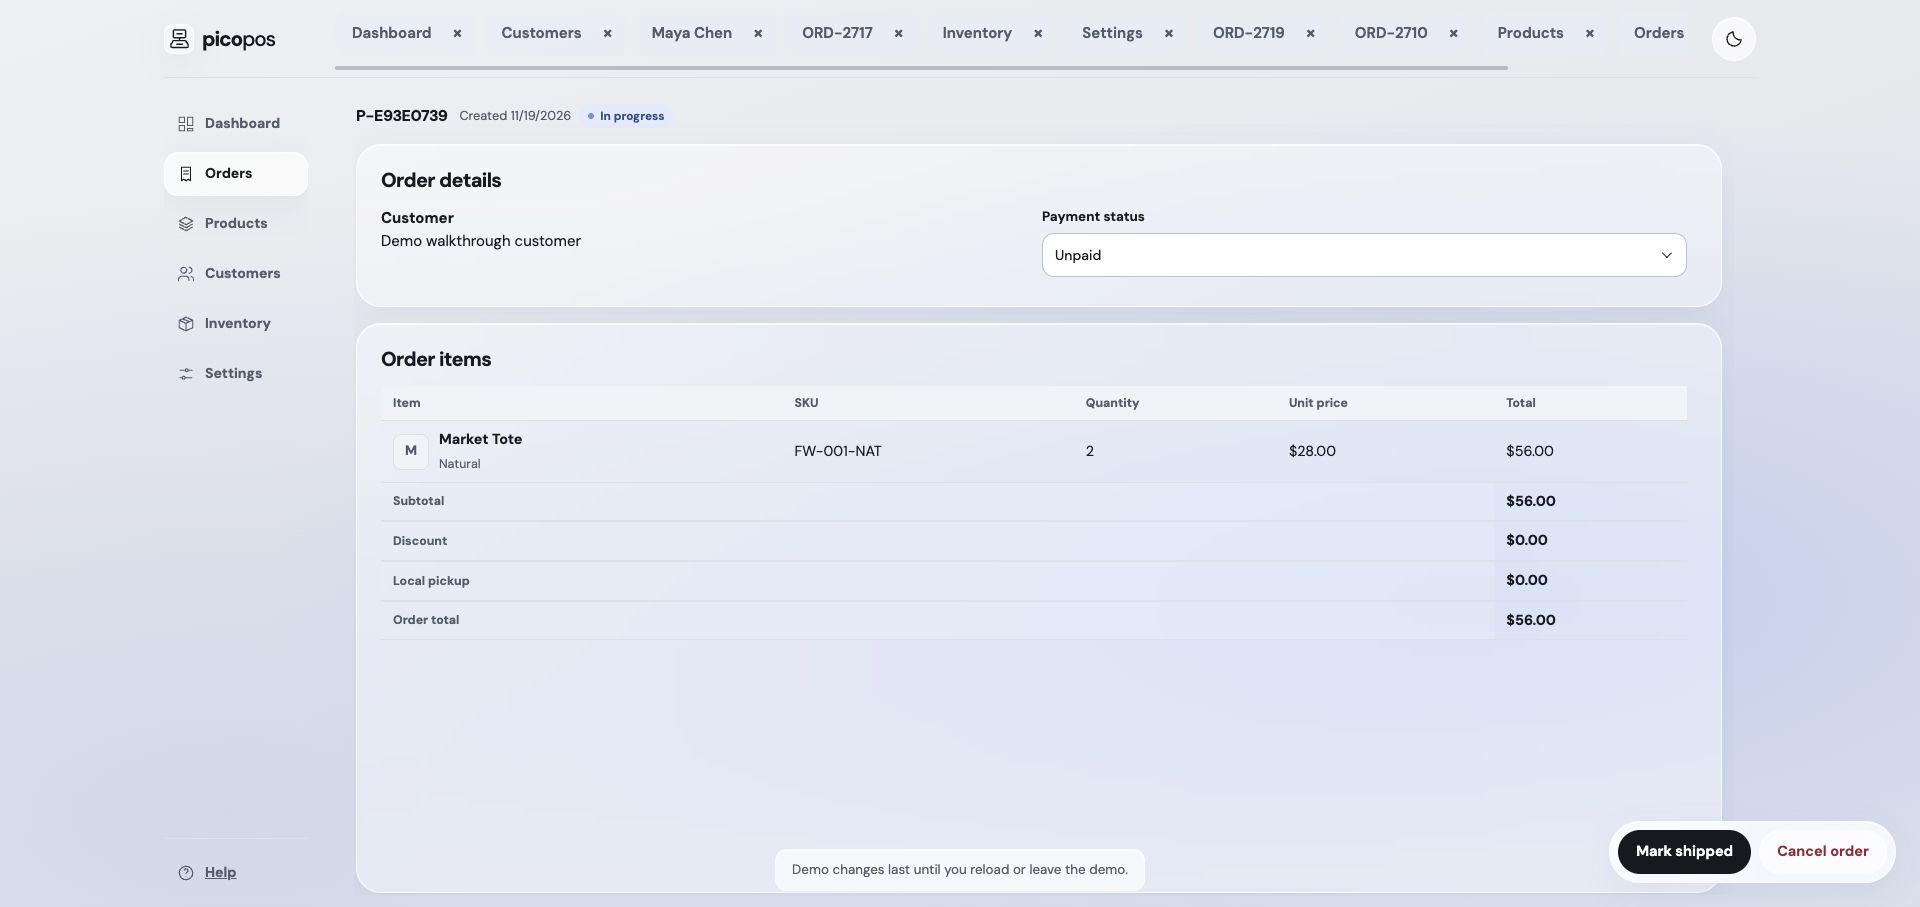
  2. In progress: confirmation reserves the two units. Mark shipped advances the whole order; Cancel order releases reservations.

    In progress: confirmation reserves the two units. Mark shipped advances the whole order; Cancel order releases reservations.
  3. Shipped: stock has left on hand and reservations are cleared. Returns are now available.

    Shipped: stock has left on hand and reservations are cleared. Returns are now available.
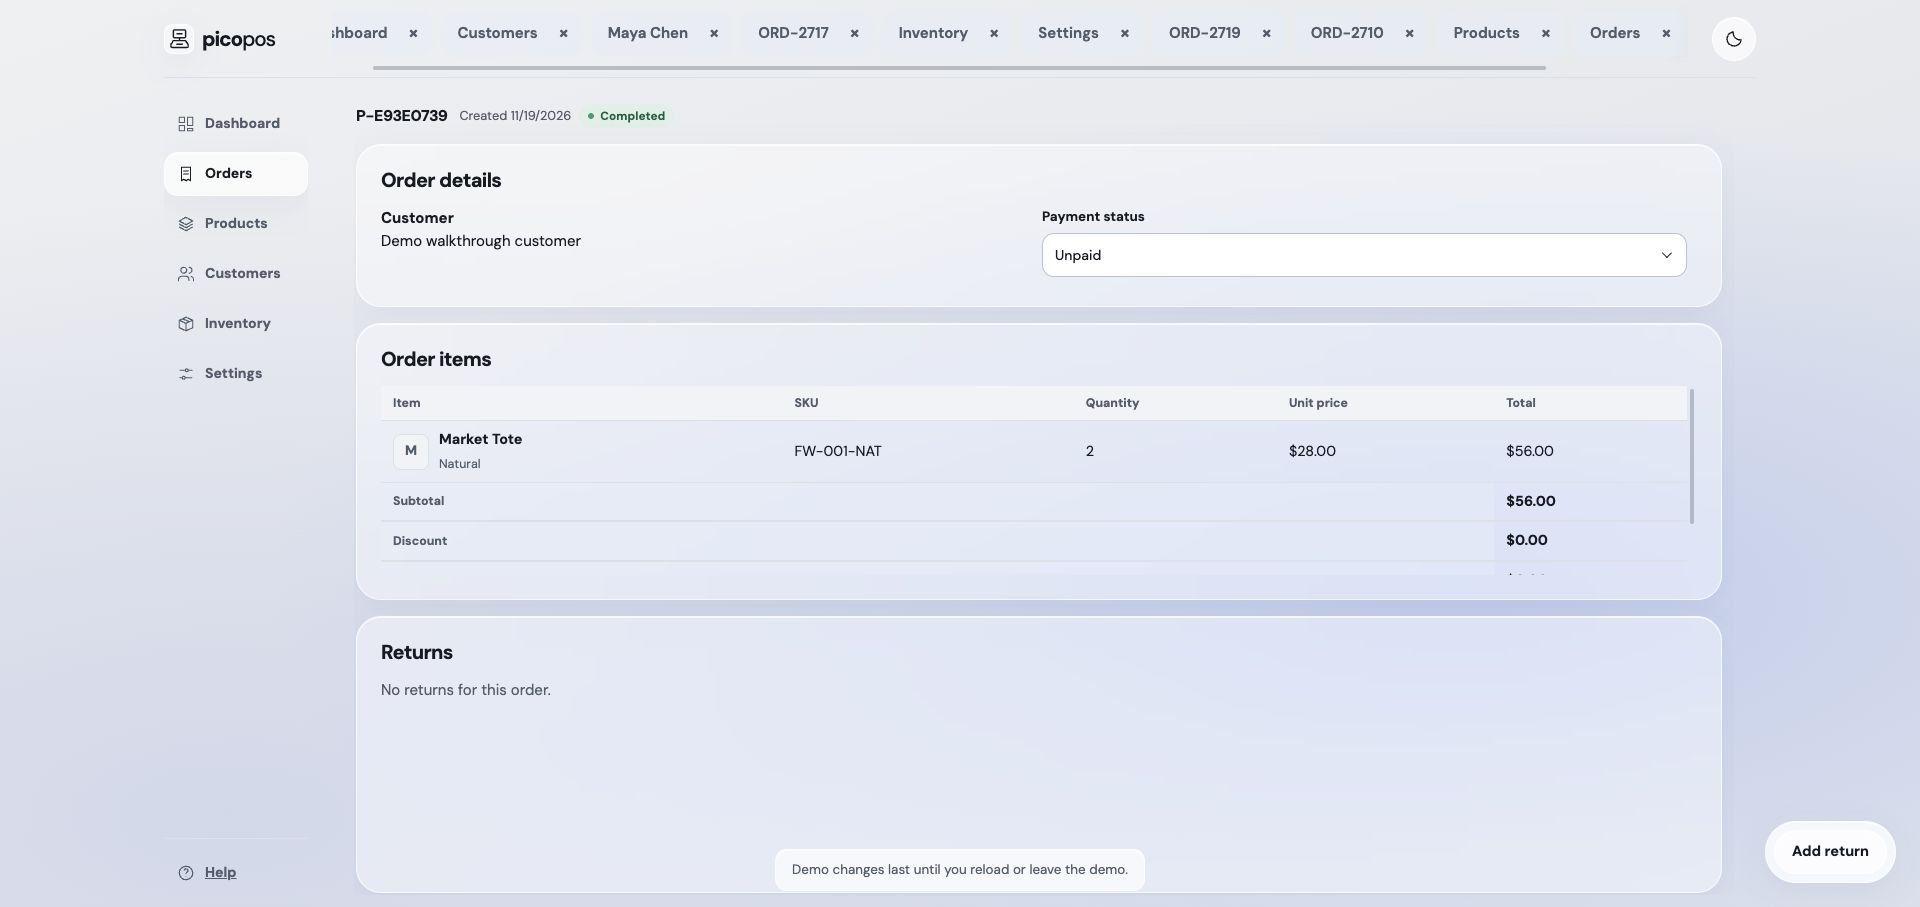
  4. Completed: select Mark completed after fulfilment. You can still record returned items.

    Completed: select Mark completed after fulfilment. You can still record returned items.
Watch & follow: Inspect payment and fulfilment separately

Payment choices record activity outside picopos. The app does not charge customers or send refunds.

Silent step-by-step video · pause at any point. Select a screenshot to enlarge it.

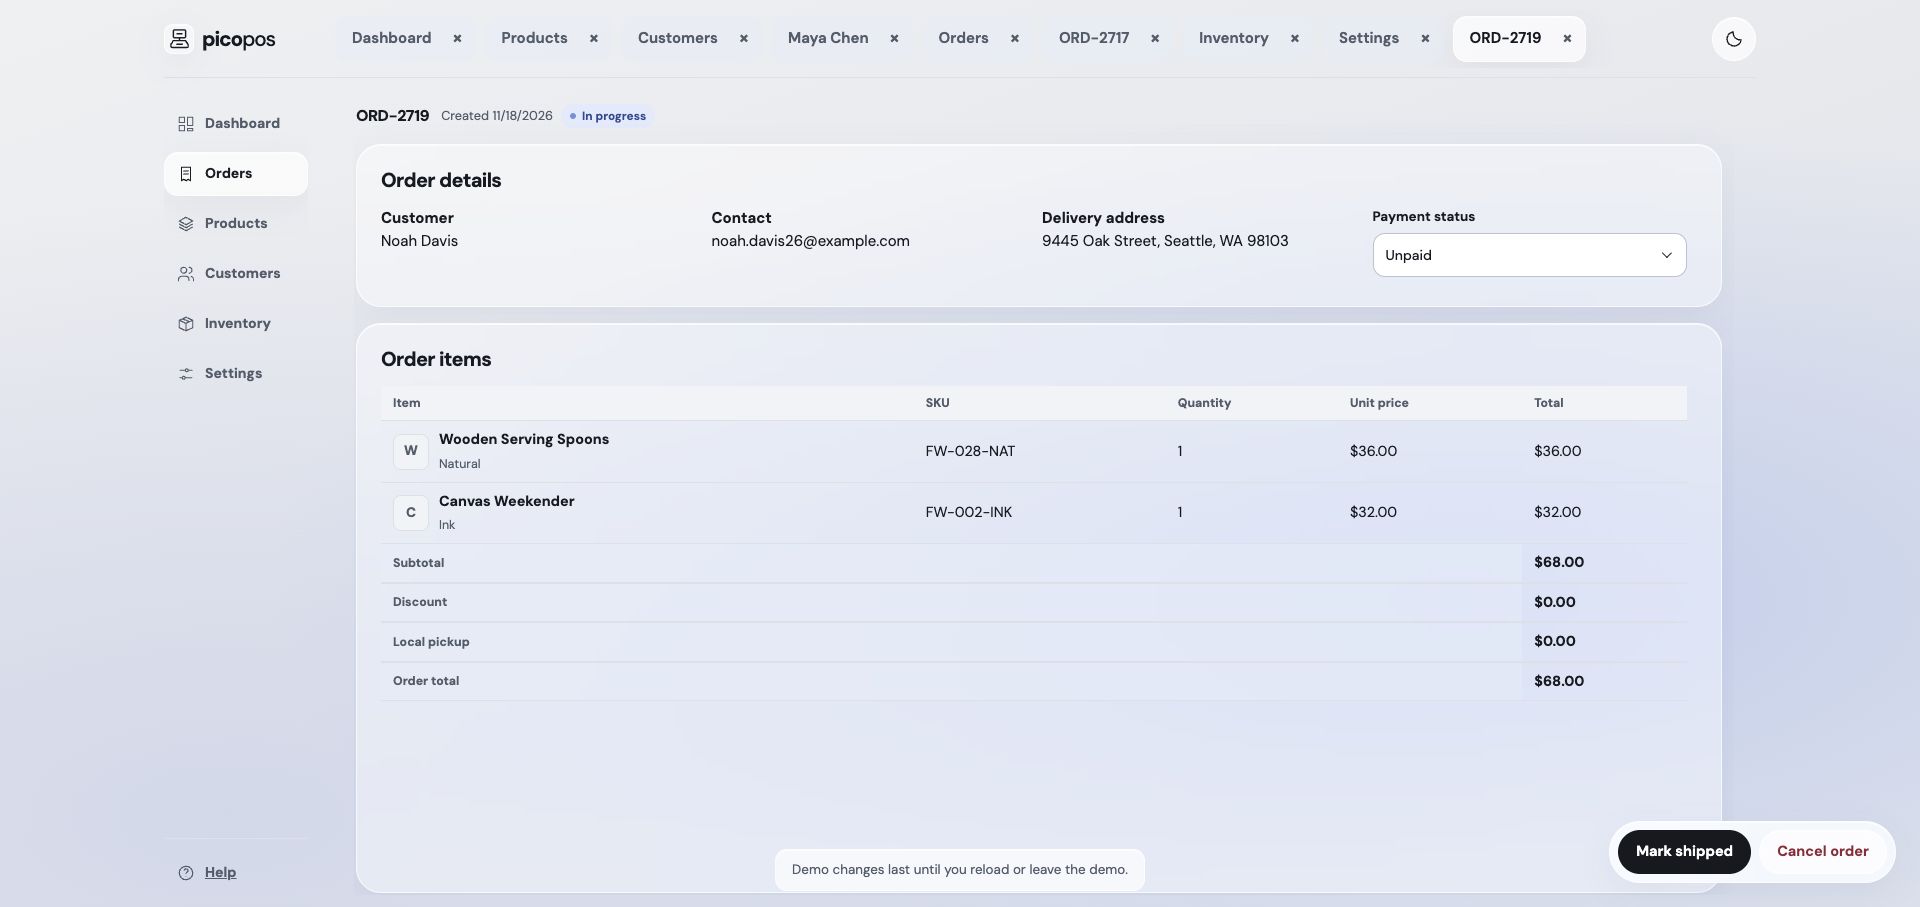
  1. An In progress order can remain Unpaid: fulfilment and payment are independent.

    An In progress order can remain Unpaid: fulfilment and payment are independent.
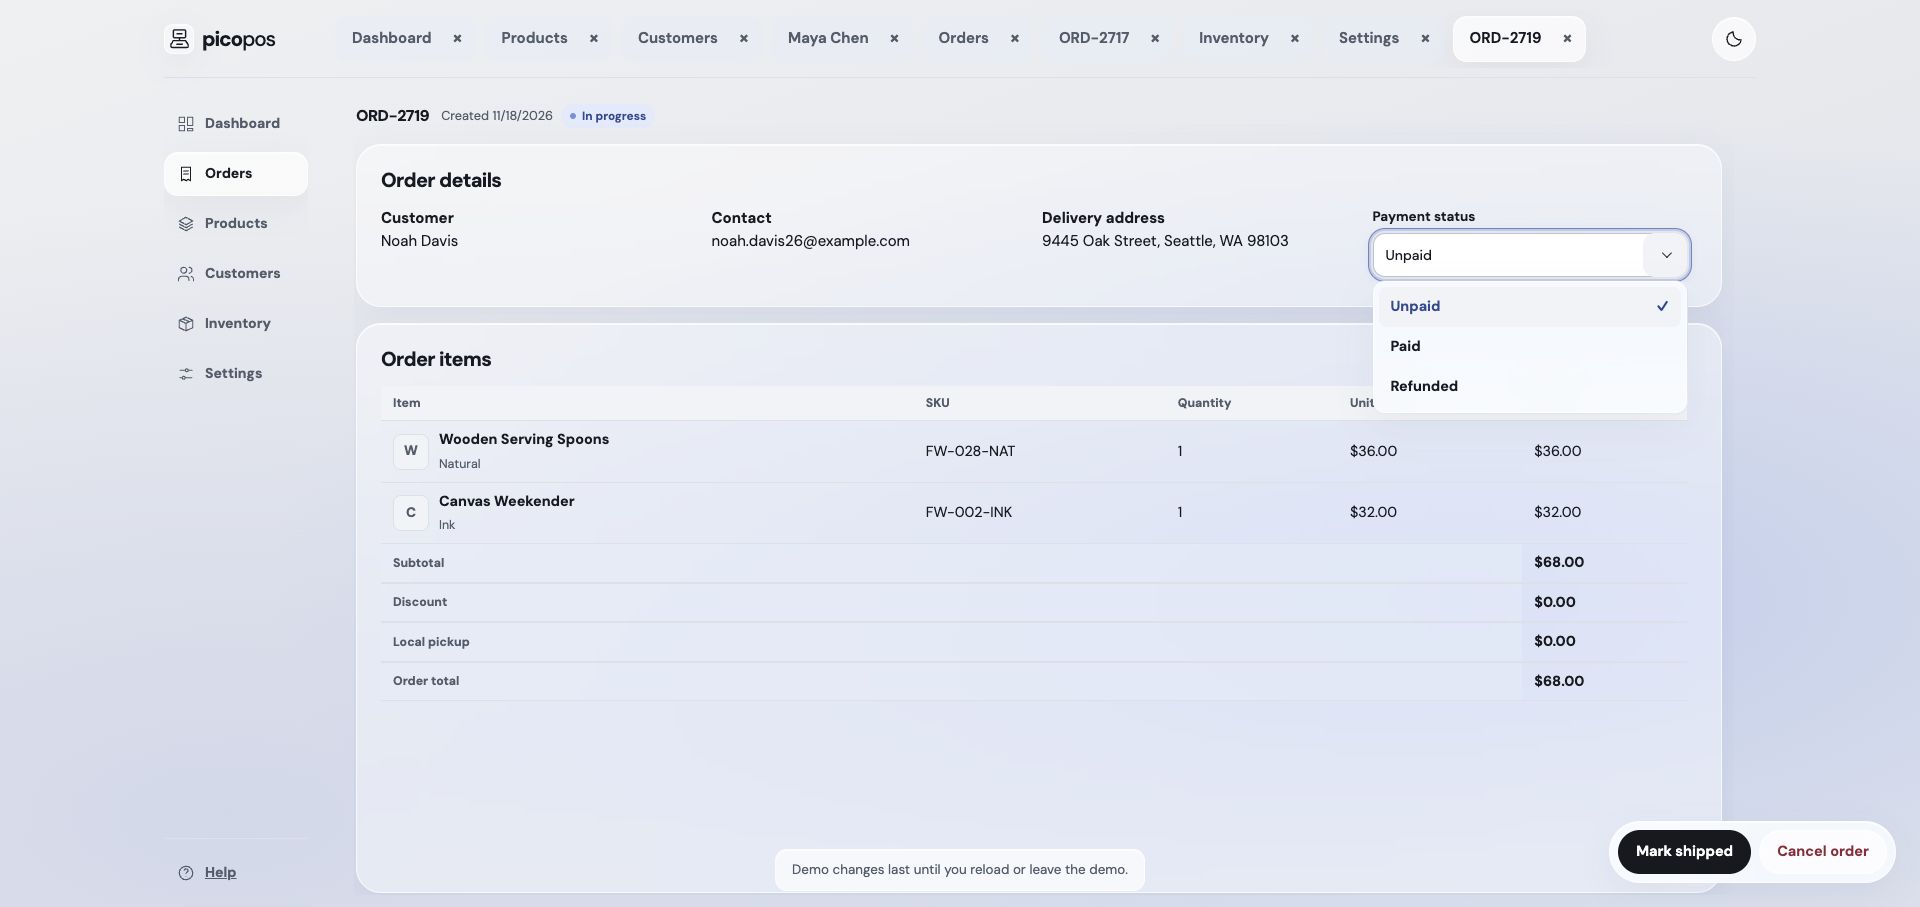
  2. Payment status offers Unpaid, Paid, and Refunded. Refunded orders are excluded from report sales.

    Payment status offers Unpaid, Paid, and Refunded. Refunded orders are excluded from report sales.
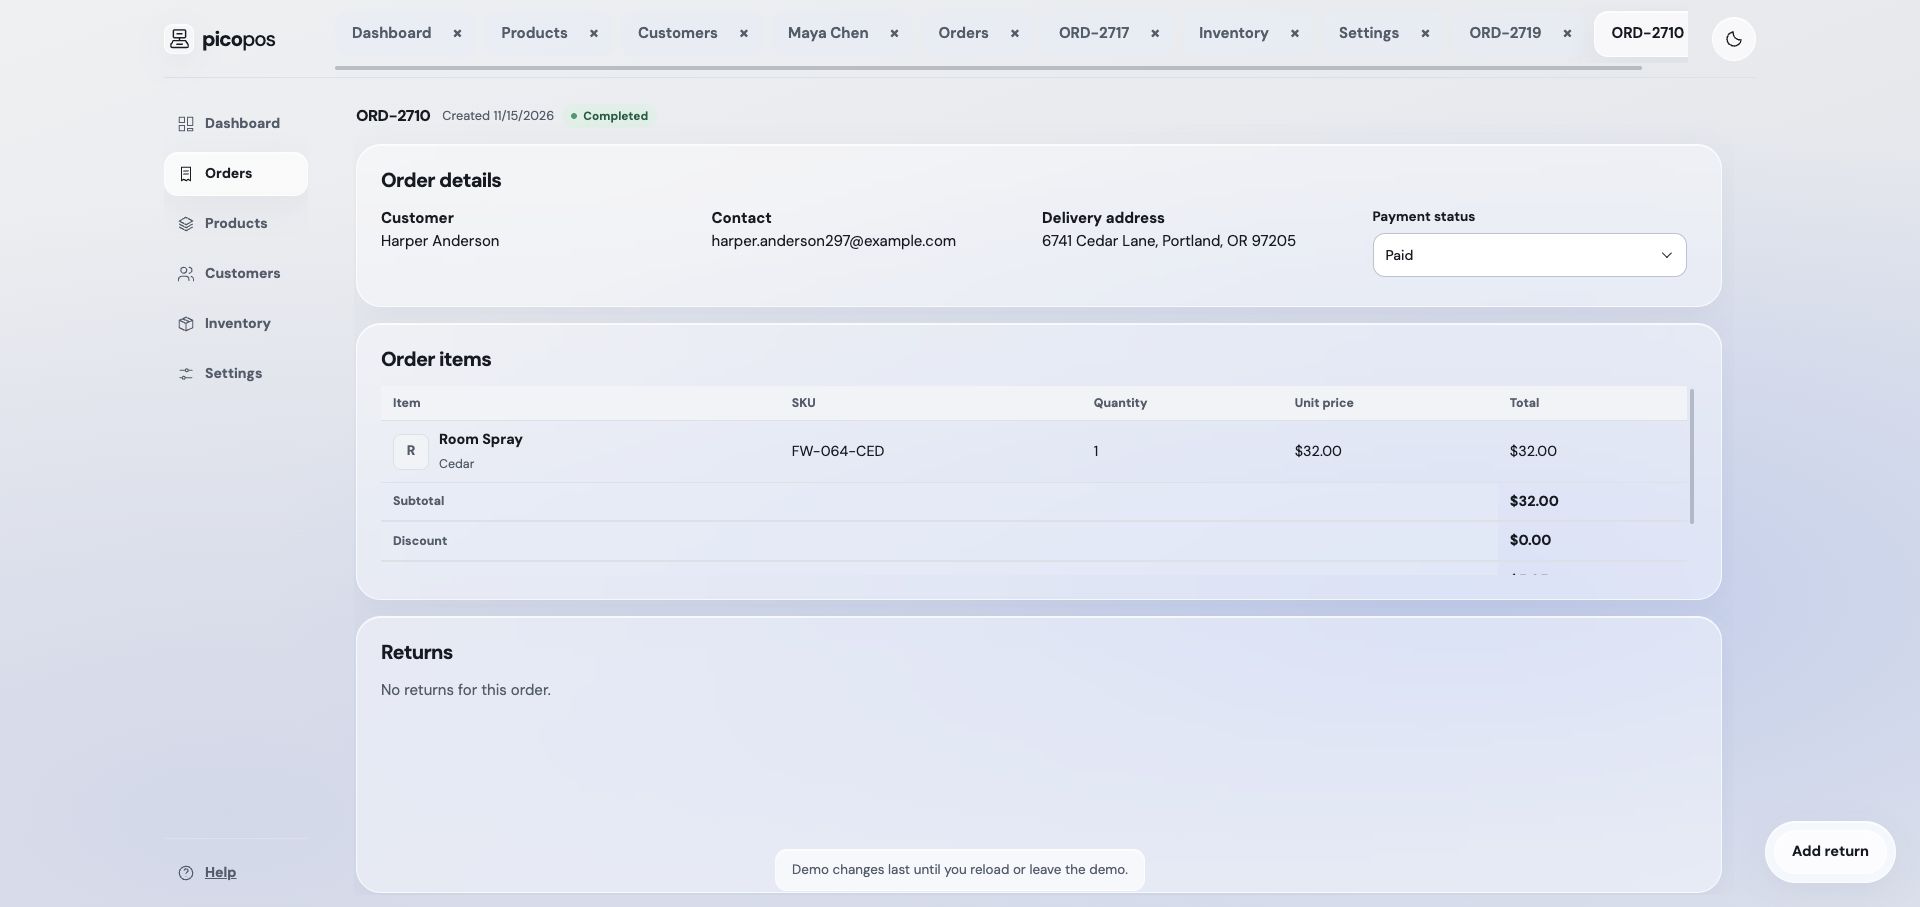
  3. A completed order retains its payment status, item details, totals, and returns section.

    A completed order retains its payment status, item details, totals, and returns section.

Returns

Record partial or full returns and distinguish sellable from damaged stock.

Open Orders
Request or receive a return
  1. Open a Shipped or Completed order and start a return.
  2. Choose the order item and the quantity being returned.
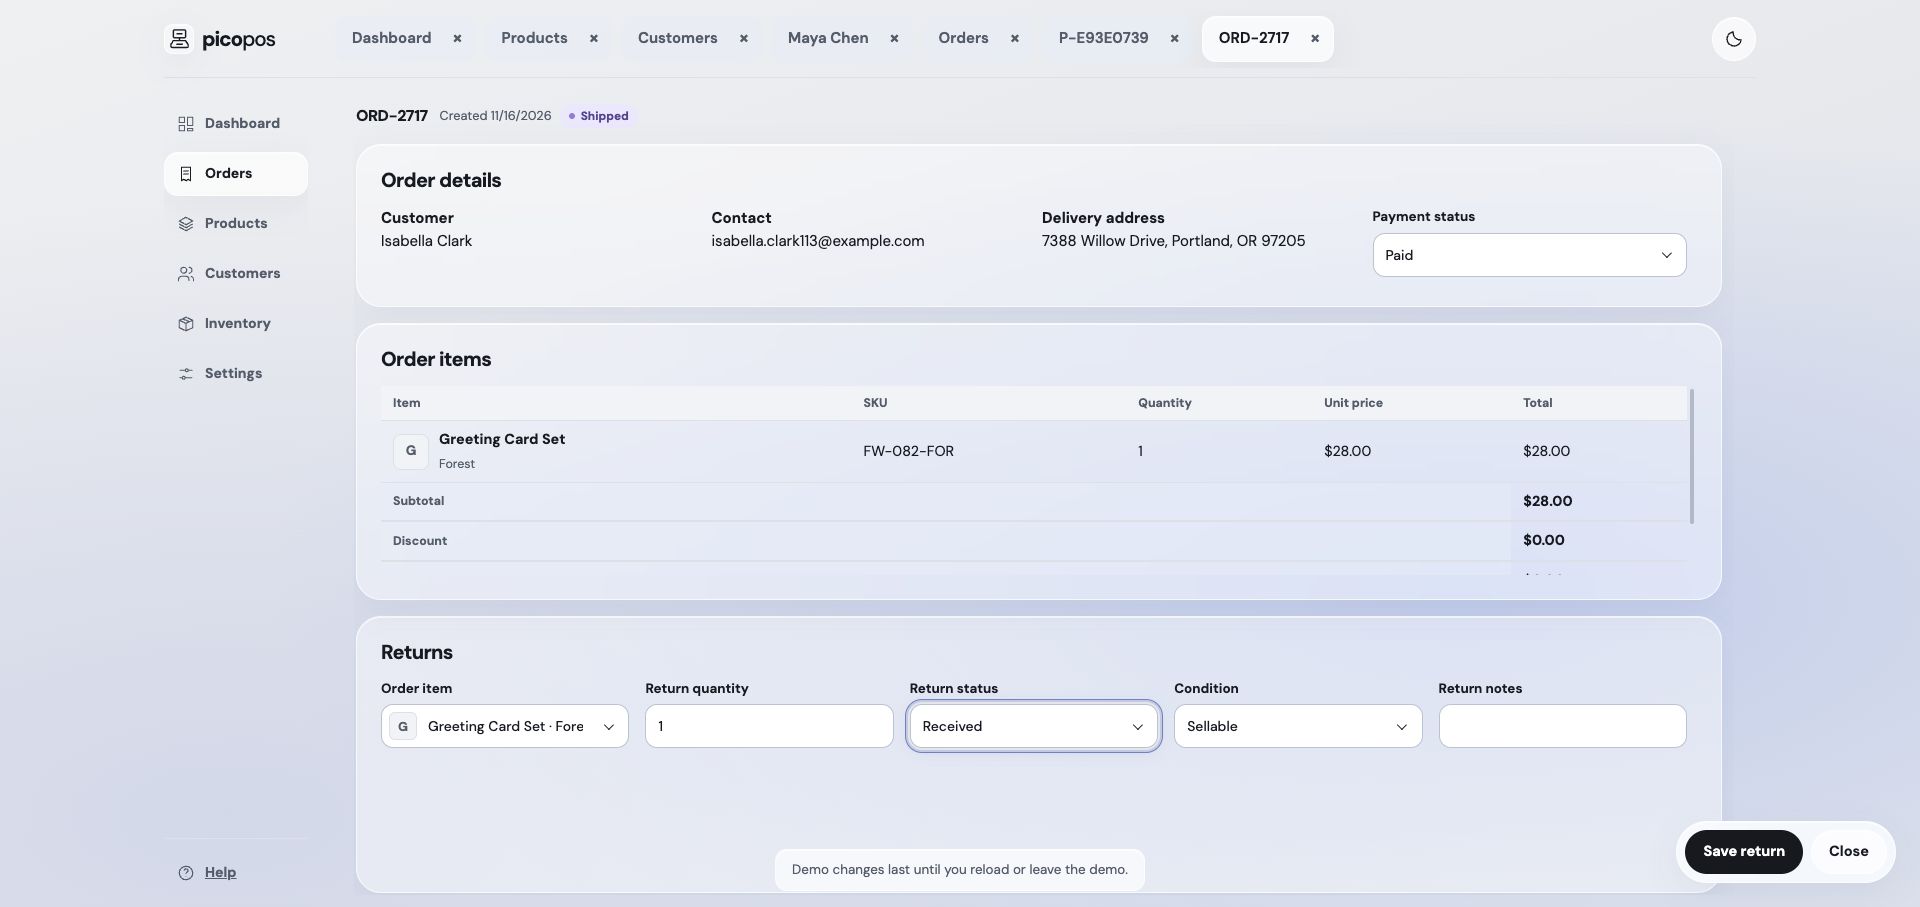
  3. Save it as Requested, or record it as Received with its condition when it has arrived.
  4. For a requested return, choose Sellable or Damaged and select Receive when the item comes back.

You can return part or all of an order item’s quantity. Combined requested and received returns cannot exceed the shipped quantity. Receipt records the date; received returns cannot be edited through the normal save flow.

What returns change

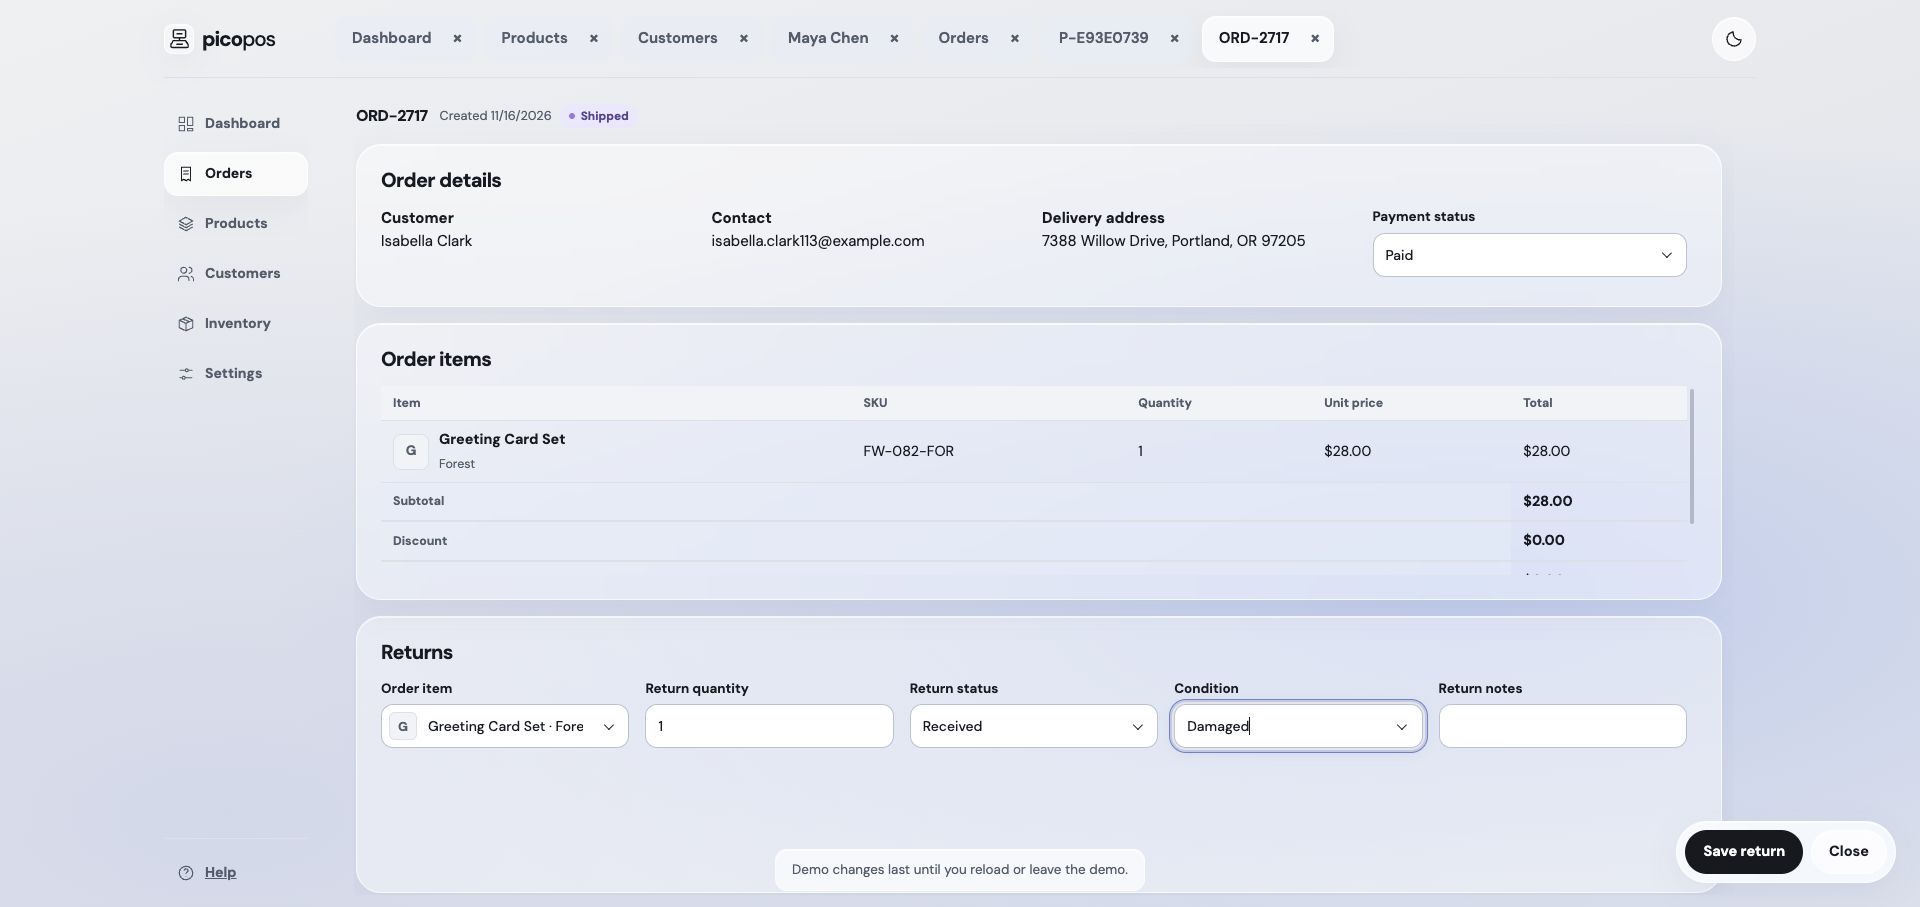
Requested returns do not move stock. A received Sellable return increases on-hand and available stock. A received Damaged return increases on-hand and unavailable stock, leaving available stock unchanged.

A stock return and a payment refund are separate records. Receiving a return does not automatically mark the order Refunded or subtract a partial refund from report sales.

Watch & follow: Request a partial return and inspect receipt conditions

The first two captures save a one-unit request against a two-unit demo order. The remaining captures illustrate receipt choices on another shipped demo order; receipt is not shown as completed.

Silent step-by-step video · pause at any point. Select a screenshot to enlarge it.

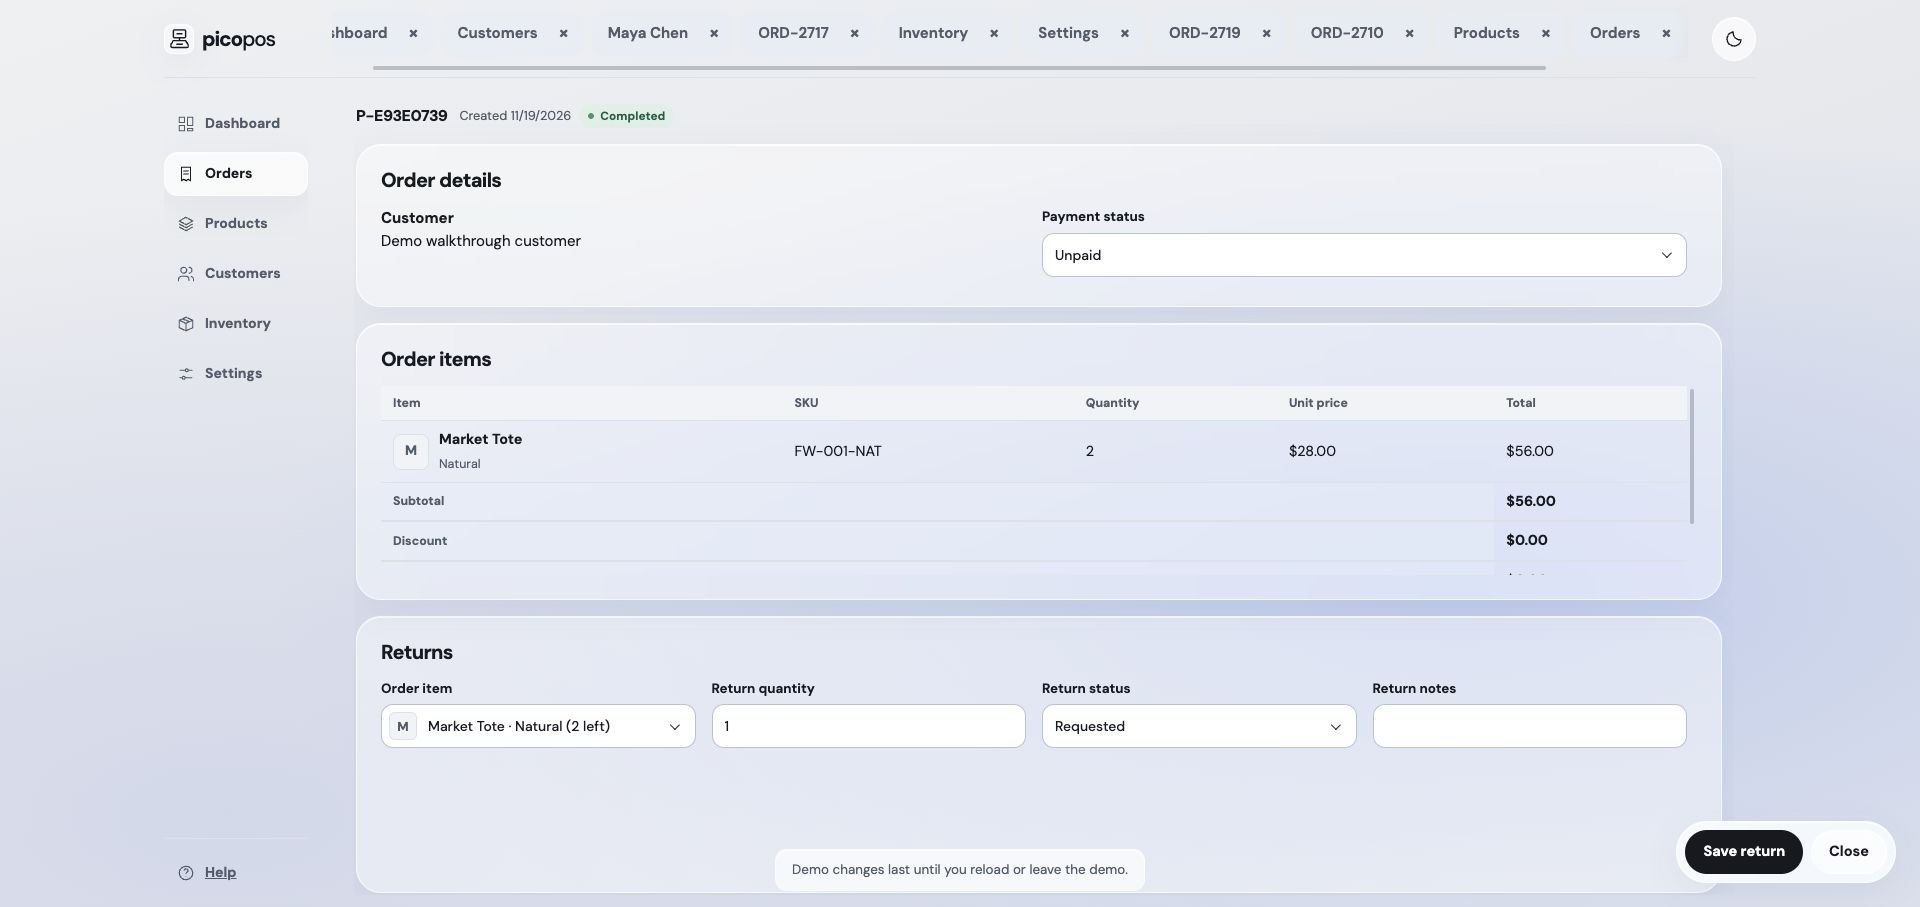
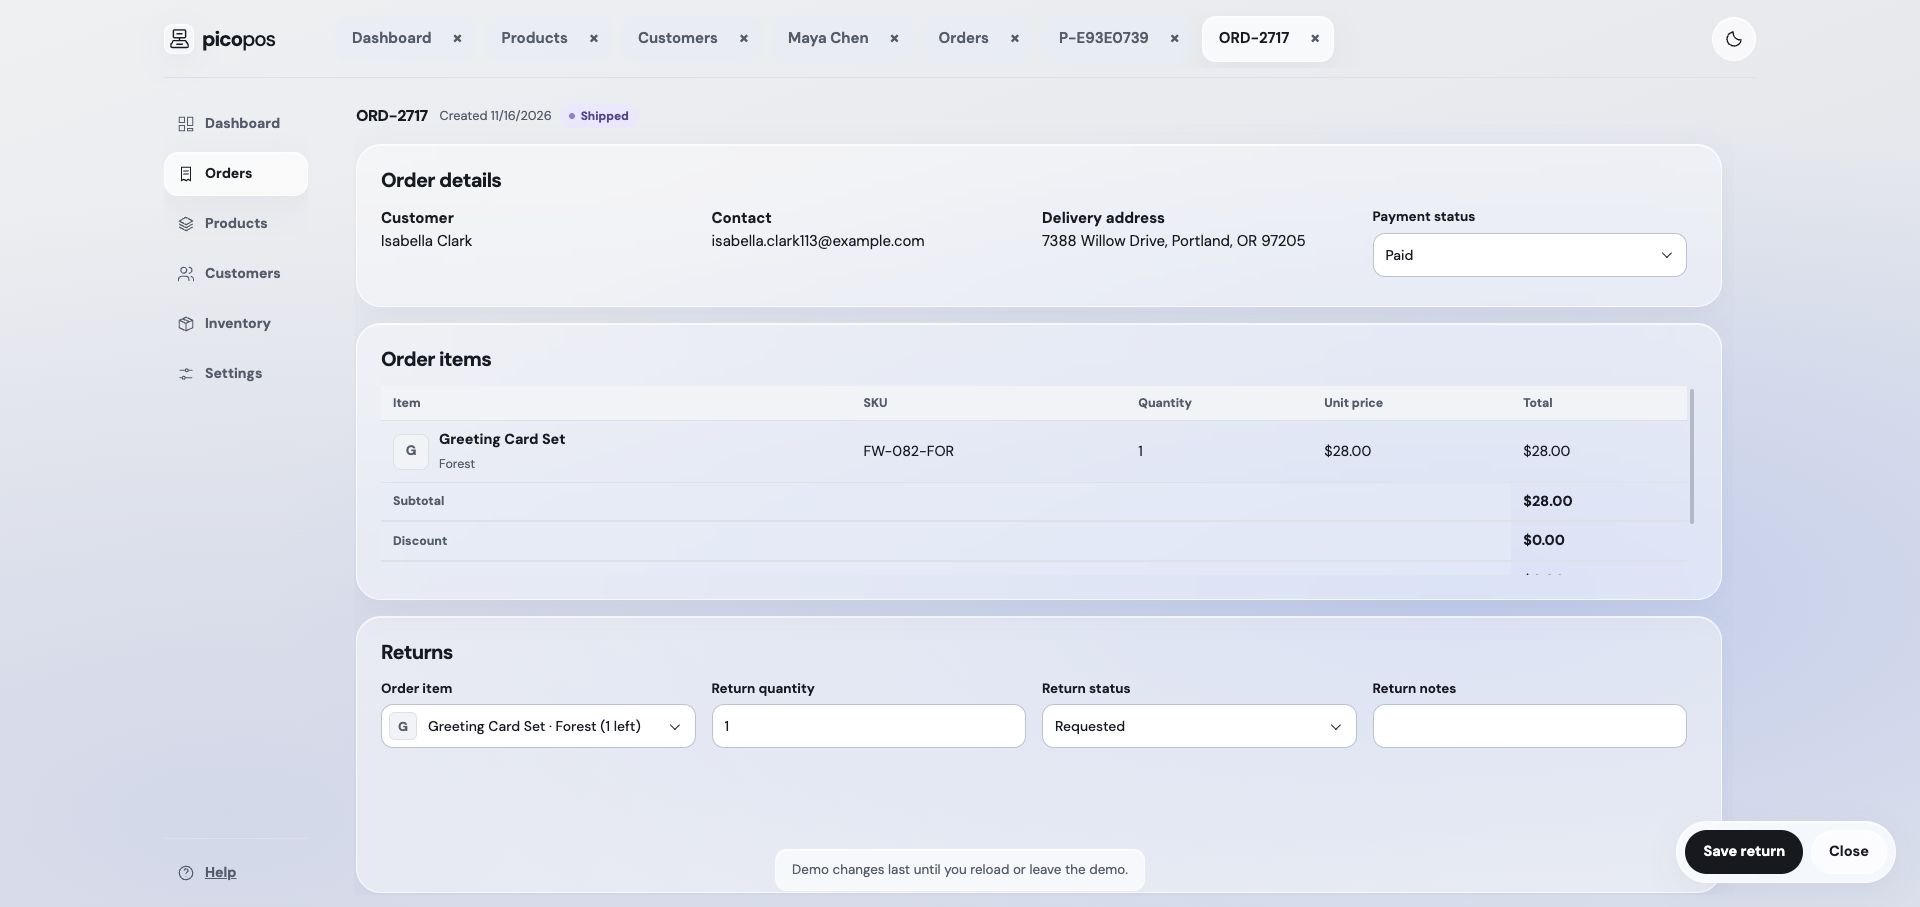
  1. From a Shipped or Completed order, select Add return, choose the item, and enter 1 of the 2 shipped units.

    From a Shipped or Completed order, select Add return, choose the item, and enter 1 of the 2 shipped units.
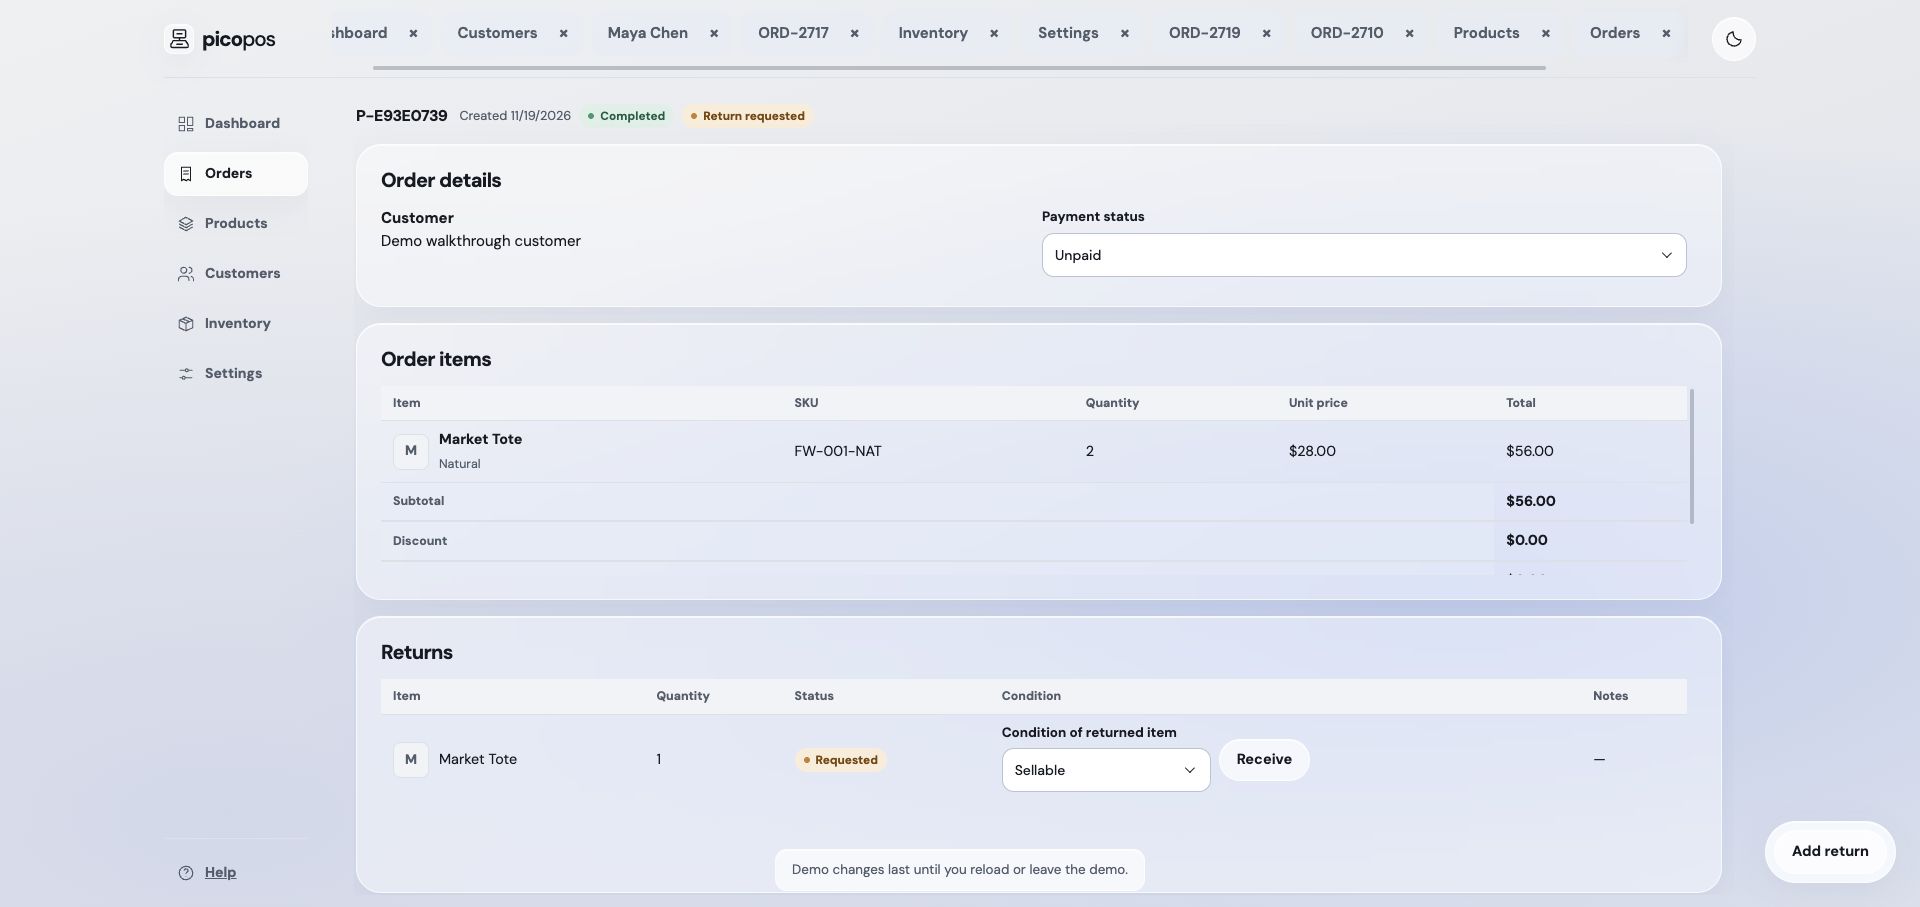
  2. Save as Requested. The return row offers a condition selector and Receive when the item arrives.

    Save as Requested. The return row offers a condition selector and Receive when the item arrives.
  3. A new return form can also start with Requested status.

    A new return form can also start with Requested status.
  4. Selecting Received reveals Condition. Sellable returns increase on-hand and available stock.

    Selecting Received reveals Condition. Sellable returns increase on-hand and available stock.
  5. Choose Damaged for an unsellable return. It increases on-hand and unavailable stock, not available stock.

    Choose Damaged for an unsellable return. It increases on-hand and unavailable stock, not available stock.

Inventory & purchase lots

Track stock balances, receipts, condition changes, and purchasing costs.

Open Inventory
Read stock balances

Inventory has Stock, Stock entries, and Purchase lots views. Search by product or SKU to find a variant. The stock summary covers all variants.

On hand is physical stock remaining after shipments and received returns. Reserved is held by In progress orders. Unavailable is stock that cannot be sold. Available = on hand − reserved − unavailable.

Record stock movements
  1. Choose the add-stock-entry action, either globally or beside a variant.
  2. Select the variant, entry type, and positive whole-number quantity. For an Adjustment, choose whether to add or remove on-hand stock.
  3. Optionally select a purchase lot and enter notes.
  4. Review the After this entry balance preview and save.

Opening stock establishes starting quantities. Receipt adds a delivery. Adjustment corrects a count. Damaged moves units into unavailable stock; Restocked moves them back to sellable stock. The app rejects changes that make physical or unavailable balances inconsistent.

Create and reconcile purchase lots

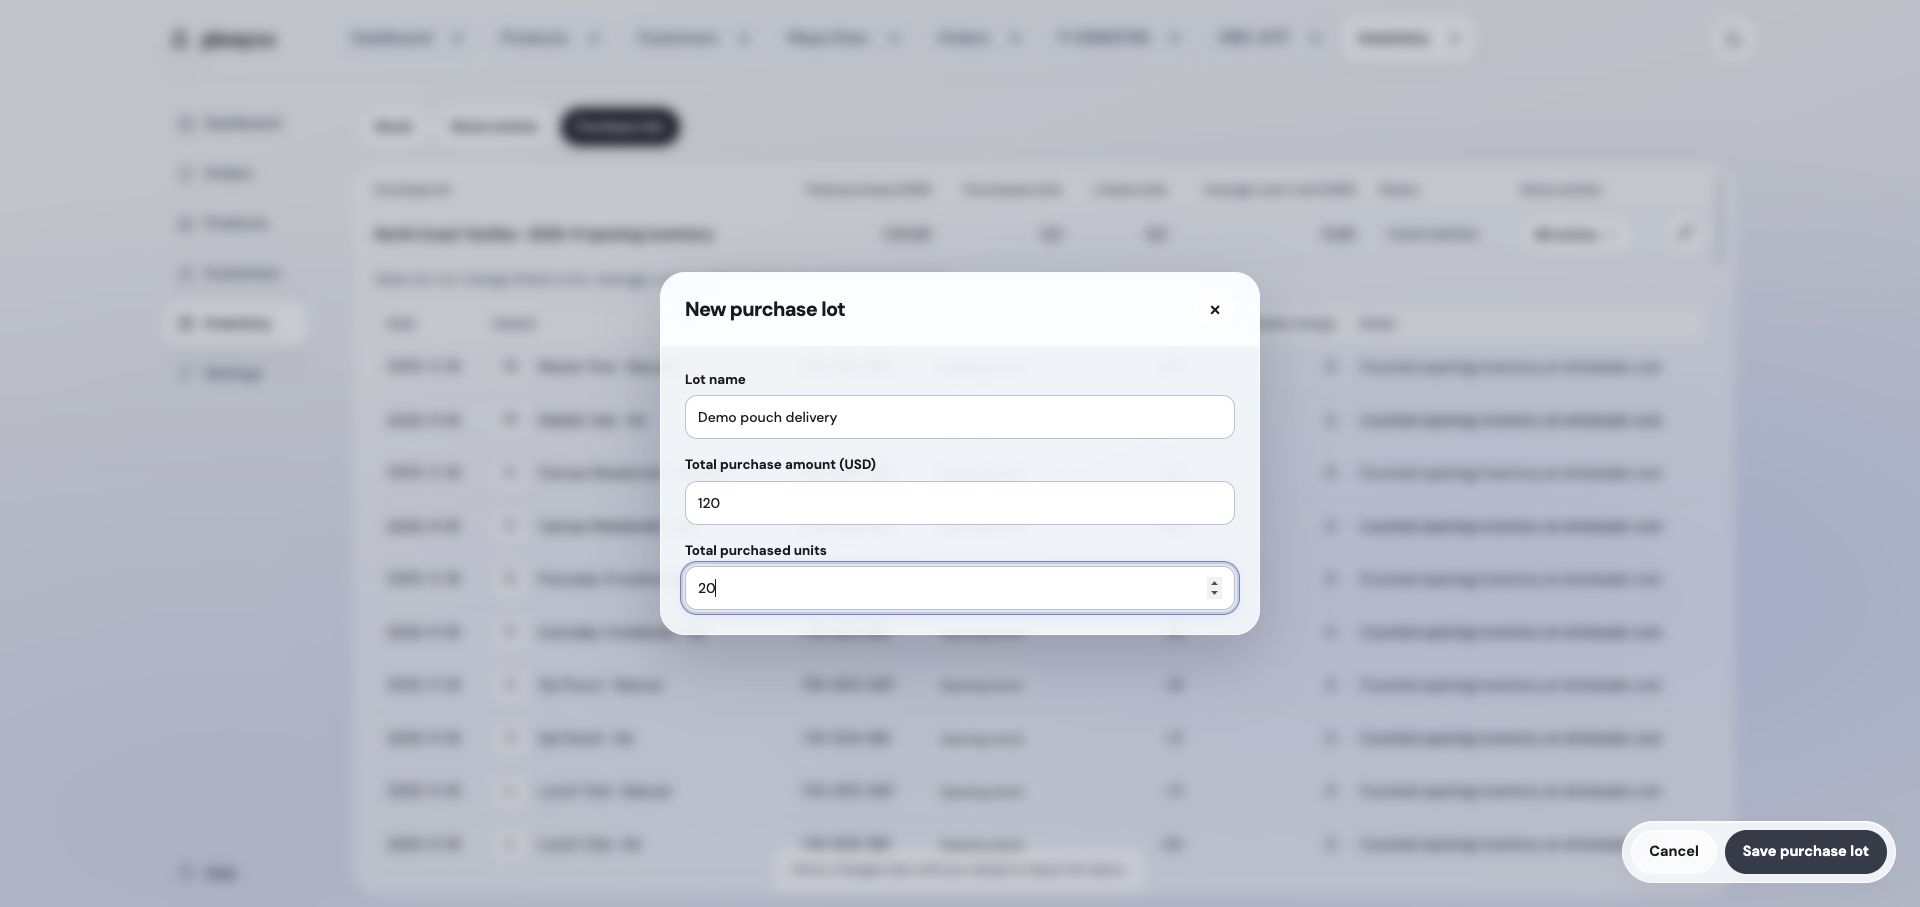
In Purchase lots, create a lot with its name, total purchase amount, and total purchased units. Creating the lot alone does not add stock: record stock entries linked to it.

Expand a lot to inspect linked products and stock entries. Compare linked units with declared purchased units and review any difference. Sales do not reduce linked purchase quantities. Signed stock corrections can change the linked-unit total.

Use the purchase-lot action on a stock entry to change or clear its link. A lot’s average unit cost is total amount ÷ total units. Positive linked opening stock and receipts supply the Dashboard’s cost estimates.

Low stock and inventory issues

The Dashboard highlights active variants with five or fewer available units. Use View stock to inspect them and record replenishment as a receipt.

If a balance warning appears after sync, review stock entries, reservations, and returns. Simultaneous edits from different devices can over-reserve stock. Correct the underlying record or enter a justified stock adjustment instead of hiding the warning.

Watch & follow: Read balances and preview every stock movement

These are unsaved previews for FW-001-NAT. Always check the resulting balances before saving.

Silent step-by-step video · pause at any point. Select a screenshot to enlarge it.

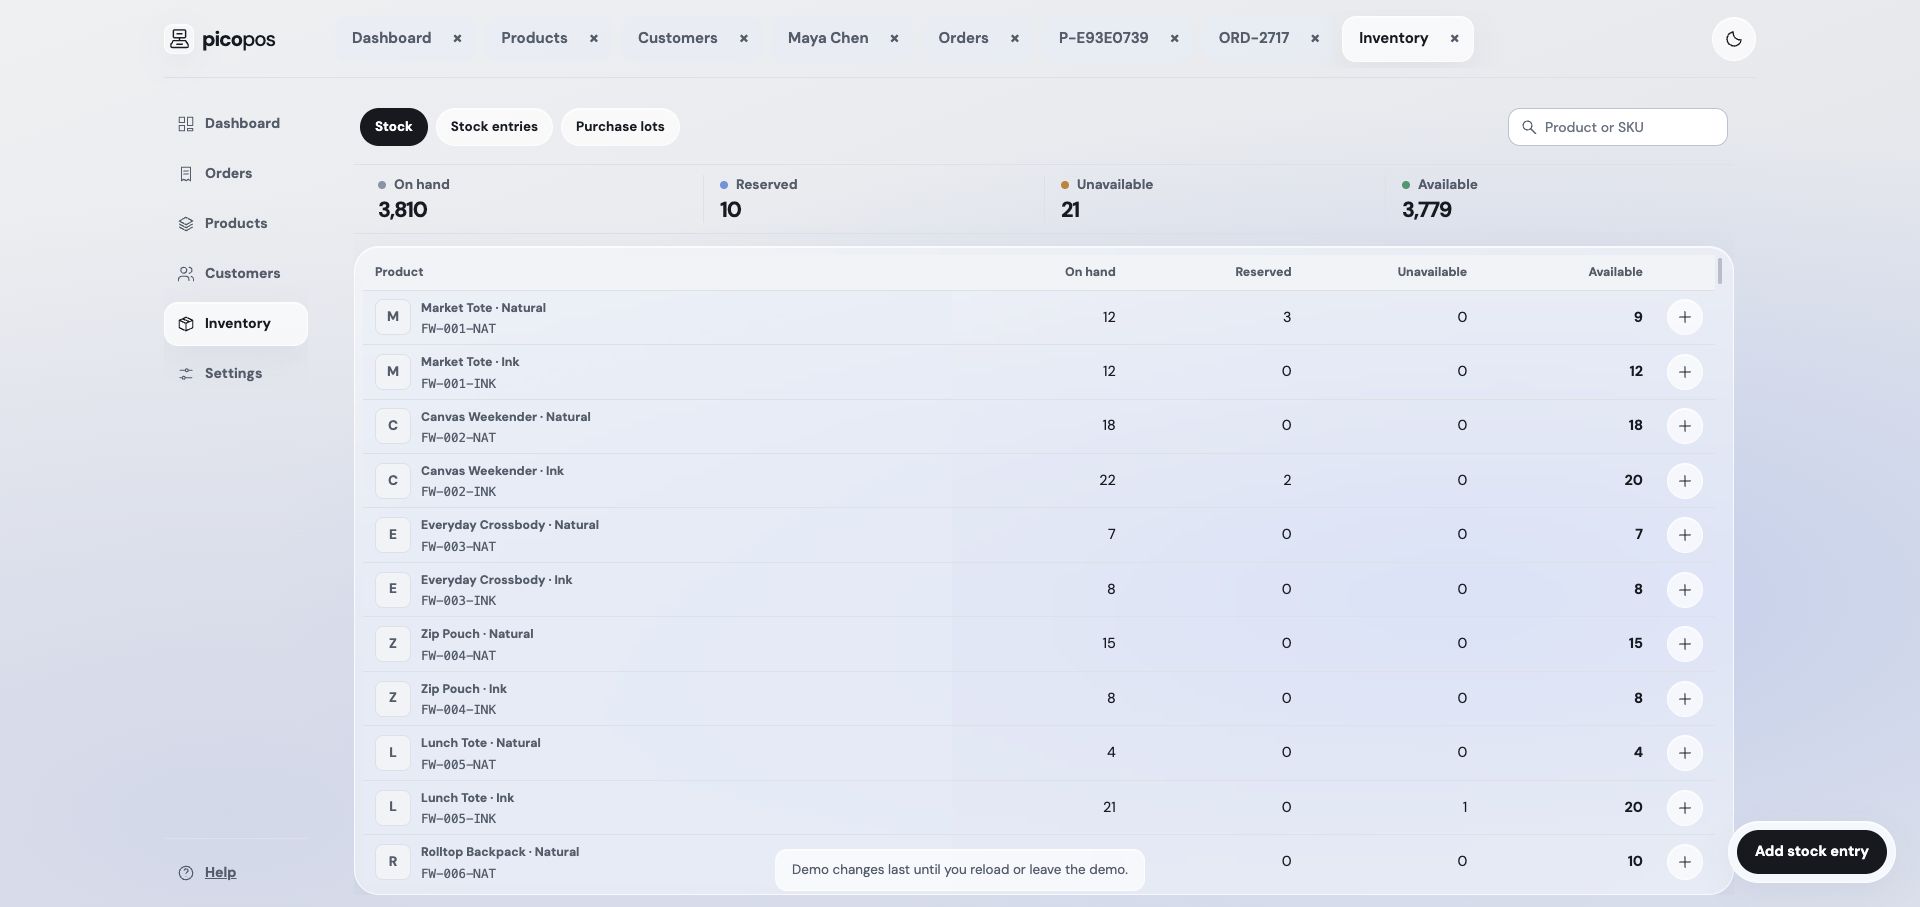
  1. Inventory summarizes on-hand, reserved, unavailable, and available quantities.

    Inventory summarizes on-hand, reserved, unavailable, and available quantities.
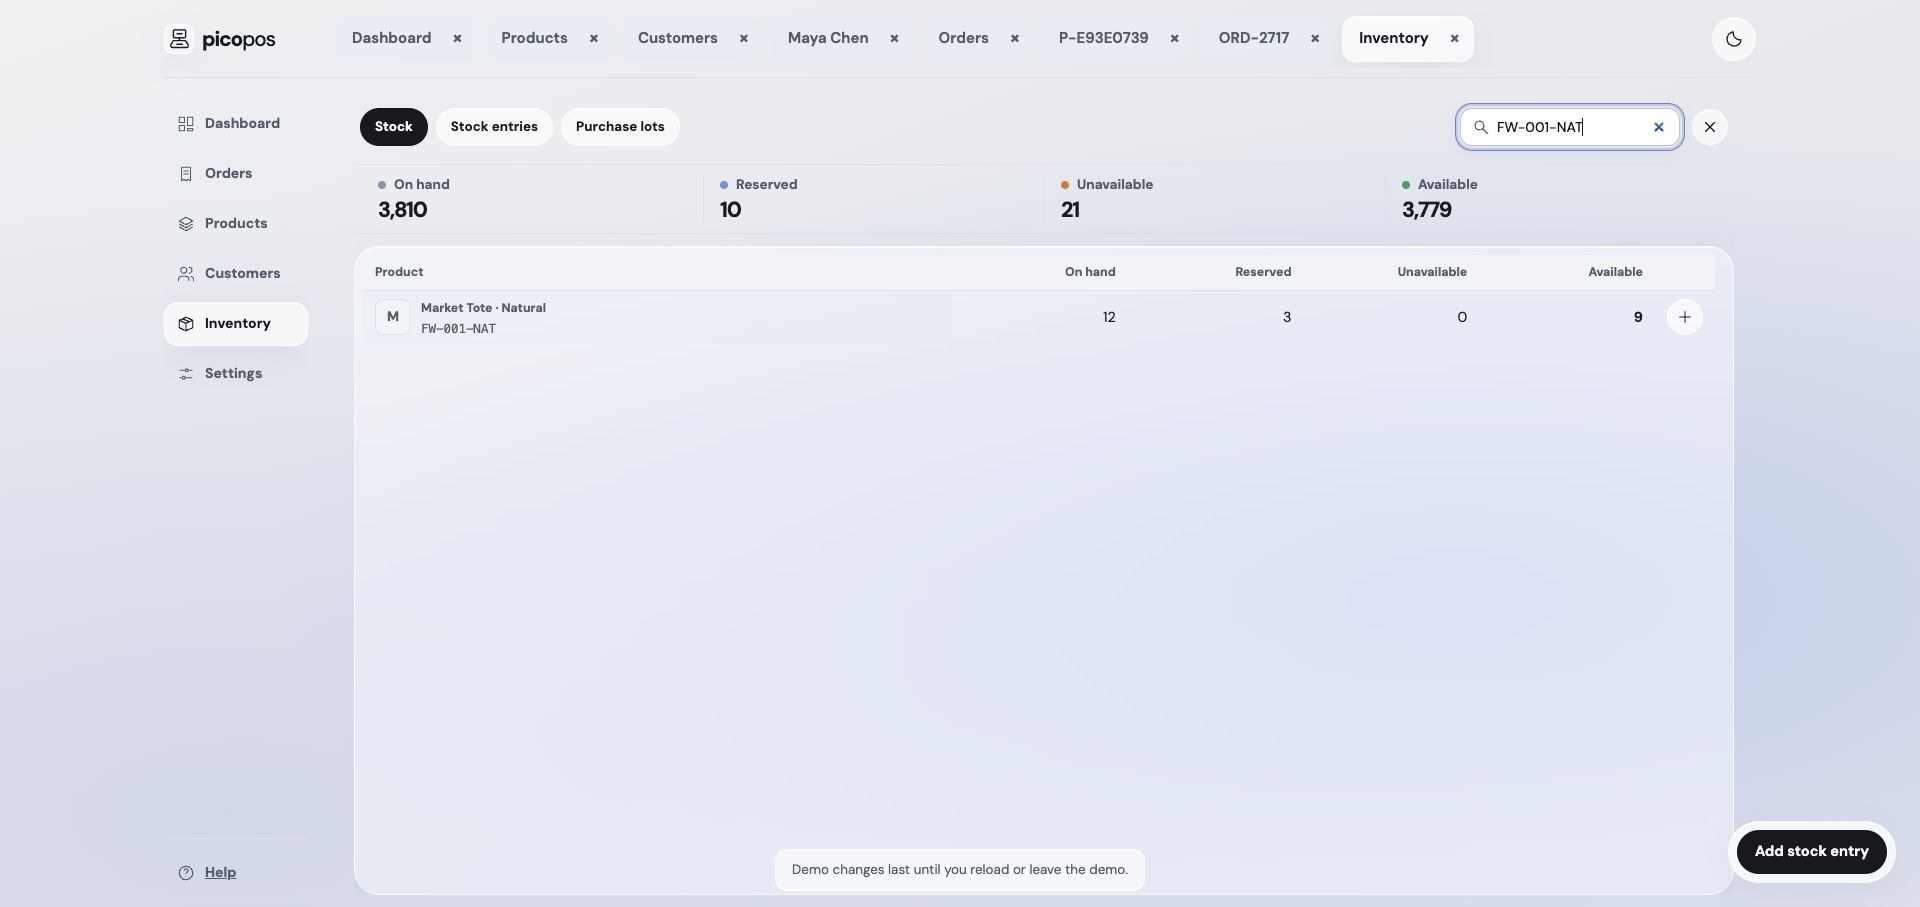
  2. Search for FW-001-NAT, then choose its Add stock entry action.

    Search for FW-001-NAT, then choose its Add stock entry action.
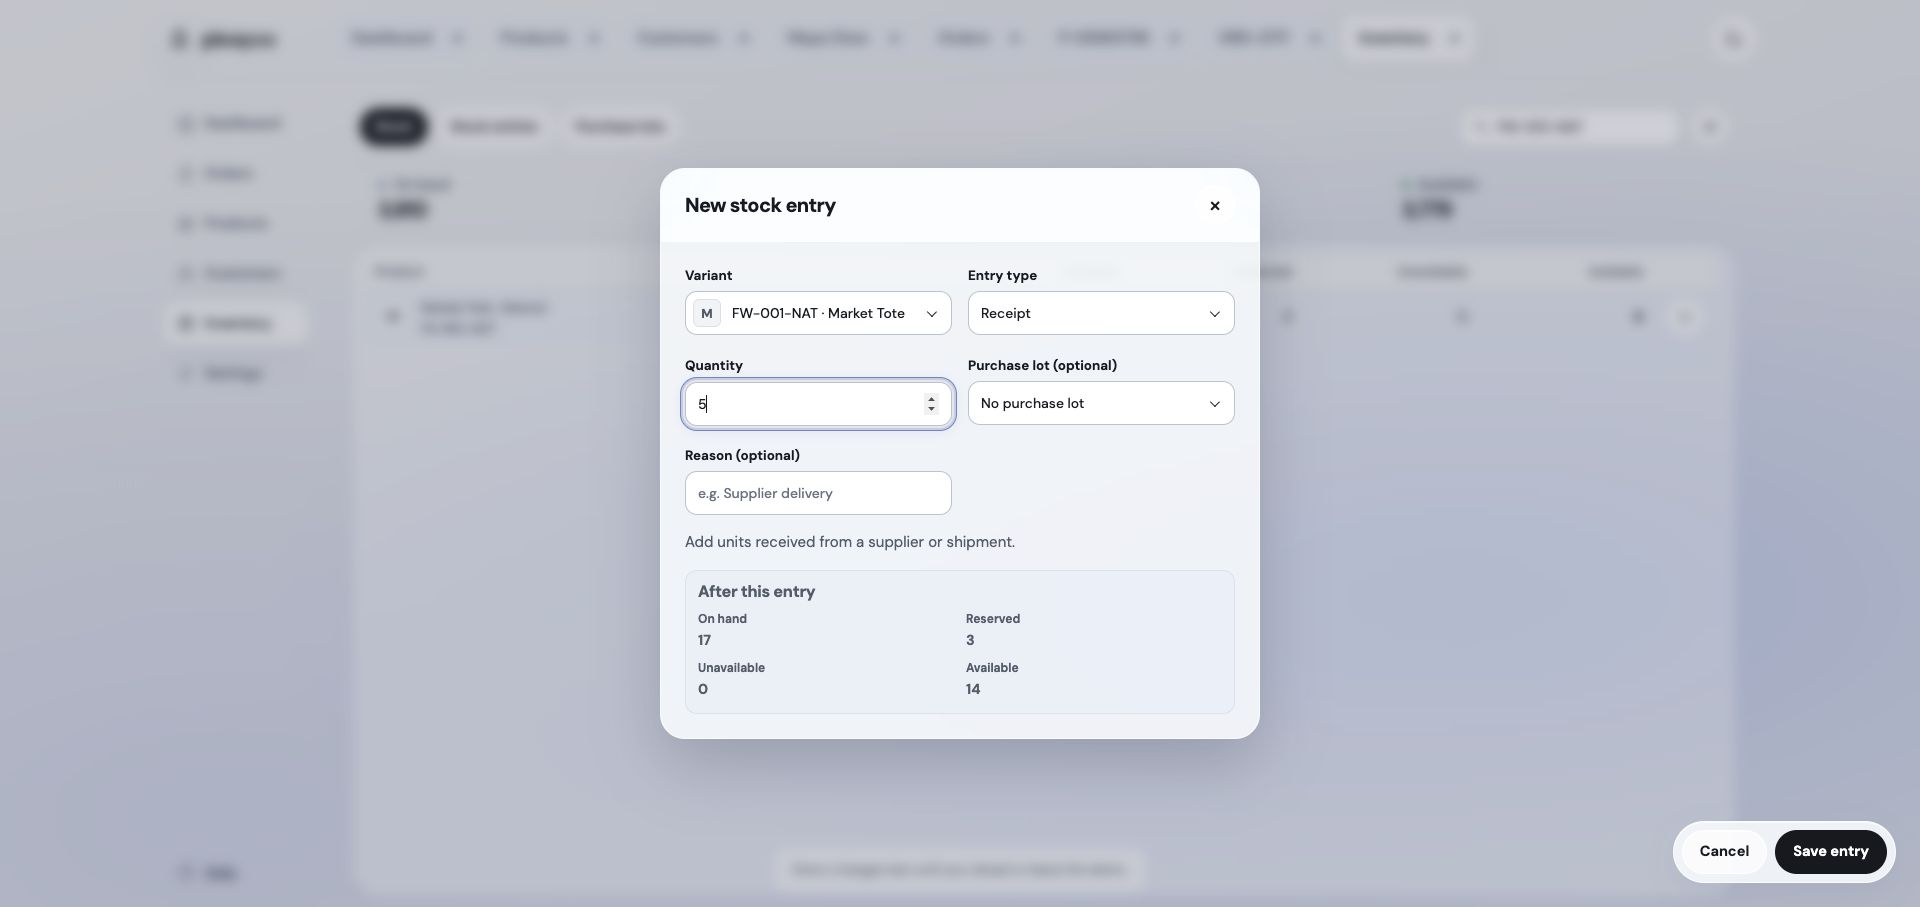
  3. Receipt with quantity 5 previews adding five delivered units.

    Receipt with quantity 5 previews adding five delivered units.
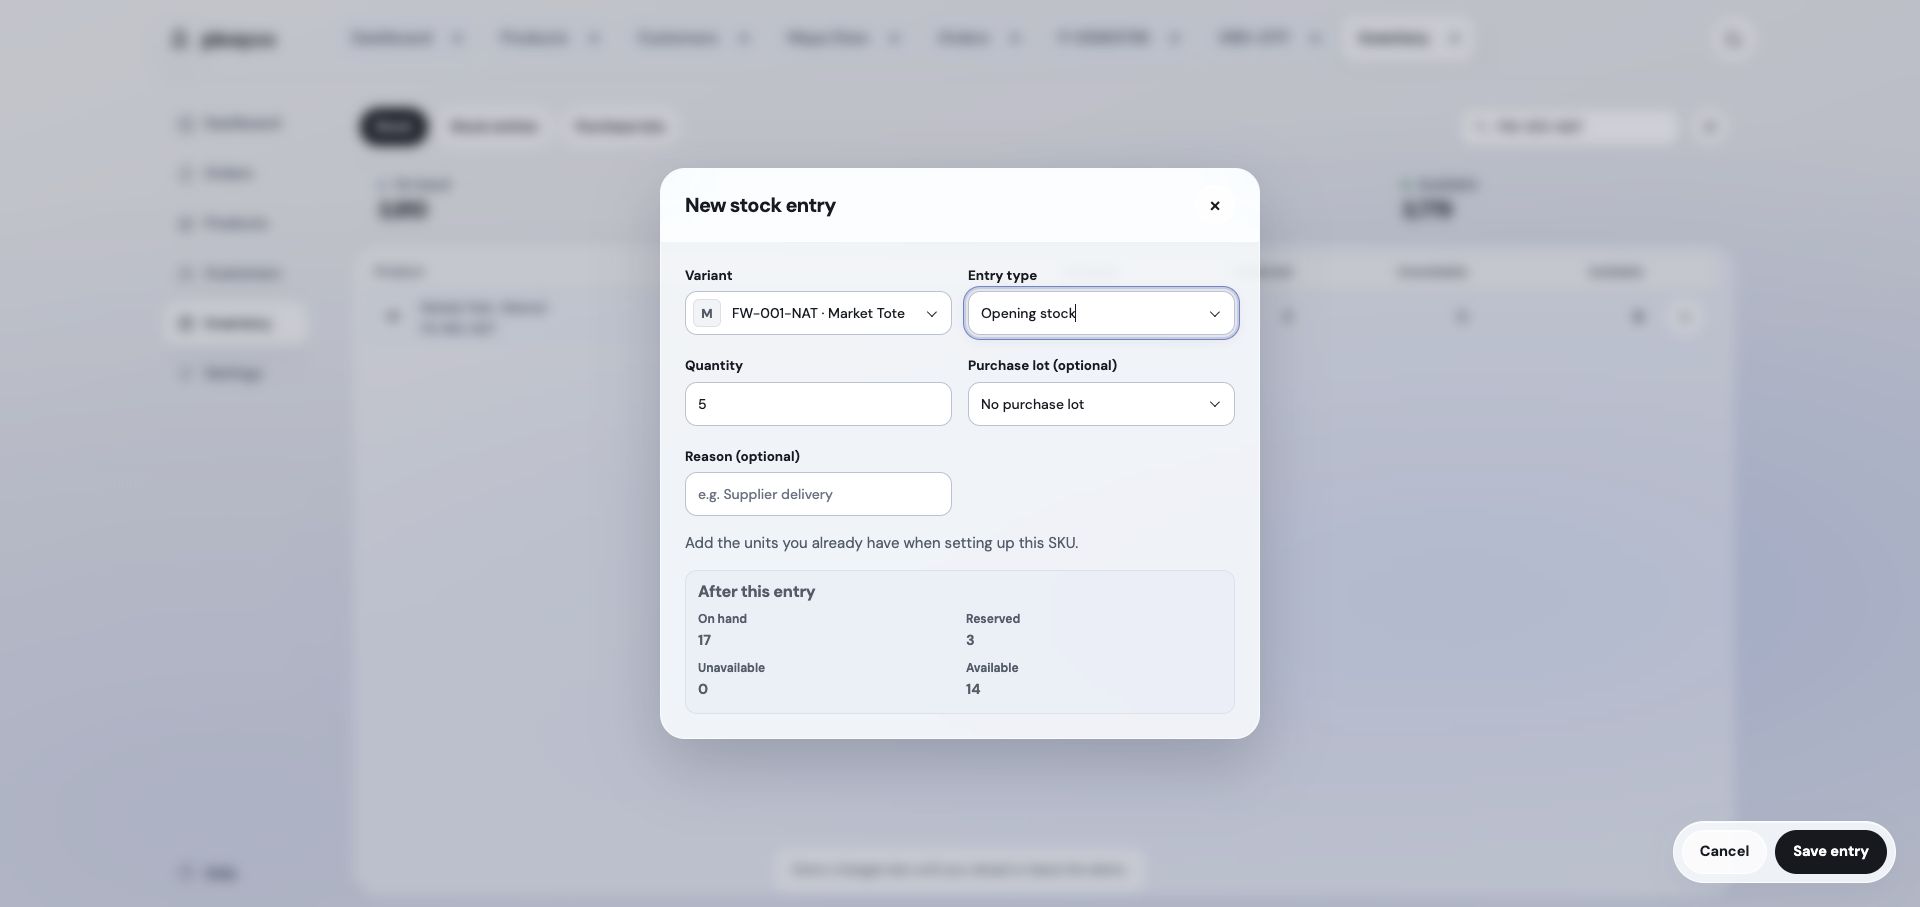
  4. Opening stock establishes an initial quantity. Use it for starting balances.

    Opening stock establishes an initial quantity. Use it for starting balances.
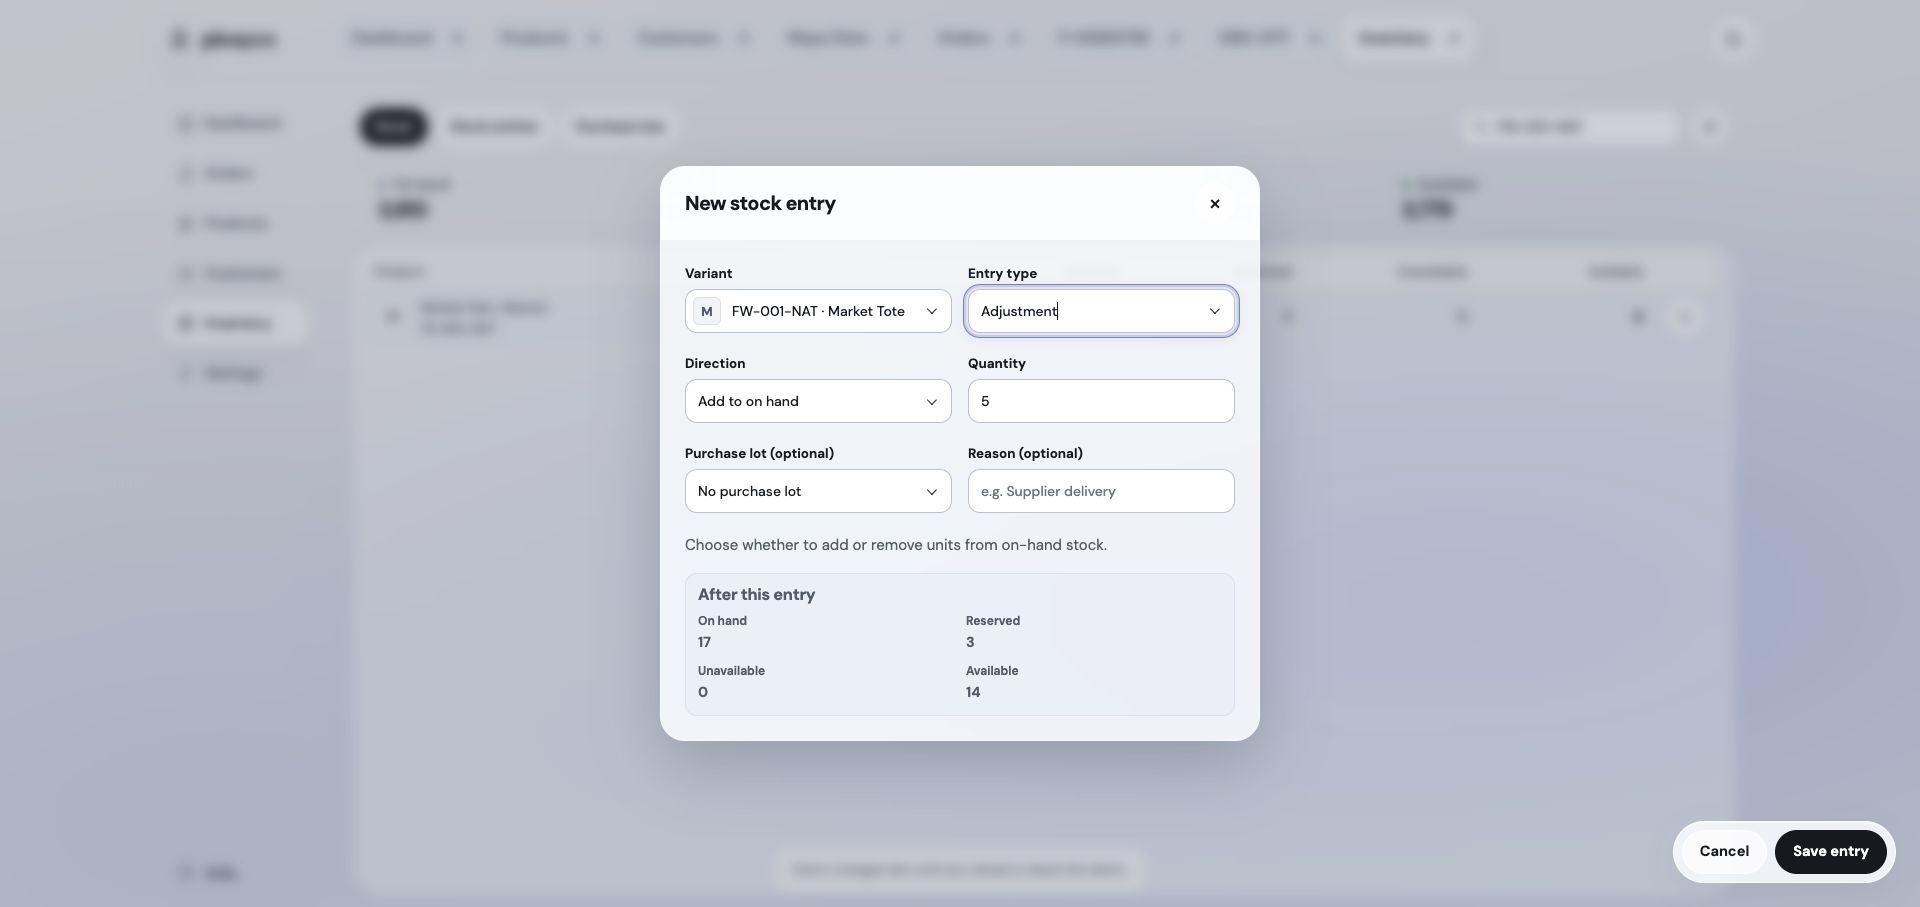
  5. Adjustment exposes a Direction field so you can add or remove on-hand stock.

    Adjustment exposes a Direction field so you can add or remove on-hand stock.
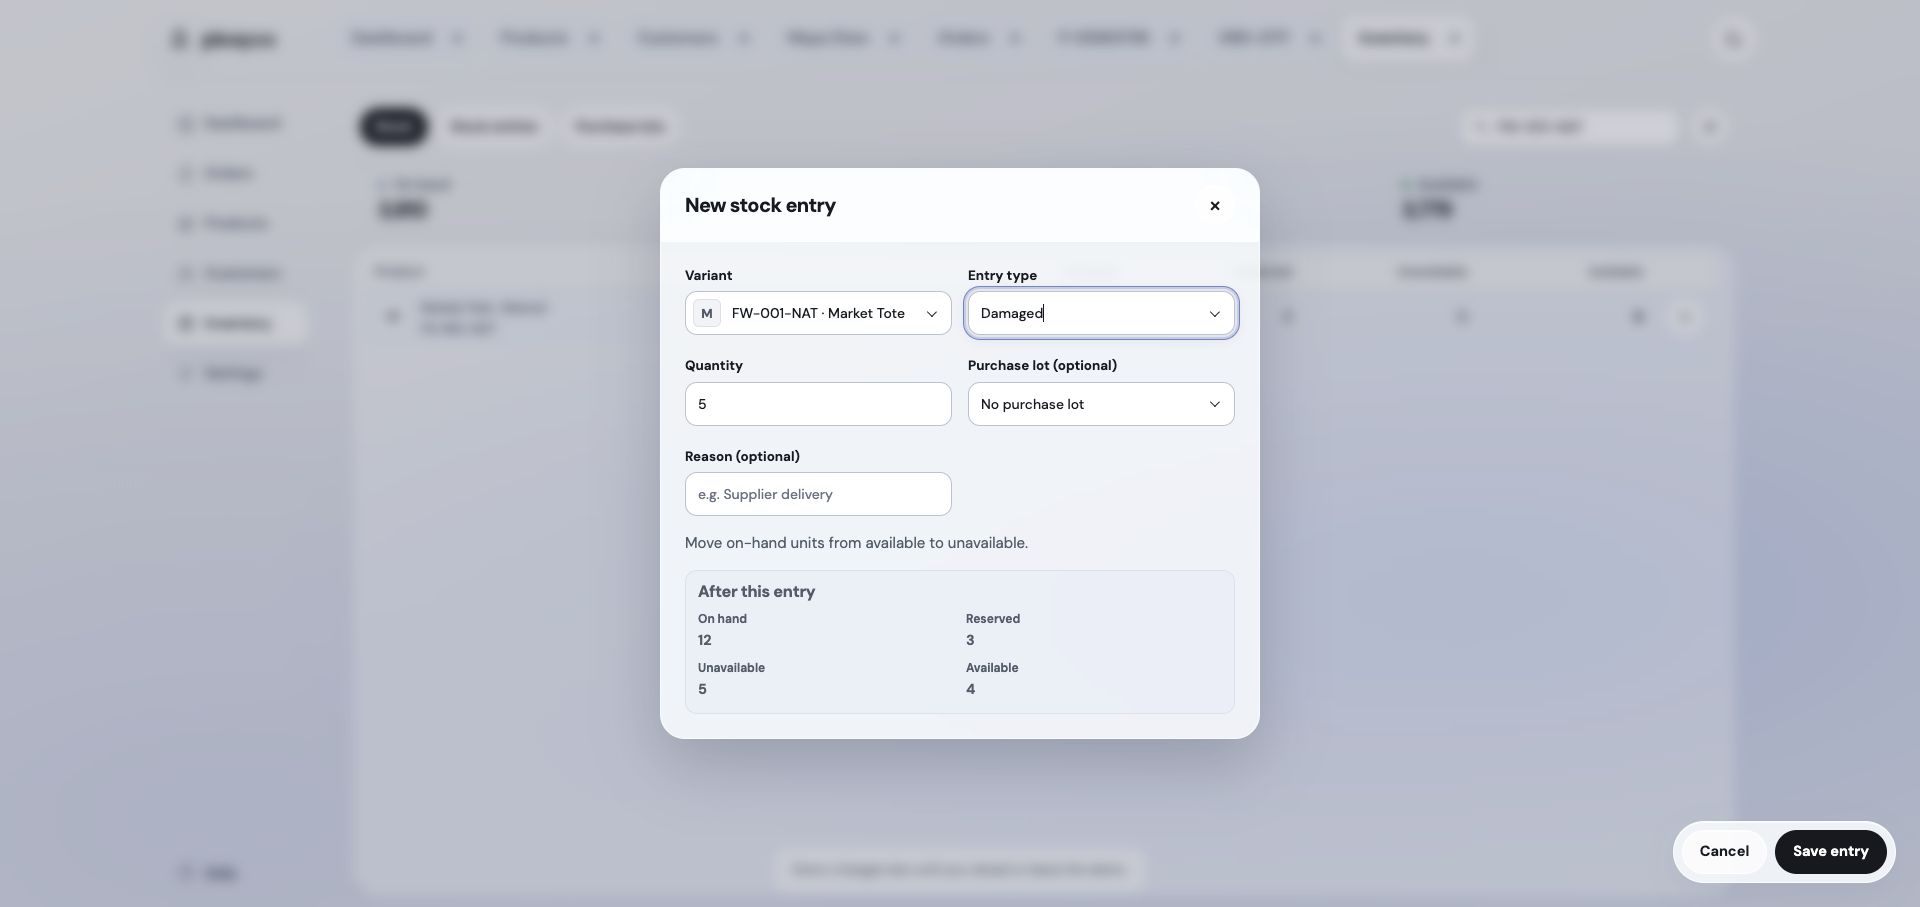
  6. Damaged moves units from available into unavailable stock without changing physical on-hand stock.

    Damaged moves units from available into unavailable stock without changing physical on-hand stock.
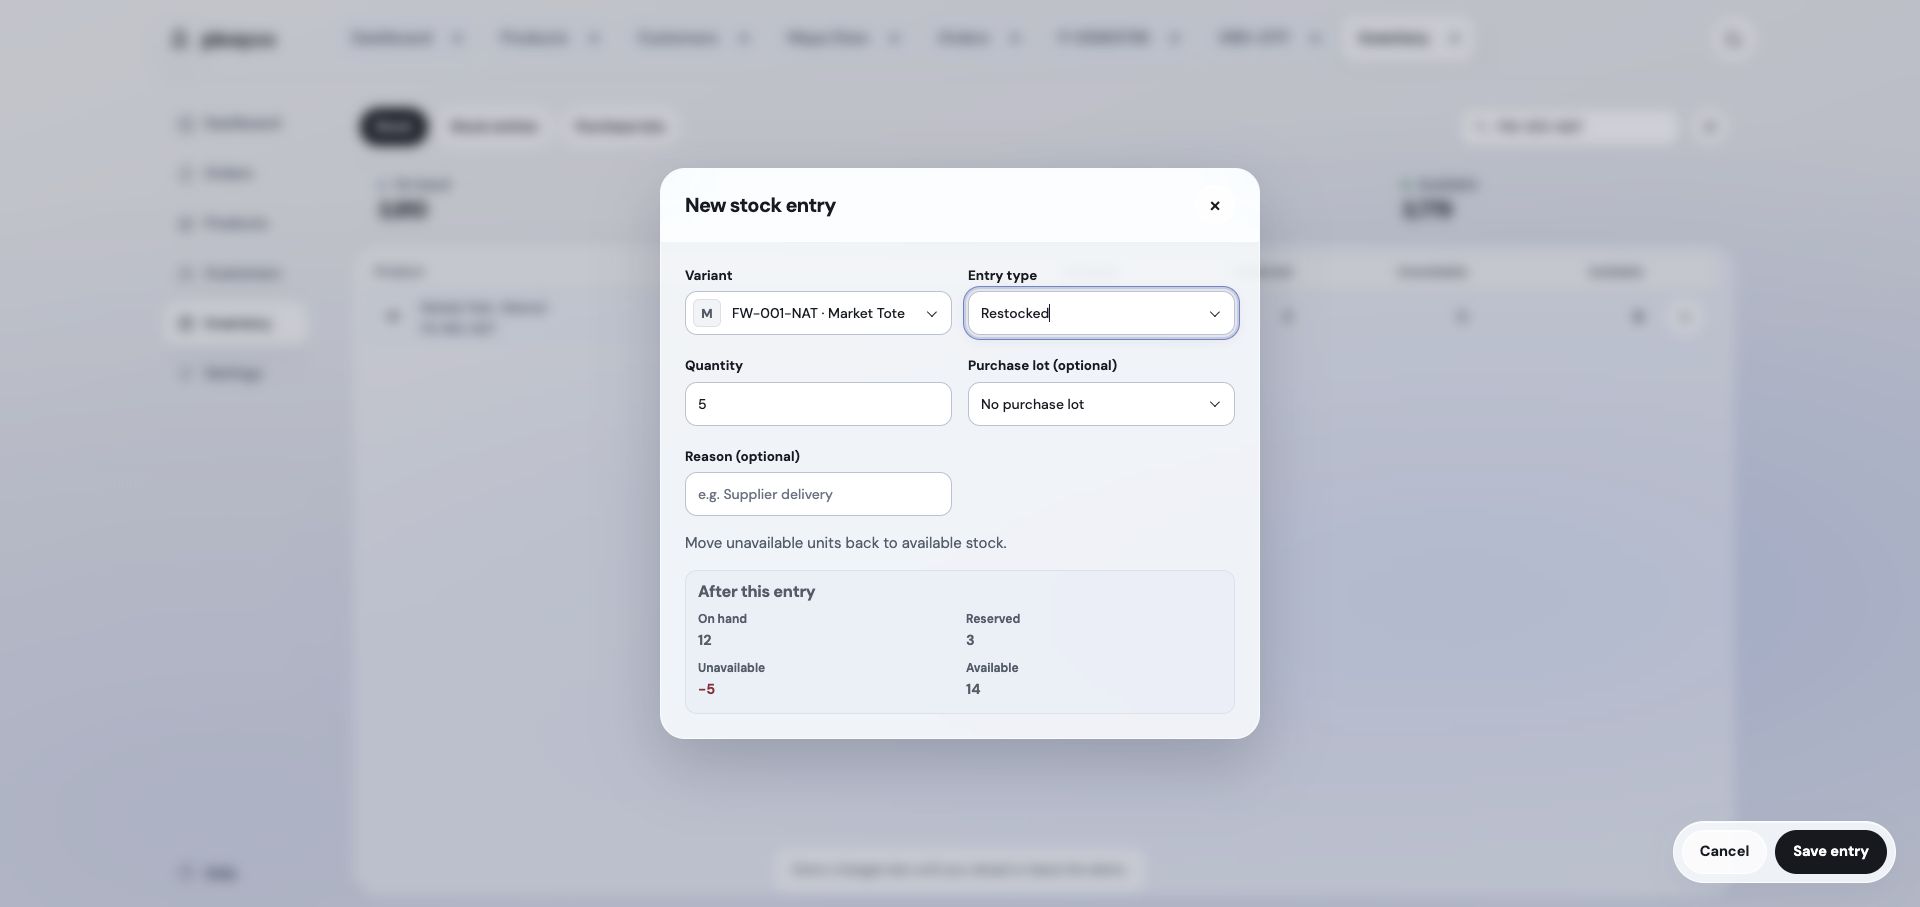
  7. Restocked moves unavailable units back to available. This example has no unavailable units, so the preview is invalid and must not be saved.

    Restocked moves unavailable units back to available. This example has no unavailable units, so the preview is invalid and must not be saved.
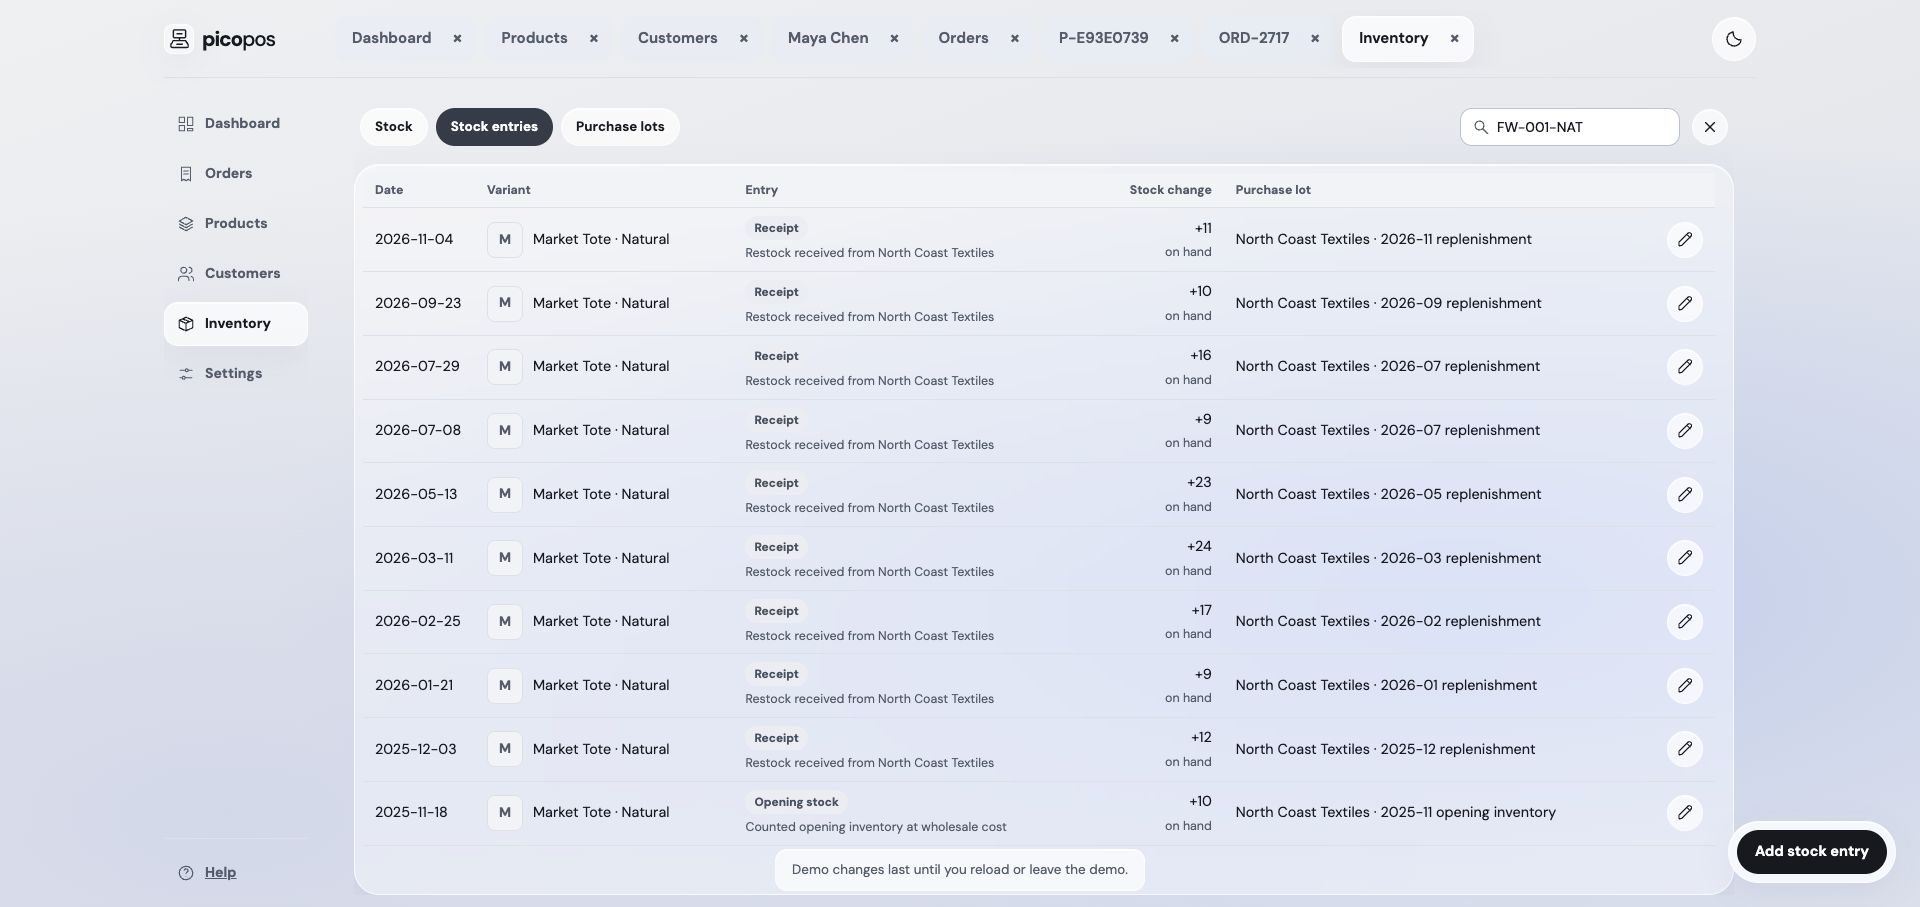
  8. Stock entries lists recorded movements and their purchase-lot links.

    Stock entries lists recorded movements and their purchase-lot links.
Watch & follow: Inspect purchase costs and linked stock

The lot editor example is prepared but not saved. A lot records costs; linked stock entries record physical receipts.

Silent step-by-step video · pause at any point. Select a screenshot to enlarge it.

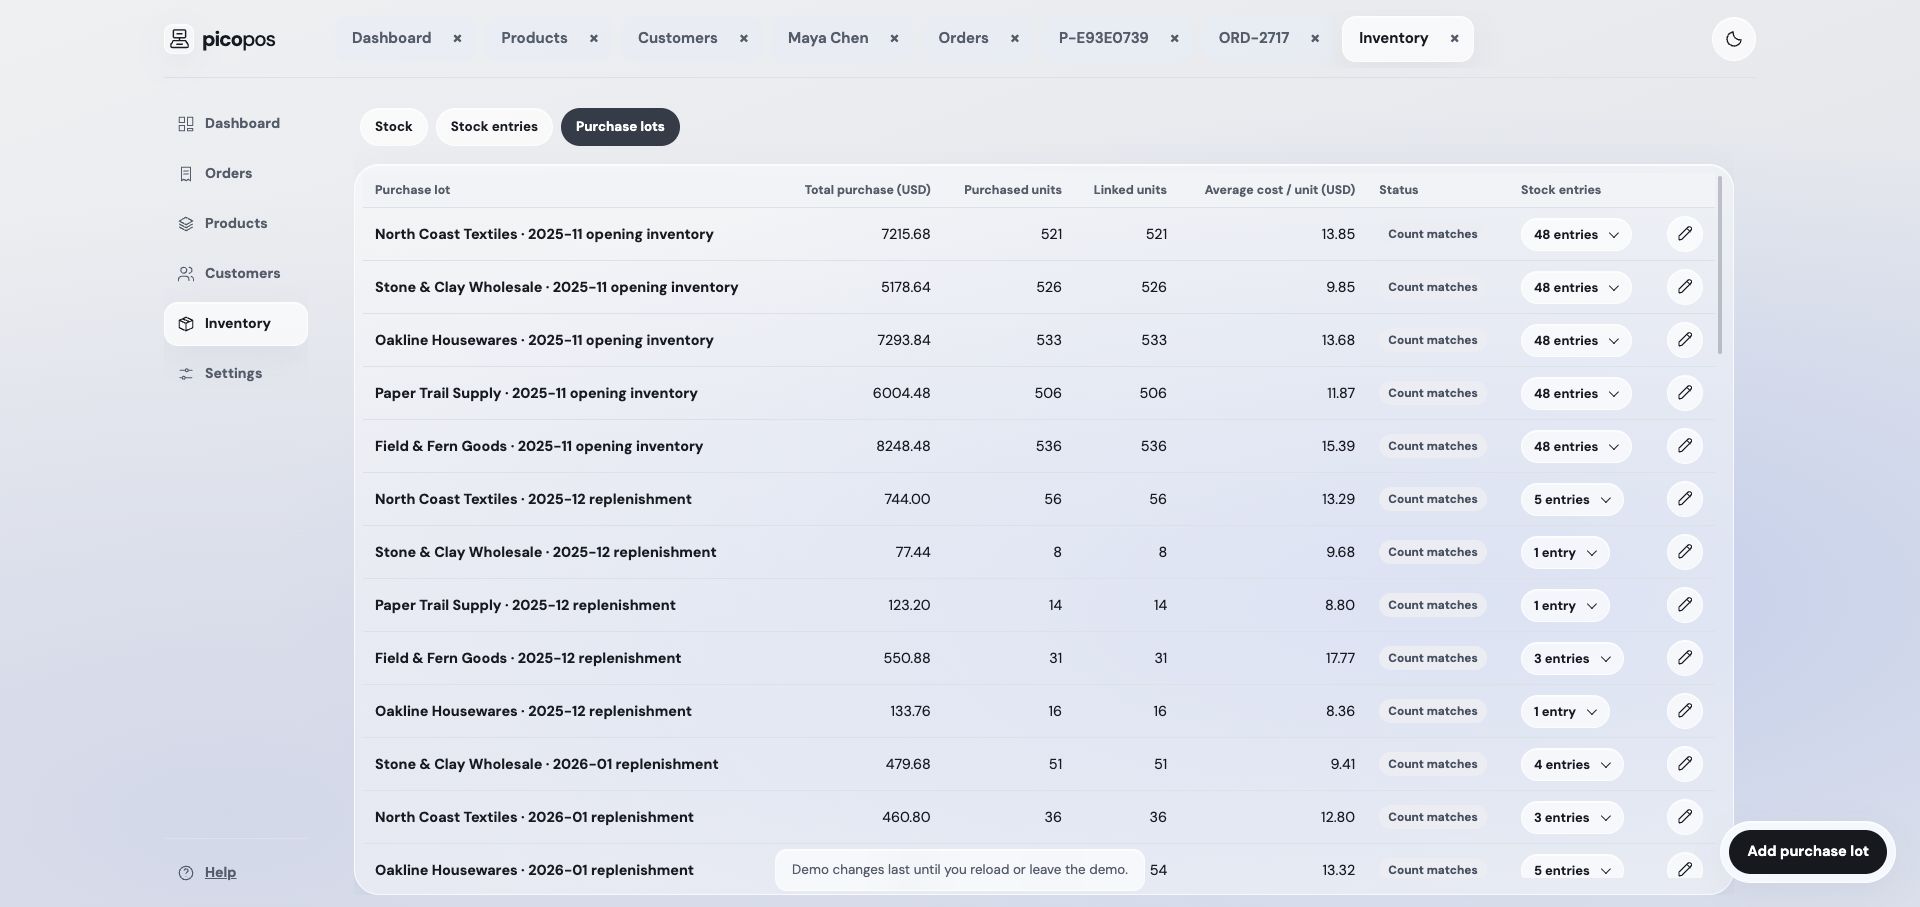
  1. Open Purchase lots to compare purchase amount, purchased units, linked units, and average unit cost.

    Open Purchase lots to compare purchase amount, purchased units, linked units, and average unit cost.
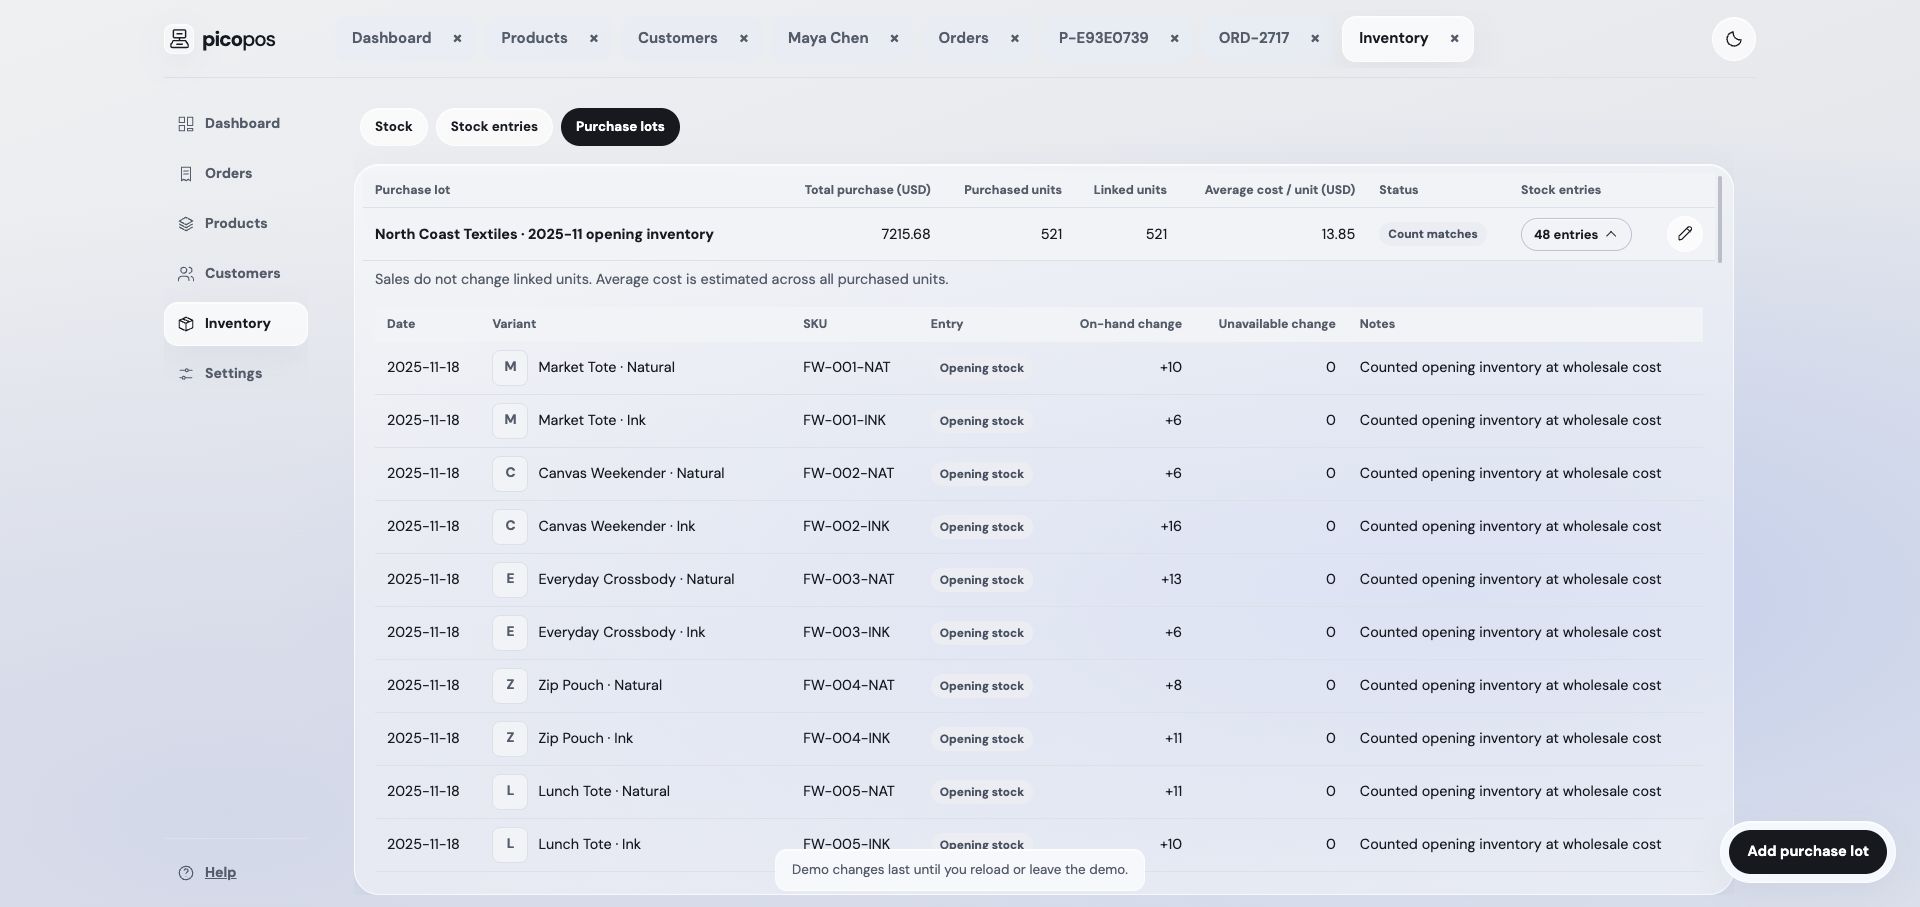
  2. Expand a lot using its Stock entries action to inspect the linked variants and quantities.

    Expand a lot using its Stock entries action to inspect the linked variants and quantities.
  3. Add purchase lot: Demo pouch delivery, USD 120, and 20 units implies USD 6 per unit. Saving a lot alone adds no stock.

    Add purchase lot: Demo pouch delivery, USD 120, and 20 units implies USD 6 per unit. Saving a lot alone adds no stock.

Business settings

Choose currency, maintain shipping rates, and manage the connection.

Open Settings
Currency and shipping rates

Choose your workbook currency in Settings and save. It changes currency formatting across the app; it does not convert existing prices or historical amounts.

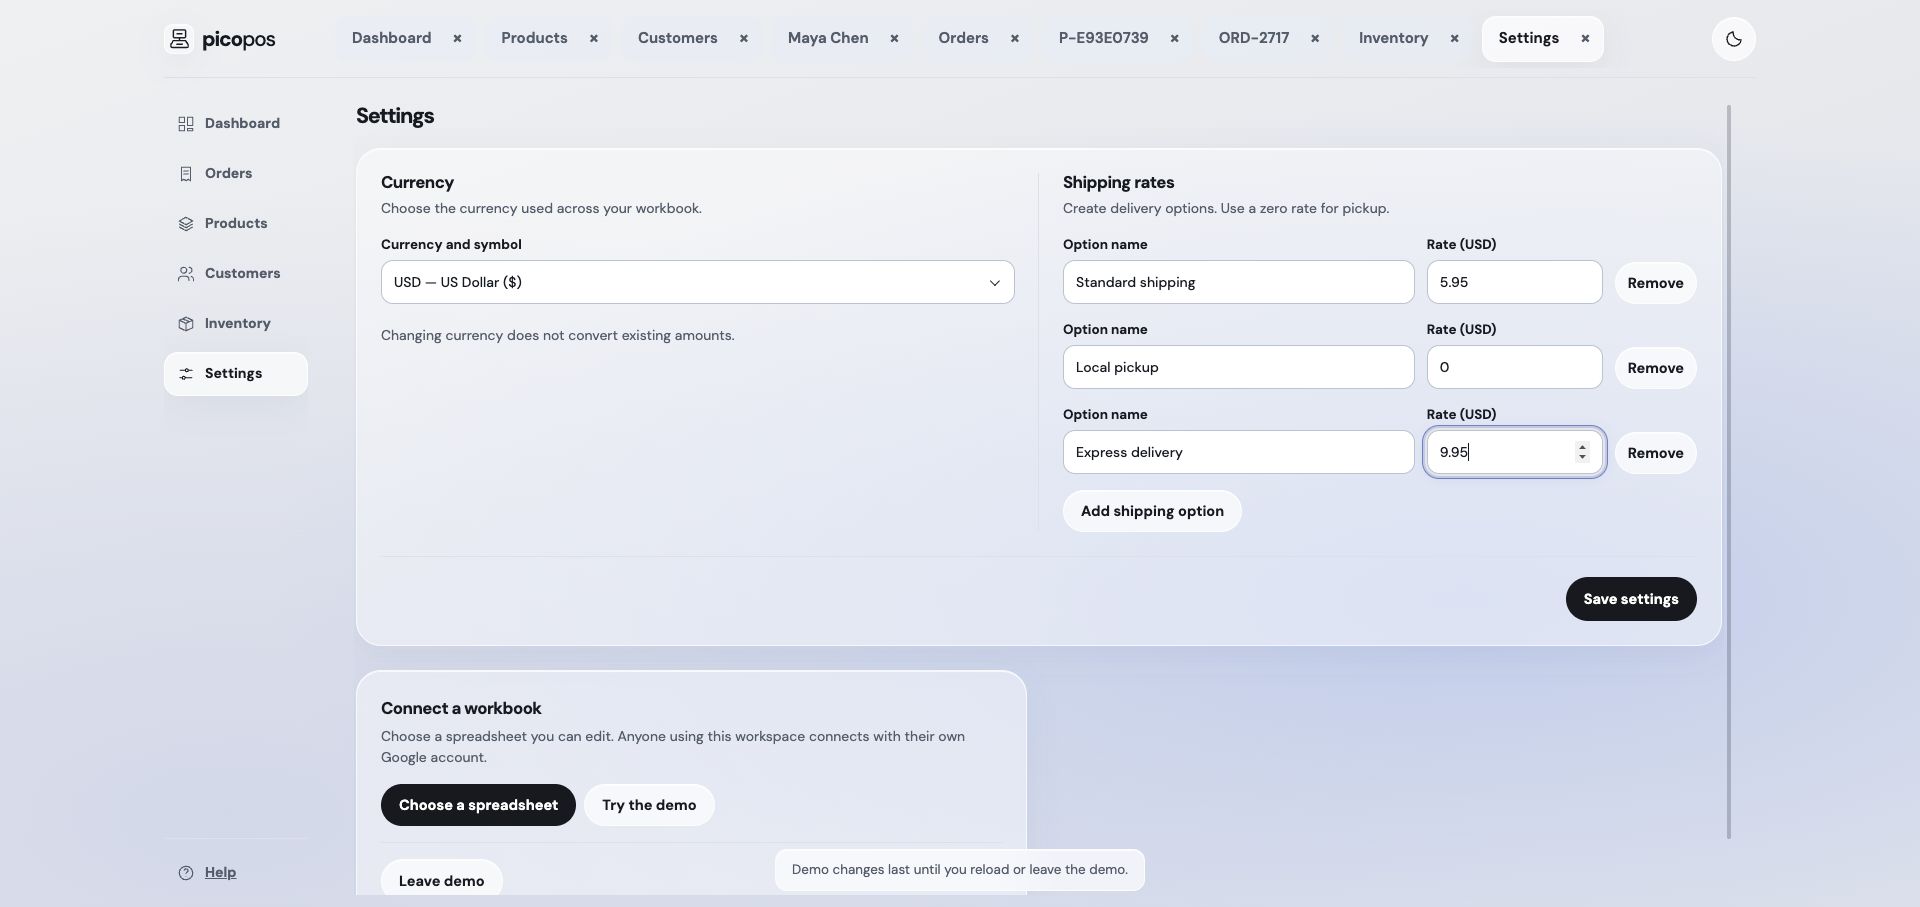
Add named shipping options with nonnegative rates. A zero rate works for pickup or free delivery. Orders store their selected option and charge, so editing a configured rate does not recalculate existing orders.

Reconnect, switch accounts, or disconnect

If Google access expires, choose Reconnect to resume sync. Use Use another Google account when you need a different account with access to the workbook.

Review pending changes before changing workbooks or disconnecting. Unsynced work belongs to the current browser profile and has not yet reached Google Sheets. Offline copies are encrypted on this device, but anyone using the unlocked browser profile can still open them. On a shared device, sync and disconnect when finished to remove the current workbook’s local copy. Do not clear site data while changes are pending. The demo has its own Leave demo action.

Watch & follow: Configure currency and shipping rates

These captures show current settings and an unsaved Express delivery example.

Silent step-by-step video · pause at any point. Select a screenshot to enlarge it.

  1. Settings contains Currency and shipping. Changing the currency does not convert existing amounts.

    Settings contains Currency and shipping. Changing the currency does not convert existing amounts.
  2. Select Add shipping option and enter Express delivery at USD 9.95. Save settings applies the change; use a zero rate for pickup.

    Select Add shipping option and enter Express delivery at USD 9.95. Save settings applies the change; use a zero rate for pickup.

Offline work & sync

Understand local saves, queued edits, conflicts, and recovery.

Open Settings
Local saves and offline access

In a connected workspace, saving updates this browser’s workbook first and queues changes for Google Sheets. After a successful connection, supported browsers keep the workbook and edit queue locally so you can continue working offline.

Production builds cache the app shell after an online visit. The development server does not provide that offline shell. Clearing site data or losing browser storage can remove unsynced edits, so check sync before closing or moving to another device.

Automatic and manual sync

Open Settings → Workbook connection to see connection and queue status. Choose the minimum sync interval or use Sync now for an immediate attempt while online. The default automatic interval is 30 seconds.

Sync runs while the app is open. Returning to the tab or coming back online triggers a check when due. It reads Sheet changes and uploads queued edits in batches; it does not run continuously after the app closes.

Preview pending edits and resolve issues

Expand Preview queued changes to inspect pending records and validation issues. Edits that reference deleted records or fail validation remain queued for review.

If both picopos and Sheets changed the same field, the picopos value wins. Sheet changes to unrelated fields are preserved. Use Discard local change only for an issue you want to abandon; it removes that queued edit rather than fixing it.

Troubleshooting
  1. Check your internet connection and the sync message in Settings.
  2. Reconnect if Google authorization has expired; verify that your account still has spreadsheet edit access.
  3. Inspect queued changes for validation issues and review any inventory warnings.
  4. Check that managed Sheet headers and IDs have not been removed or changed.
  5. Retry Sync now once the cause is resolved. Avoid clearing browser storage while changes are still pending.